Azure Database for PostgreSQL is a relational database service based on the open-source Postgres database engine. It is a fully-managed, enterprise-ready community PostgreSQL database as a service that can handle mission-critical workloads with predictable performance, security, high availability, and dynamic scalability.
You can ingest data from your Azure PostgreSQL database using Hevo Pipelines and replicate it to a Destination of your choice.
Prerequisites
-
IP address or host name of your PostgreSQL database instance is available.
-
The PostgreSQL version is 9.5 or higher, up to 17.x.
-
Log-based incremental replication is enabled if ingestion mode is Logical Replication.
Note: Hevo currently does not support logical replication on read replicas.
-
SELECT, USAGE, and CONNECT privileges are granted to the database user.
Note: We recommend that you create a database user for configuring your Azure PostgreSQL Source in Hevo. If you already have a database user, grant the required privileges.
-
Database hostname and port number of the Source instance are available.
-
You are assigned the Team Administrator, Team Collaborator, or Pipeline Administrator role in Hevo to create the Pipeline.
Perform the following steps to configure your Azure PostgreSQL Source:
Set up Log-based Incremental Replication
Hevo supports data ingestion from PostgreSQL servers via Write Ahead Logs set at the logical level (available on PostgreSQL version 9.4). A Write Ahead Log(WAL) is a collection of log files that record information about data modifications and data object modifications made on a PostgreSQL server instance. Typically WAL is used for data replication and data recovery.
By default, the replication method is set to REPLICA. You must change it to LOGICAL.
To do this:
-
Log in to the Azure Portal.
-
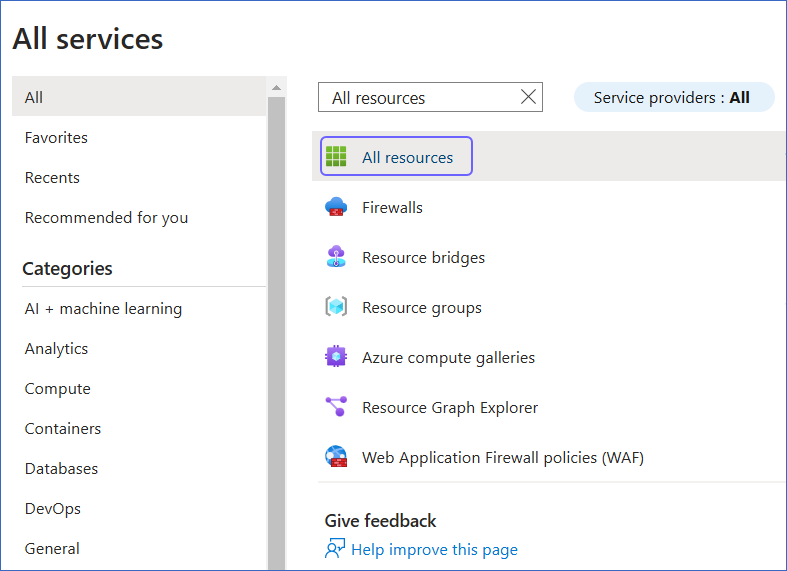
Under Azure services, select More services.

-
On the All services page, search for and select All resources.
-
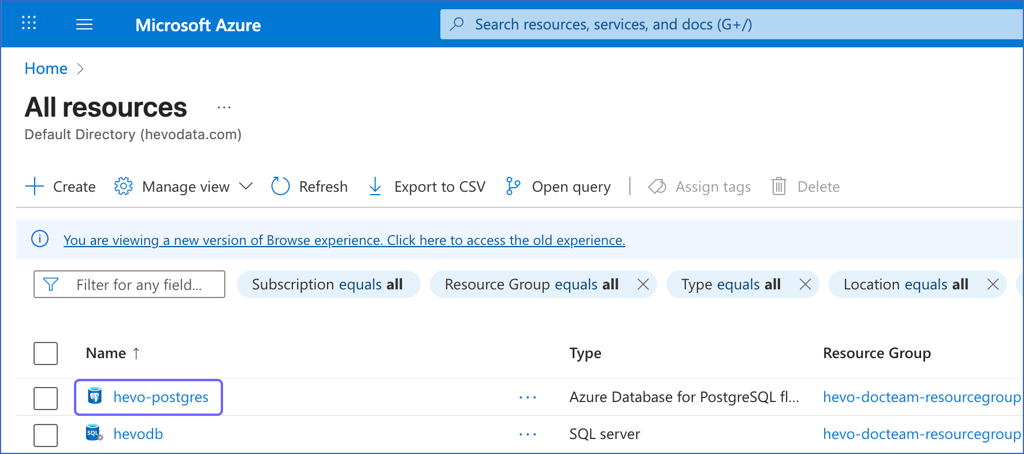
On the All resources page, click the database for which you want to change the replication mode. For example, hevo-postgres in the image below.
-
In the left navigation pane of your <Database Name> page, under Settings, click Server Parameters.
-
In the Search bar, type
wal_leveland update the value to LOGICAL, and then click Save.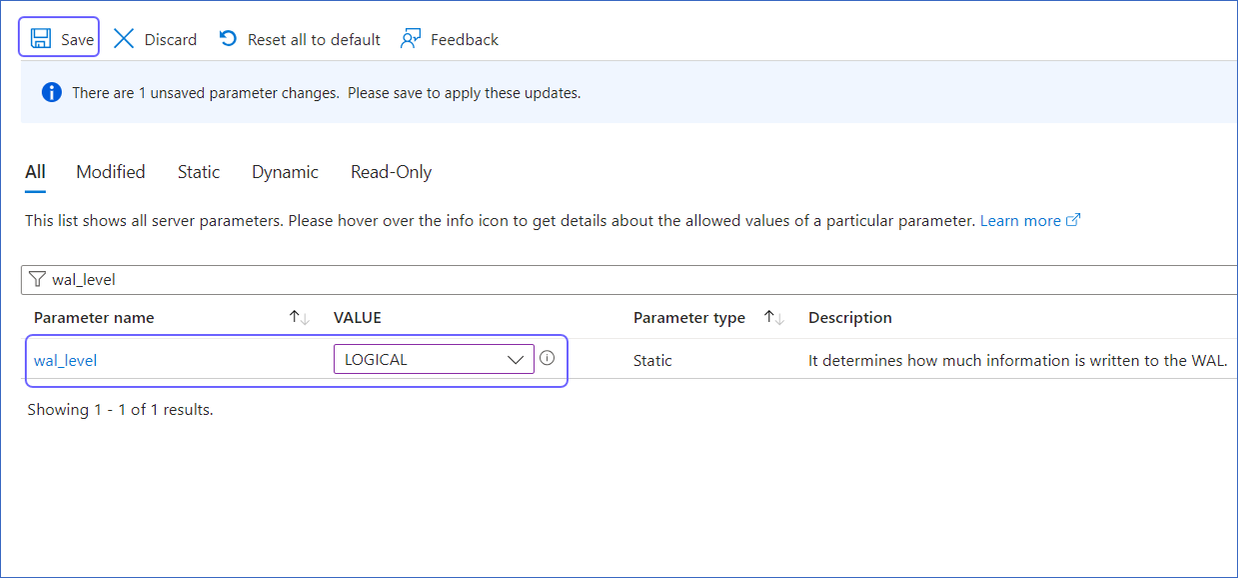
-
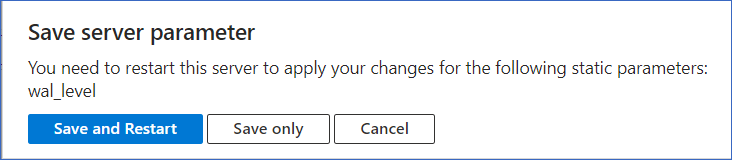
Click Save and Restart in the confirmation dialog to restart the PostgreSQL server for the parameter changes to take effect.
Whitelist Hevo’s IP Addresses
You need to whitelist the Hevo IP addresses for your region to enable Hevo to connect to your PostgreSQL database. You can do this by creating firewall rules in your Microsoft Azure database settings as follows:
-
Log in to the Azure Portal.
-
Under Azure services, select More services.
-
On the All services page, search for and select All resources.
-
On the All resources page, click the database you want to synchronize with Hevo.
-
In the left navigation pane of your <Database Name> page, under Settings, click Networking.
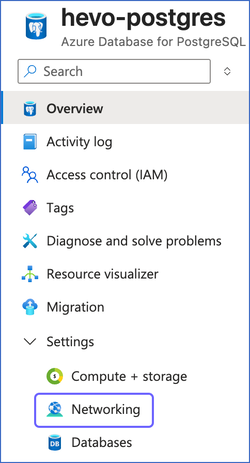
-
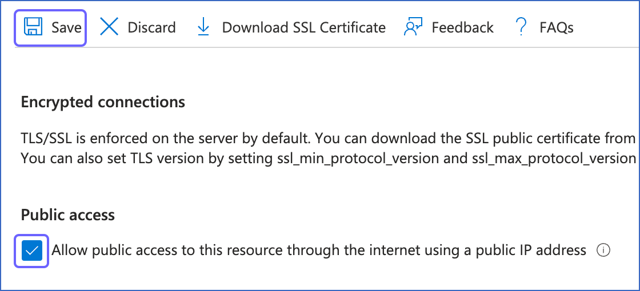
In the Public access section of the Networking pane, ensure that the Allow public access to this… check box is selected. If it is not, select the check box and then click Save.
-
In the Firewall rules section, do the following:
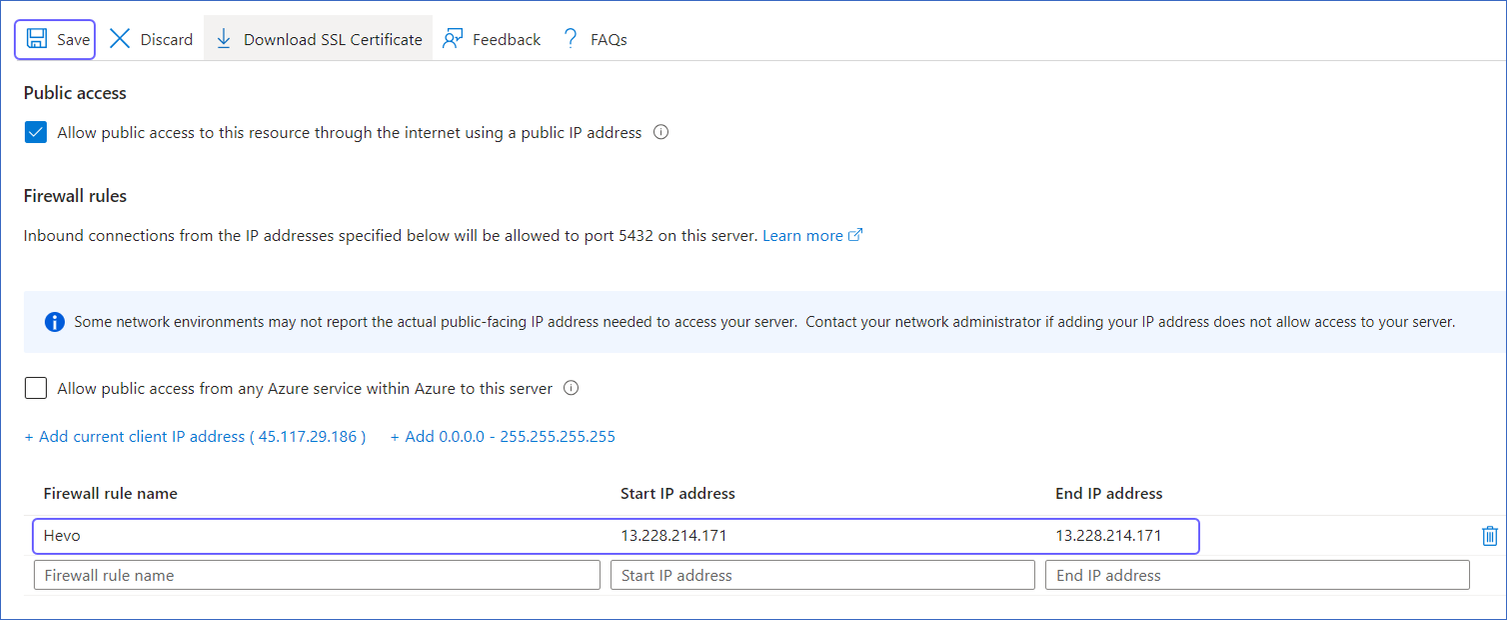
-
Specify a Firewall rule name.
-
Specify Hevo’s IP addresses in the Start IP address and End IP address fields as per your region.
Note: As Hevo has specific IP addresses and not a range, the value in the Start IP address and End IP address fields is the same.
-
Repeat steps 1 and 2 to add all the IP addresses for your Hevo region.
-
Click Save.
-
Create a Database User and Grant Privileges
1. Create a database user (Optional)
Perform the following steps to create a user in your Azure PostgreSQL database:
-
Connect to your Azure PostgreSQL database instance as a user with admin privilege using an SQL client tool, such as psql.
-
Run the following command to create a database user:
CREATE ROLE <database_username> WITH LOGIN PASSWORD '<password>';Note: Replace the placeholder values in the command above with your own. For example, <database_username> with hevouser.
2. Grant privileges to the user
The database user specified in the Hevo Pipeline must have the following privileges:
-
SELECT -
USAGE -
CONNECT -
REPLICATION
To assign these privileges:
-
Connect to your Azure PostgreSQL database instance as a user with admin privilege using an SQL client tool, such as psql.
-
Run the following commands to grant privileges to the database user:
GRANT CONNECT ON DATABASE <database_name> to <database_username>; GRANT USAGE ON SCHEMA <schema_name> TO <database_username>; GRANT SELECT ON ALL TABLES IN SCHEMA <schema_name> TO <database_username>; -
Alter the schema’s default privileges to grant
SELECTprivileges on tables created in the future to the database user:ALTER DEFAULT PRIVILEGES IN SCHEMA <schema_name> GRANT SELECT ON TABLES to <database_username>;Note: If you want to use Log-based Incremental Replication, grant the
REPLICATIONpermission to the database user. Log in to the database as a user with admin privilege and run the following command:ALTER ROLE <database_username> WITH REPLICATION;
Note: Replace the placeholder values in the commands above with your own. For example, <database_username> with hevouser.
Retrieve the Hostname and Port Number (Optional)
Note: The Azure PostgreSQL hostnames start with your database name and end with azure.com. For example, hevo-postgres.postgres.database.azure.com.
Perform the following steps to retrieve the hostname:
-
Log in to the Azure Portal.
-
Under Azure services, select More services.
-
On the All services page, search for and select All resources.
-
On the All resources page, click your Azure Database for PostgreSQL server.
-
In the Essentials panel, locate the Server name. Use this as the hostname in Hevo while creating your Pipeline.
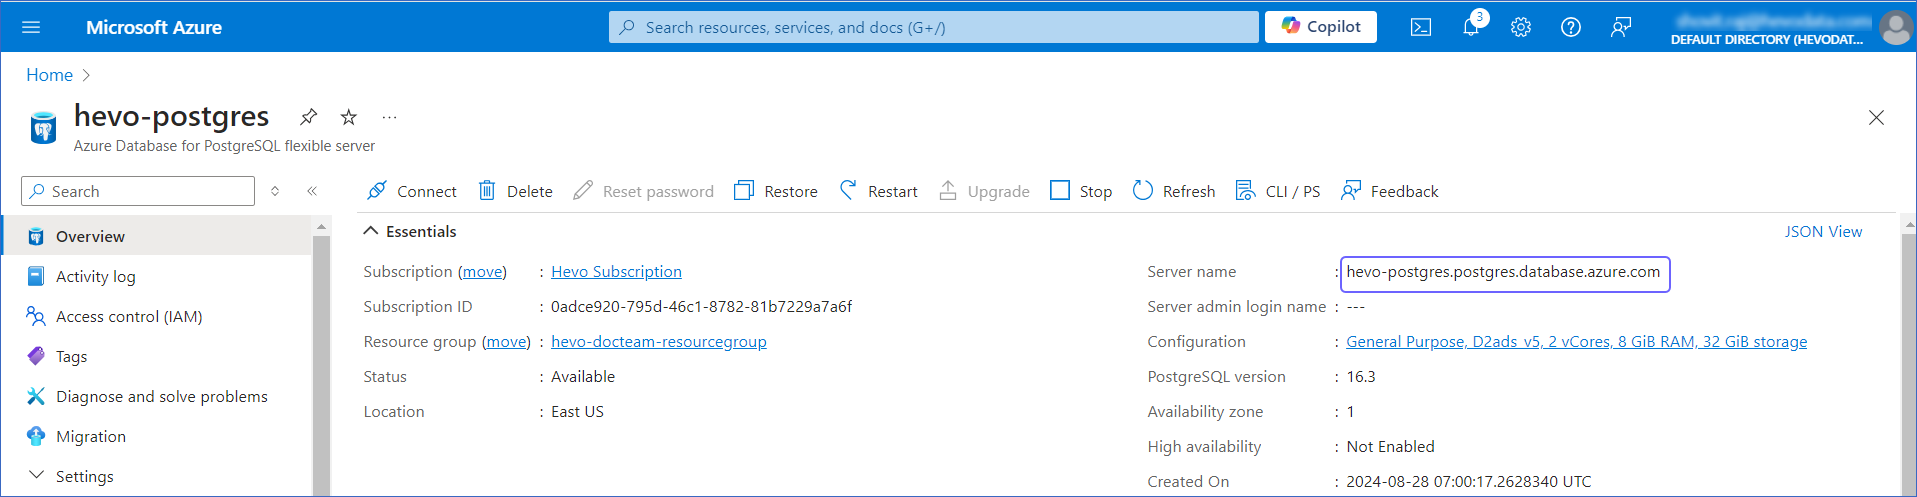
The default port is 5432.
Specify Azure PostgreSQL Connection Settings
Perform the following steps to configure Azure PostgreSQL as a Source in Hevo:
-
Click PIPELINES in the Navigation Bar.
-
Click + Create Pipeline in the Pipelines List View.
-
On the Select Source Type page, select Azure PostgreSQL.
-
On the Select Destination Type page, select the type of Destination you want to use.
-
On the page that appears, do the following:
-
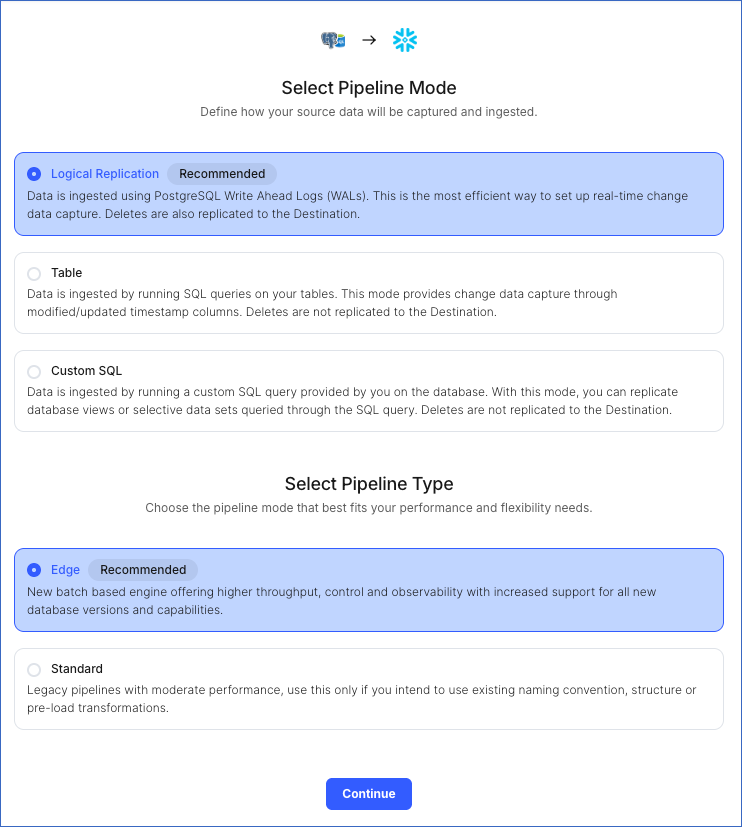
Select Pipeline Mode: Choose the mode for ingesting data from the Source. Default value: Logical Replication. The available modes are Logical Replication, Table, and Custom SQL. Additionally, the XMIN Pipeline mode is available for Early Access.
Depending on the Pipeline mode you select, you must configure the objects to be replicated. Refer to section, Object and Query Mode Settings for the steps to do this.
Note: For Custom SQL Pipeline mode, all Events loaded to the Destination are billable.
-
Select Pipeline Type: Choose the type of Pipeline you want to create based on your requirements, and then click Continue.
-
If you select Edge, read Azure PostgreSQL to configure your Edge Pipeline.
-
If you select Standard, skip to step 6 below.
This section is displayed only if all the following conditions are met:
-
The selected Destination type is supported in Edge.
-
The Pipeline mode is set to Logical Replication.
-
Your Team was created before September 15, 2025, and has an existing Pipeline created with the same Destination type and Pipeline mode.
For Teams that do not meet the above criteria, if the selected Destination type is supported in Edge and the Pipeline mode is set to Logical Replication, you can proceed to create an Edge Pipeline. Read Azure PostgreSQL to configure your Edge Pipeline. Otherwise, you can proceed to create a Standard Pipeline.
-
-
-
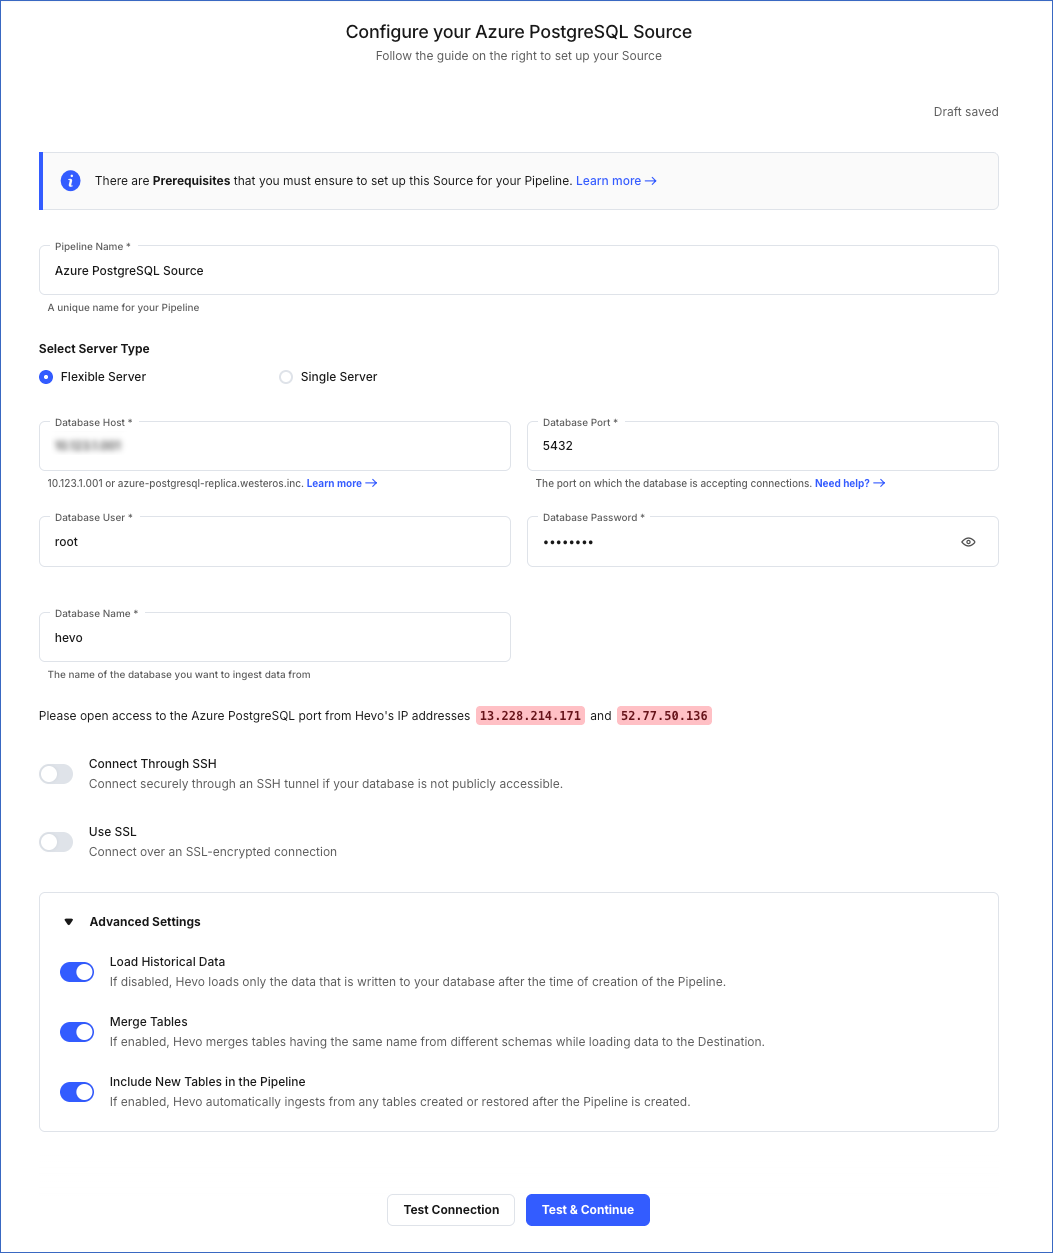
On the Configure your Azure PostgreSQL Source page, specify the following:
-
Pipeline Name: A unique name for your Pipeline, not exceeding 255 characters.
-
Select Server Type: The deployment mode of your Azure PostgreSQL server. This can be either Flexible Server or Single Server. Default value: Flexible Server.
-
Database Host: The Azure PostgreSQL host’s IP address or DNS. For example, postgres.database.azure.com.
Note: For a URL-based hostname, exclude the
http://orhttps://part. For example, if the hostname URL is https://postgres.database.azure.com, enter postgres.database.azure.com. -
Database Port: The port on which your Azure PostgreSQL server listens for connections. Default value: 5432.
-
Database User: The read-only user who has the permission to read tables in your database.
-
Database Password: The password for the read-only user.
-
Database Name: The name of an existing database that you wish to replicate.
-
Schema Name (Optional): The schema in your database that holds the tables to be replicated. Default value: public.
Note: The Schema Name field is displayed only for Table and Custom SQL ingestion modes.
-
Connection Settings:
-
Connect Through SSH: Enable this option to connect to Hevo using an SSH tunnel, instead of directly connecting your PostgreSQL database host to Hevo. This provides an additional level of security to your database by not exposing your PostgreSQL setup to the public. Read Connecting Through SSH.
If this option is turned off, you must whitelist Hevo’s IP addresses.
-
Use SSL: Enable this option to use an SSL-encrypted connection. Specify the following:
-
CA File: The file containing the SSL server certificate authority (CA).
-
Load all CA Certificates: If selected, Hevo loads all CA certificates (up to 50) from the uploaded CA file, else it loads only the first certificate.
Note: Select this check box if you have more than one certificate in your CA file.
-
-
Client Certificate: The client’s public key certificate file.
-
Client Key: The client’s private key file.
-
-
-
Advanced Settings
-
Load Historical Data: Applicable for Pipelines created with Logical Replication or Table mode. If this option is enabled, the entire table data is fetched during the first run of the Pipeline. If disabled, Hevo loads only the records written to your database after the Pipeline was created.
-
Merge Tables: Applicable for Pipelines with Logical Replication mode.
If enabled, Hevo merges tables with the same name from different databases while loading the data to the warehouse. Hevo loads the Database Name field with each record.
If disabled, the database name is prefixed to each table name. Read How does the Merge Tables feature work? -
Include New Tables in the Pipeline: Applicable for all ingestion modes except Custom SQL.
If enabled, Hevo automatically ingests data from tables created in the Source after the Pipeline has been built. These may include completely new tables or previously deleted tables that have been re-created in the Source. All data for these tables is ingested using database logs, making it incremental and therefore billable.
If disabled, new and re-created tables are not ingested automatically. They are added in SKIPPED state in the objects list, on the Pipeline Overview page. You can update their status to INCLUDED to ingest data.
You can change this setting later.
-
-
-
Click Test Connection. This button is enabled once you specify all the mandatory fields. Hevo’s underlying connectivity checker validates the connection settings you provide.
-
Click Test & Continue to proceed for setting up the Destination. This button is enabled once you specify all the mandatory fields.
Object and Query Mode Settings
Once you have specified the Source connection settings in Step 6 above, do one of the following:
-
For Pipelines configured with the Table or Logical Replication mode:
-
On the Select Objects page, select the objects you want to replicate and click Continue.

Note:
-
Each object represents a table in your database.
-
From Release 2.19 onwards, for log-based Pipelines, you can keep the objects listed in the Select Objects page deselected by default. In this case, when you skip object selection, all objects are skipped for ingestion, and the Pipeline is created in the Active state. You can include the required objects post-Pipeline creation. Contact Hevo Support to enable this option for your team.
-
-
On the Configure Objects page, specify the query mode you want to use for each selected object.

Note: In Full Load mode, Hevo attempts to replicate the full table in a single run of the Pipeline, with an ingestion limit of 25 Million rows.
-
Click Continue.
-
-
For Pipelines configured with the XMIN mode:
-
On the Select Objects page, select the objects you want to replicate.
Note:
-
Each object represents a table in your database.
-
For the selected objects, only new and updated records are ingested using the
XMINcolumn. -
The Edit Config option is unavailable for the objects selected for XMIN-based ingestion. You cannot change the ingestion mode for these objects post-Pipeline creation.
-
-
Click Continue.
-
-
For Pipelines configured with the Custom SQL mode:
-
On the Provide Query Settings page, enter the custom SQL query to fetch data from the Source.
-
In the Query Mode drop-down, select the query mode, and click Continue.

-
Data Replication
| For Teams Created | Ingestion Mode | Default Ingestion Frequency | Minimum Ingestion Frequency | Maximum Ingestion Frequency | Custom Frequency Range (in Hrs) |
|---|---|---|---|---|---|
| Before Release 2.21 | Table | 15 Mins | 15 Mins | 24 Hrs | 1-24 |
| Log-based | 5 Mins | 5 Mins | 1 Hr | NA | |
| After Release 2.21 | Table | 6 Hrs | 30 Mins | 24 Hrs | 1-24 |
| Log-based | 30 Mins | 30 Mins | 12 Hrs | 1-24 |
Note: The custom frequency must be set in hours as an integer value. For example, 1, 2, or 3 but not 1.5 or 1.75.
-
Historical Data: In the first run of the Pipeline, Hevo ingests all available data for the selected objects from your Source database.
-
Incremental Data: Once the historical load is complete, data is ingested as per the ingestion frequency.
Additional Information
Read the detailed Hevo documentation for the following related topics:
Error 1003 - Authentication failure
Potential Causes
- The credentials for the database user authorizing the connection are incorrect.
Suggested Actions
-
Verify that the password entered for the authorizing user in the Configure your Source page is correct.
-
Invite another team member with the required privileges to set up the Pipeline. Read Inviting and Moderating Team Members.
Error 1006 - Connection settings errors
Potential Causes
-
The database connection details are incorrect.
-
Hevo’s IP addresses are not whitelisted.
Suggested Actions
-
Verify that the Database Host entered in the Configure your Source page is correct.
-
Verify that the Database Port entered in the Configure your Source page is correct.
-
Verify that Hevo’s IP addresses are whitelisted.
-
For Amazon RDS databases: Check that the Security Group and VPC Subnet associated with the database allows access from all Hevo’s IP addresses.
-
Invite another team member with the required privileges to set up the Pipeline. Read Inviting and Moderating Team Members.
Error 1011 - Connection settings errors
Potential Causes
- The username or password is incorrect.
Suggested Actions
-
Grant the
rds_replicationrole to the database user:-
Log in to the database as a user with the
rds_superuserrole. -
Run the following command:
GRANT rds_replication TO <database_username>; -
-
Invite another team member with the required privileges to set up the Pipeline. Read Inviting and Moderating Team Members.
Error 1012 - Access role issue for logical replication
Potential Causes
- The username or password is incorrect.
Suggested Actions
-
Grant the
rds_replicationrole to the database user:-
Log in to the database as a user with the
rds_superuserrole. -
Run the following command:
GRANT rds_replication TO <database_username>; -
-
Invite another team member with the required privileges to set up the Pipeline. Read Inviting and Moderating Team Members.
Error 1014 - Access role issue for logical replication
Potential Causes
- The database name is either incorrect or not provided.
Suggested Actions
-
Verify that the Database Host entered in the Configure your Source page is correct.
-
Verify that the Database Port entered in the Configure your Source page is correct.
-
Verify that the user entered in the Configure your Source page has access to the database.
-
Invite another team member with the required privileges to set up the Pipeline. Read Inviting and Moderating Team Members.
Error 1017 - Database does not exist
Potential Causes
-
The database connection details are incorrect.
-
Hevo’s IP addresses are not whitelisted.
-
The database user authorizing the connection does not have sufficient permissions to access the database.
Suggested Actions
-
Verify that the Database Host and or Database Port entered in the Configure your Source page are correct.
-
Verify that Hevo’s IP addresses for your region are whitelisted. Refer to the content for your PostgreSQL variant for steps to do this.
-
Check that the Security Group and VPC subnet associated with the database allows access from all Hevo’s IP addresses for Amazon RDS databases.
-
Invite another team member with the required privileges to set up the Pipeline. Read Inviting and Moderating Team Members.
Error 1023 - Connection settings errors
Potential Causes
-
Hevo is unable to access the PostgreSQL server.
-
Hevo’s IP address is not whitelisted.
Suggested Actions
-
Whitelist Hevo’s IP addresses:
-
Navigate to the PostgreSQL configuration file,
pg_hba.conf. This file is generally found in the path:/etc/postgresql/<version>/main/. -
Add the Hevo IP addresses for your region or 0.0.0.0 to allow all IPs to connect:
host all user_name 0.0.0.0/0 md5 -
-
Invite another team member with the required privileges to set up the Pipeline. Read Inviting and Moderating Team Members.
Error 1024 - No pg_hba.conf entry
Potential Causes
- The configuration for log-based incremental replication is incorrect.
Suggested Actions
-
Set up log-based incremental replication correctly. Click the link for the respective MySQL variant for steps to do this:
-
Invite another team member with the required privileges to set up the Pipeline. Read Inviting and Moderating Team Members.
Source Considerations
-
If you add a column with a default value to a table in PostgreSQL, entries with it are created in the WAL only for the rows that are added or updated after the column is added. As a result, in the case of log-based Pipelines, Hevo cannot capture the column value for the unchanged rows. To capture those values, you need to:
-
Restart the historical load for the respective object.
-
Run a query in the Destination to add the column and its value to all rows.
-
-
For new Azure PostgreSQL databases, SSL connections may be enforced. To turn off SSL connections, do the following:
-
Log in to the Azure Portal.
-
Under Azure services, select More services.
-
On the All services page, search for and select All resources.
-
On the All resources page, click the database for which you want to turn off the SSL connection mode. For example, hevo-postgres in the image below.
-
In the left navigation pane of your <Database Name> page, under Settings, click Server Parameters.
-
Turn off the
require_secure_transportserver parameter, and then click Save.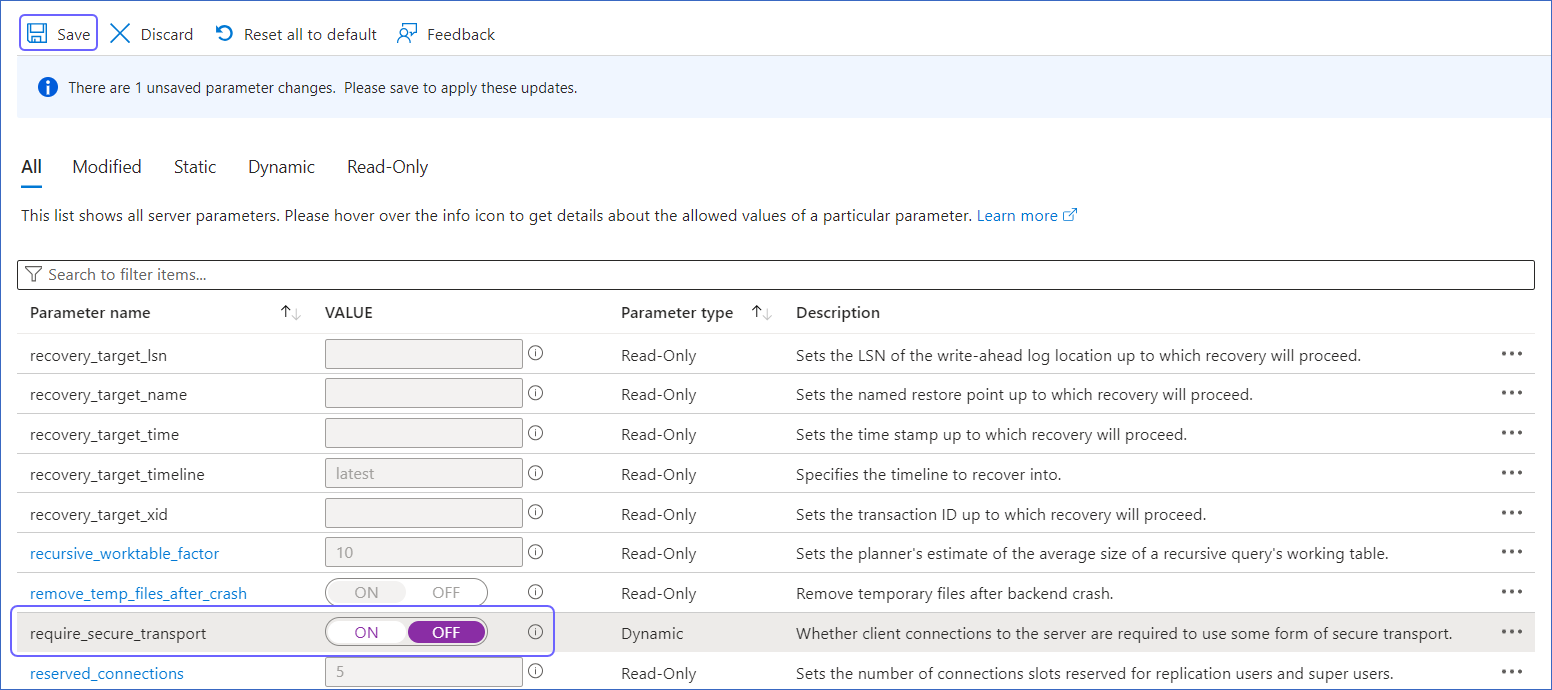
-
-
When you delete a row in the Source table, its XMIN value is deleted as well. As a result, for Pipelines created with the XMIN Pipeline mode, Hevo cannot track deletes in the Source object(s). To capture deletes, you need to restart the historical load for the respective object.
-
XMIN is a system-generated column in PostgreSQL, and it cannot be indexed. Hence, to identify the updated rows in Pipelines created with the XMIN Pipeline mode, Hevo scans the entire table. This action may lead to slower data ingestion and increased processing overheads on your PostgreSQL database host. Due to this, Hevo recommends that you create the Pipeline in the Logical Replication mode.
Note: The XMIN limitations specified above are applicable only to Pipelines created using the XMIN Pipeline mode, which is currently available for Early Access.
-
PostgreSQL retains Write-Ahead Logs (WALs) until all replication clients, such as Hevo or other consumers, have acknowledged the receipt of relevant changes. In other words, PostgreSQL waits for each client to catch up to a certain point in the WAL stream before it can safely discard older logs. As a result, the WAL size may grow even though Hevo consistently ingests new changes without lag and has no backlog. This growth can be due to long-running transactions, inactive or lagging replicas, or delays in PostgreSQL’s internal cleanup. If the WAL size exceeds the retention threshold, PostgreSQL may drop the replication slot, causing Pipeline failure. To prevent this, monitor long-running transactions and ensure other replication clients are progressing as expected. Read Viewing Statistics in PostgreSQL.
Limitations
-
If you are using PostgreSQL version 17.x, Hevo does not support logical replication failover. As a result, if your standby server is promoted to primary, Hevo will not synchronize the replication slots from the primary server with the standby. This can lead to Pipeline failures.
-
The data type Array in the Source is automatically mapped to Varchar at the Destination. No other mapping is currently supported.
-
Hevo does not support data replication from foreign tables, temporary tables, and views.
-
If your Source data has indexes (indices) and constraints, you must recreate them in your Destination table, as Hevo does not replicate them from the Source. It only creates the existing primary keys.
-
Hevo does not set the
__hevo_marked_deletedfield to True for data deleted from the Source table using the TRUNCATE command. This could result in a data mismatch between the Source and Destination tables. -
Hevo supports only RSA keys for establishing SSL connections. Hence, you must ensure that your SSL certificates and keys are generated using the RSA encryption algorithm.
-
Hevo does not load data from a column into the Destination table if its size exceeds 16 MB, and skips the Event if it exceeds 40 MB. If the Event contains a column larger than 16 MB, Hevo attempts to load the Event after dropping that column’s data. However, if the Event size still exceeds 40 MB, then the Event is also dropped. As a result, you may see discrepancies between your Source and Destination data. To avoid such a scenario, ensure that each Event contains less than 40 MB of data.
-
For log-based Pipelines, you may see duplicate data in your Destination tables for interleaved transactions. This occurs because Hevo may replicate data from the WAL multiple times for the nested transactions.
-
Hevo does not support the TimescaleDB extension for PostgreSQL databases. If your Pipeline uses logical replication to ingest data, Hevo cannot replicate data from the hypertables created by this extension. However, you can ingest data from these databases using the Table or Custom SQL modes.
Note: In Hevo, the Table and Custom SQL ingestion modes capture only inserts and updates; deletes are not captured.
See Also
Revision History
Refer to the following table for the list of key updates made to this page:
| Date | Release | Description of Change |
|---|---|---|
| Nov-07-2025 | NA | Updated the document as per the latest Hevo UI. |
| Oct-29-2025 | NA | Added a limitation about Hevo not supporting the TimescaleDB extension. |
| Oct-13-2025 | NA | Updated section, Specify Azure PostgreSQL Connection Settings to clarify when the Select Pipeline Type section is displayed during Pipeline configuration. |
| Oct-09-2025 | NA | Updated section, Specify Azure PostgreSQL Connection Settings to mention that the Load Historical Data option is also applicable for Pipelines created with Table mode. |
| Sep-18-2025 | NA | Updated section, Specify Azure PostgreSQL Connection Settings as per the latest UI. |
| Sep-16-2025 | NA | Updated the Prerequisites section to add a note about read replicas. |
| Sep-04-2025 | NA | - Removed the Create a Read Replica (Optional) section. - Updated sections, Prerequisites and Source Considerations to remove references regarding read replica support. |
| Aug-01-2025 | NA | Added clarification that data ingested from new and re-created tables is billable. |
| Jul-24-2025 | NA | Updated the document as per the latest Azure portal UI. |
| Jul-22-2025 | NA | Updated sections, Prerequisites to add information about the maximum supported version of PostgreSQL and Limitations to mention that Hevo does not support logical replication failover for PostgreSQL version 17.x. |
| Jul-08-2025 | NA | Updated section, Prerequisites to add information about the maximum supported version of PostgreSQL. |
| Jul-07-2025 | NA | Updated the Limitations section to inform about the max record and column size in an Event. |
| Jun-23-2025 | NA | Updated section, Source Considerations to add information about WAL size growth issue in PostgreSQL. |
| Jun-02-2025 | NA | Added a limitation about duplicate data for interleaved transactions. |
| Jan-07-2025 | NA | Updated the Limitations section to add information on Event size. |
| Nov-11-2024 | NA | Updated sections, Create a Read Replica (Optional), Set up Log-based Incremental Replication, Whitelist Hevo’s IP Addresses, and Source Considerations as per the latest Azure PostgreSQL UI. |
| Sep-30-2024 | NA | Updated the Source Considerations section to add information about the logical replication support for read replicas. |
| Jun-27-2024 | NA | Updated section, Limitations to add information about Hevo supporting only RSA-based keys. |
| May-30-2024 | NA | - Reorganized section, Create a database user for consistency, - Updated section, Grant privileges to the user to add all the necessary permissions. |
| Apr-29-2024 | NA | Updated section, Specify Azure PostgreSQL Connection Settings to include more detailed steps. |
| Apr-15-2024 | 2.22.2 | Updated section, Specify Azure PostgreSQL Connection Settings to add information about support for flexible server and single server deployment modes. |
| Mar-18-2024 | 2.21.2 | Updated section, Specify Azure PostgreSQL Connection Settings to add information about the Load all CA certificates option. |
| Mar-05-2024 | 2.21 | Added the Data Replication section. |
| Feb-05-2024 | NA | Updated sections, Specify Azure PostgreSQL Connection Settings and Object and Query Mode Settings to add information about the XMIN ingestion mode. |
| Jan-22-2024 | 2.19.2 | Updated section, Object and Query Mode Settings to add a note about the enhanced object selection flow available for log-based Pipelines. |
| Jan-10-2024 | NA | - Updated section, Source Considerations to add information about limitations of XMIN query mode. - Removed mentions of XMIN as a query mode. |
| Nov-03-2023 | NA | Renamed section, Object Settings to Object and Query Mode Settings. |
| Oct-11-2023 | NA | Updated section, Limitations to add information about Hevo not supporting Azure Database for PostgreSQL - Flexible Server. |
| Oct-03-2023 | NA | Updated sections: -Set up Log-based Incremental Replication to reflect the changed Azure PostgreSQL UI, - Specify Azure PostgreSQL Connection Settings to describe the schema name displayed in Table and Custom SQL ingestion modes, - Source Considerations to add information about logical replication not supported on read replicas, and - Limitations to add limitations about data replicated by Hevo. |
| Sep-19-2023 | NA | Updated section, Limitations to add information about Hevo not supporting data replication from certain tables. |
| Jun-26-2023 | NA | Added section, Source Considerations. |
| Apr-21-2023 | NA | Updated section, Specify Azure PostgreSQL Connection Settings to add a note to inform users that all loaded Events are billable for Custom SQL mode-based Pipelines. |
| Mar-09-2023 | 2.09 | Updated section, Specify Azure PostgreSQL Connection Settings to mention about SEE MORE in the Select an Ingestion Mode section. |
| Dec-19-2022 | 2.04 | Updated section, Specify Azure PostgreSQL Connection Settings to add information that you must specify all fields to create a Pipeline. |
| Dec-07-2022 | 2.03 | Updated section, Specify Azure PostgreSQL Connection Settings to mention about including skipped objects post-Pipeline creation. |
| Dec-07-2022 | 2.03 | Updated section, Specify Azure PostgreSQL Connection Settings to mention about the connectivity checker. |
| Jul-04-2022 | NA | - Added sections, Specify Azure PostgreSQL Connection Settings and Object Settings. |
| Jan-24-2022 | 1.80 | Removed from Limitations that Hevo does not support UUID datatype as primary key. |
| Sep-09-2021 | 1.71 | Updated the section, Limitations to include information about columns with the UUID data type not being supported as a primary key. |
| Sep-06-2021 | NA | Updated the section, Limitations to remove the mention of SSL login not being supported, as it is supported now. |
| Feb-22-2021 | 1.57 | Added sections: - Create a Read Replica - Create a User and Grant Privileges - Retrieve the Hostname and Port Number. |