Amazon Redshift is a fully managed, reliable data warehouse service in the cloud that offers large-scale storage and analysis of data sets and performs large-scale database migrations. It is a part of the larger cloud-computing platform, Amazon Web Services (AWS).
Hevo can load data from any of your Pipelines into an Amazon Redshift data warehouse. You can set up the Redshift Destination on the fly, as part of the Pipeline creation process, or independently. The ingested data is first staged in Hevo’s S3 bucket before it is batched and loaded to the Amazon Redshift Destination.
If you are new to AWS and Redshift, you can follow the steps listed below to create an AWS account and after that, create an Amazon Redshift database to which the Hevo Pipeline will load the data. Alternatively, you can create users and assign them the required permissions to set up and manage databases within Amazon Redshift. Read AWS Identity and Access Management for more details.
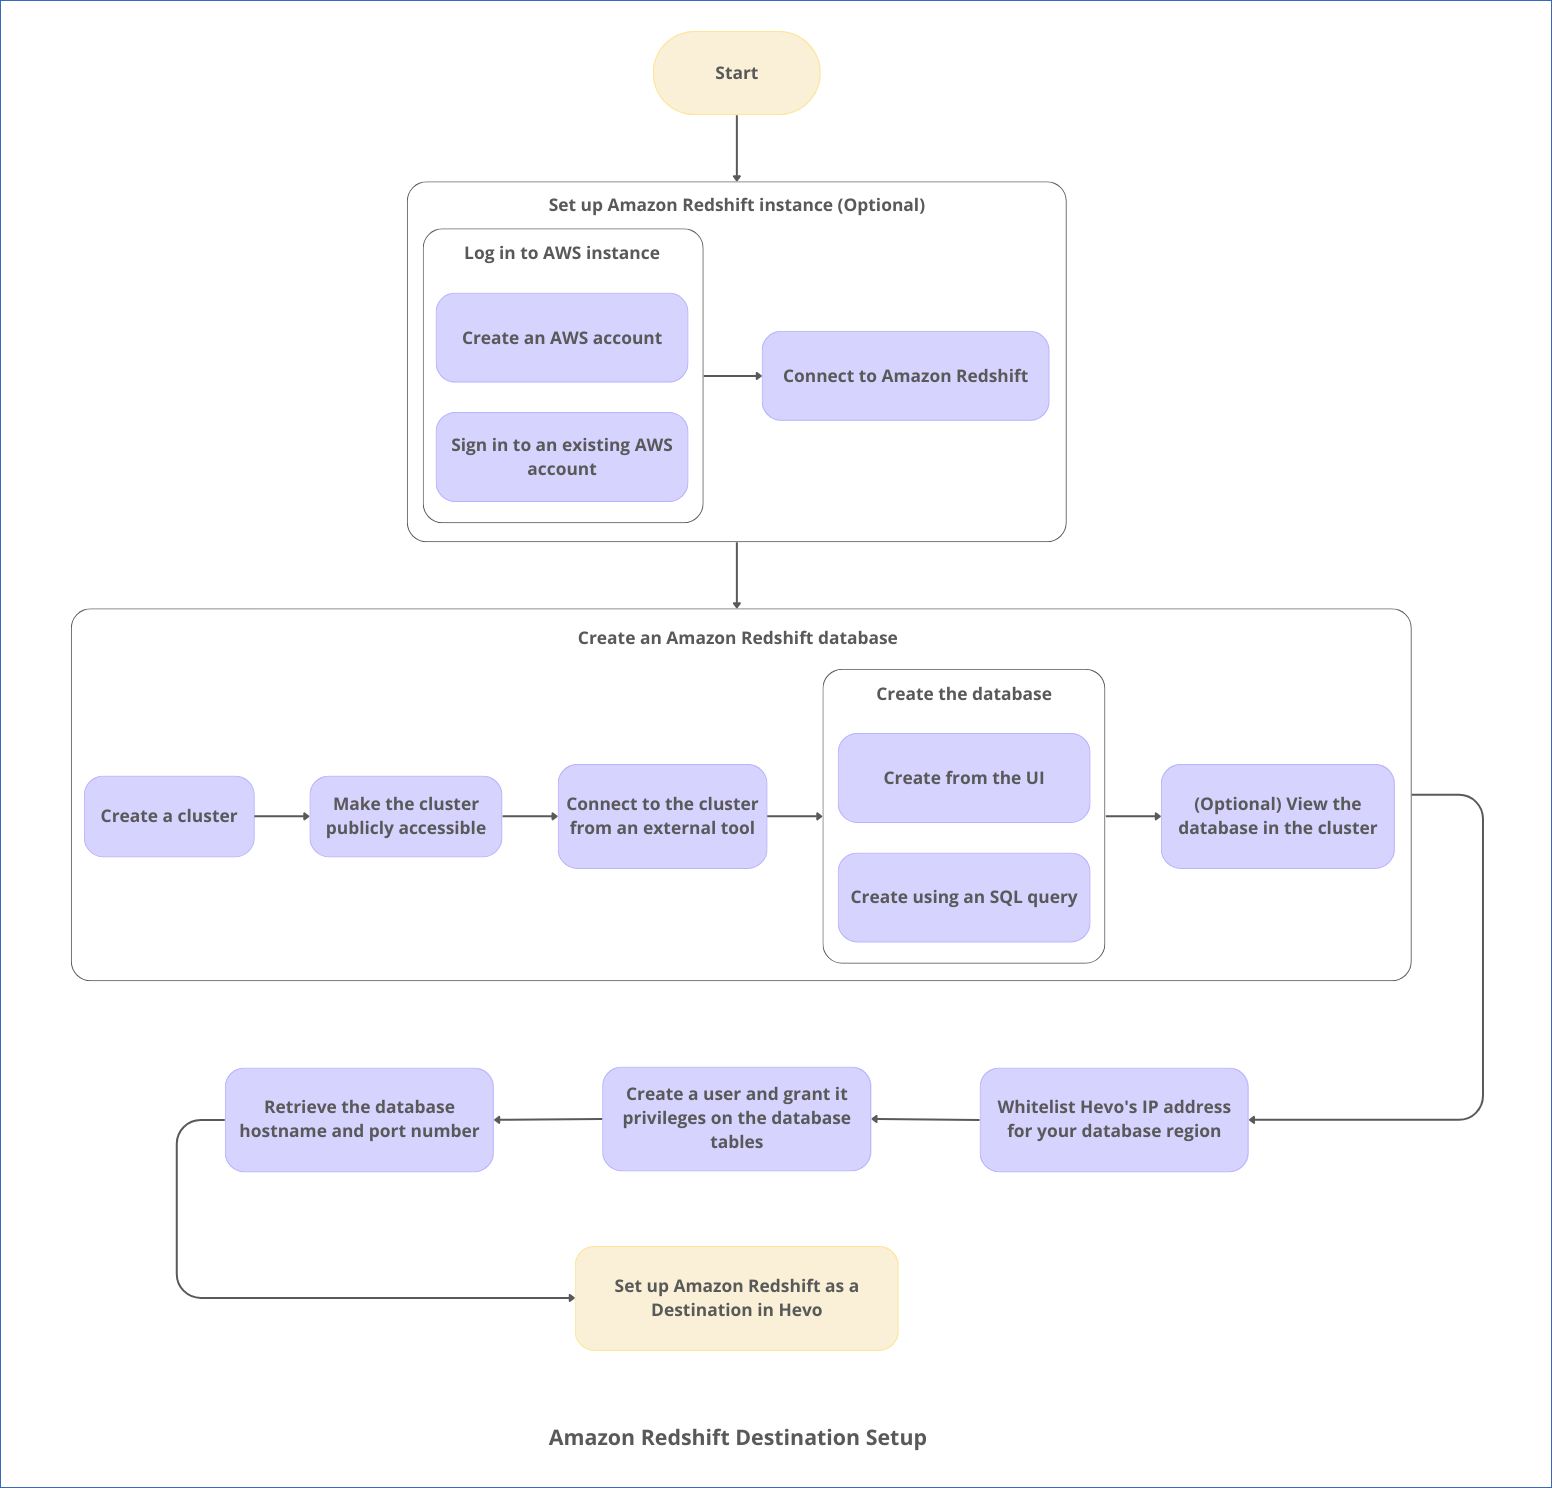
The following image illustrates the key steps that you need to complete to configure Amazon Redshift as a Destination in Hevo:
Prerequisites
Set up an Amazon Redshift Instance (Optional)
Note: The following steps must be performed by an Admin user or a user with permissions to create an instance on AWS. Permissions and roles are managed through the IAM page in AWS.
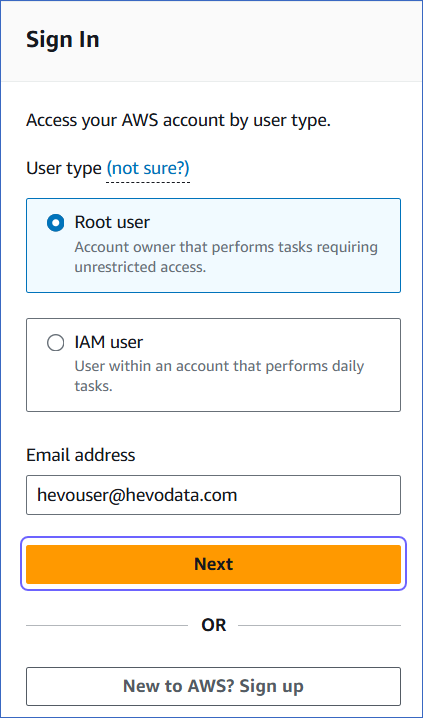
1. Log in to your AWS instance
Do one of the following:
2. Connect to Amazon Redshift
-
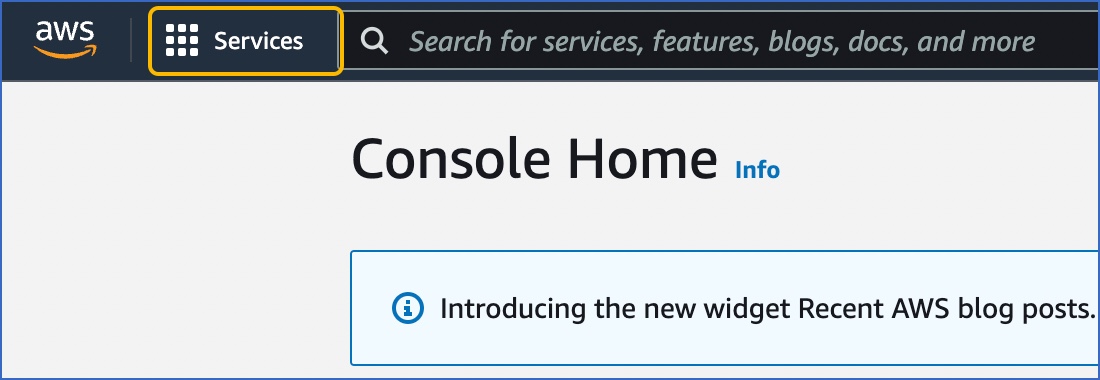
In the AWS Console Home, click Services in the top left.
-
Select Analytics, Amazon Redshift.
-
On the Complete Sign-up page, click Complete your AWS Registration.
-
Complete the required steps to create your AWS account.
Create a Database (Optional)
The core component of the Amazon Redshift data warehouse is a Cluster. Your databases are created within a cluster. Read Structure of Data in the Amazon Redshift Data Warehouse.
1. Create a Cluster
-
Log in to the Amazon Redshift dashboard.
-
Click the hamburger menu at the top left corner of the dashboard.

-
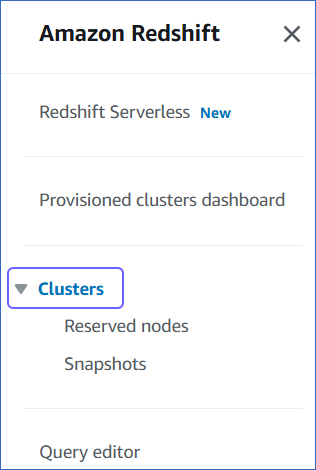
In the left navigation pane, click Clusters.
-
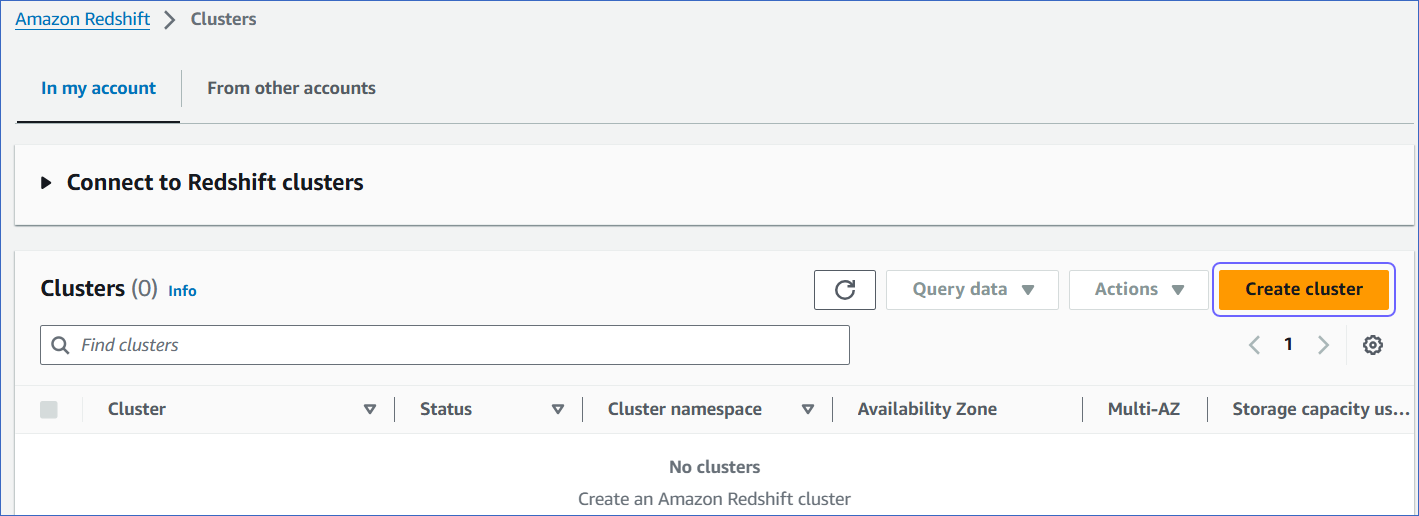
In the In my account tab, Clusters section, click Create cluster.
-
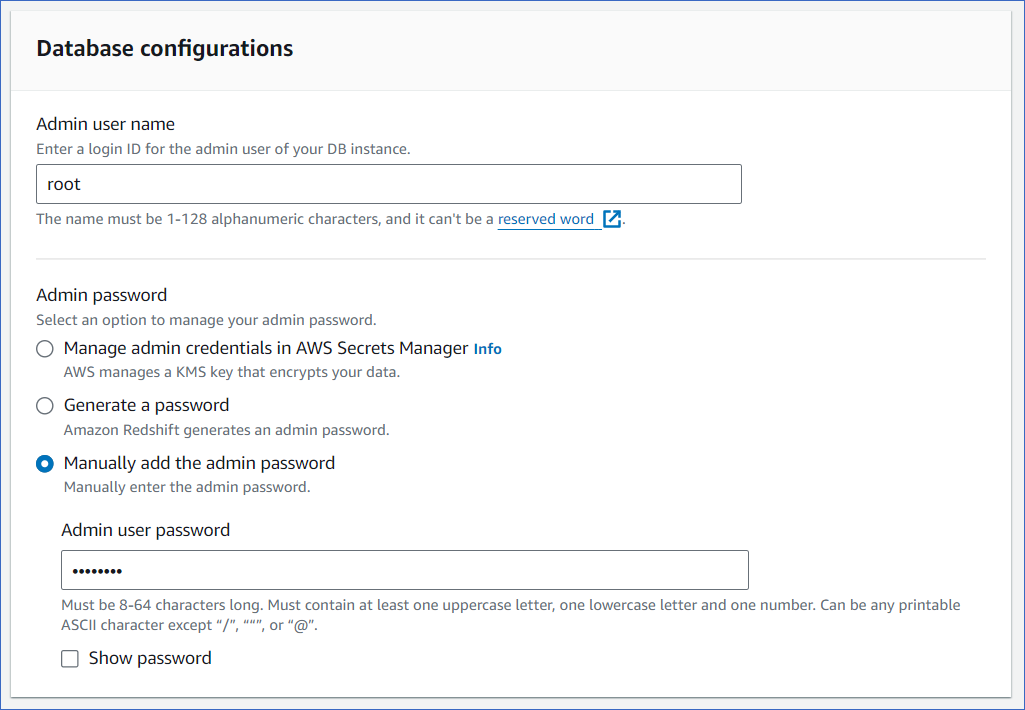
On the Create cluster page, Cluster configuration section, specify the following:
-
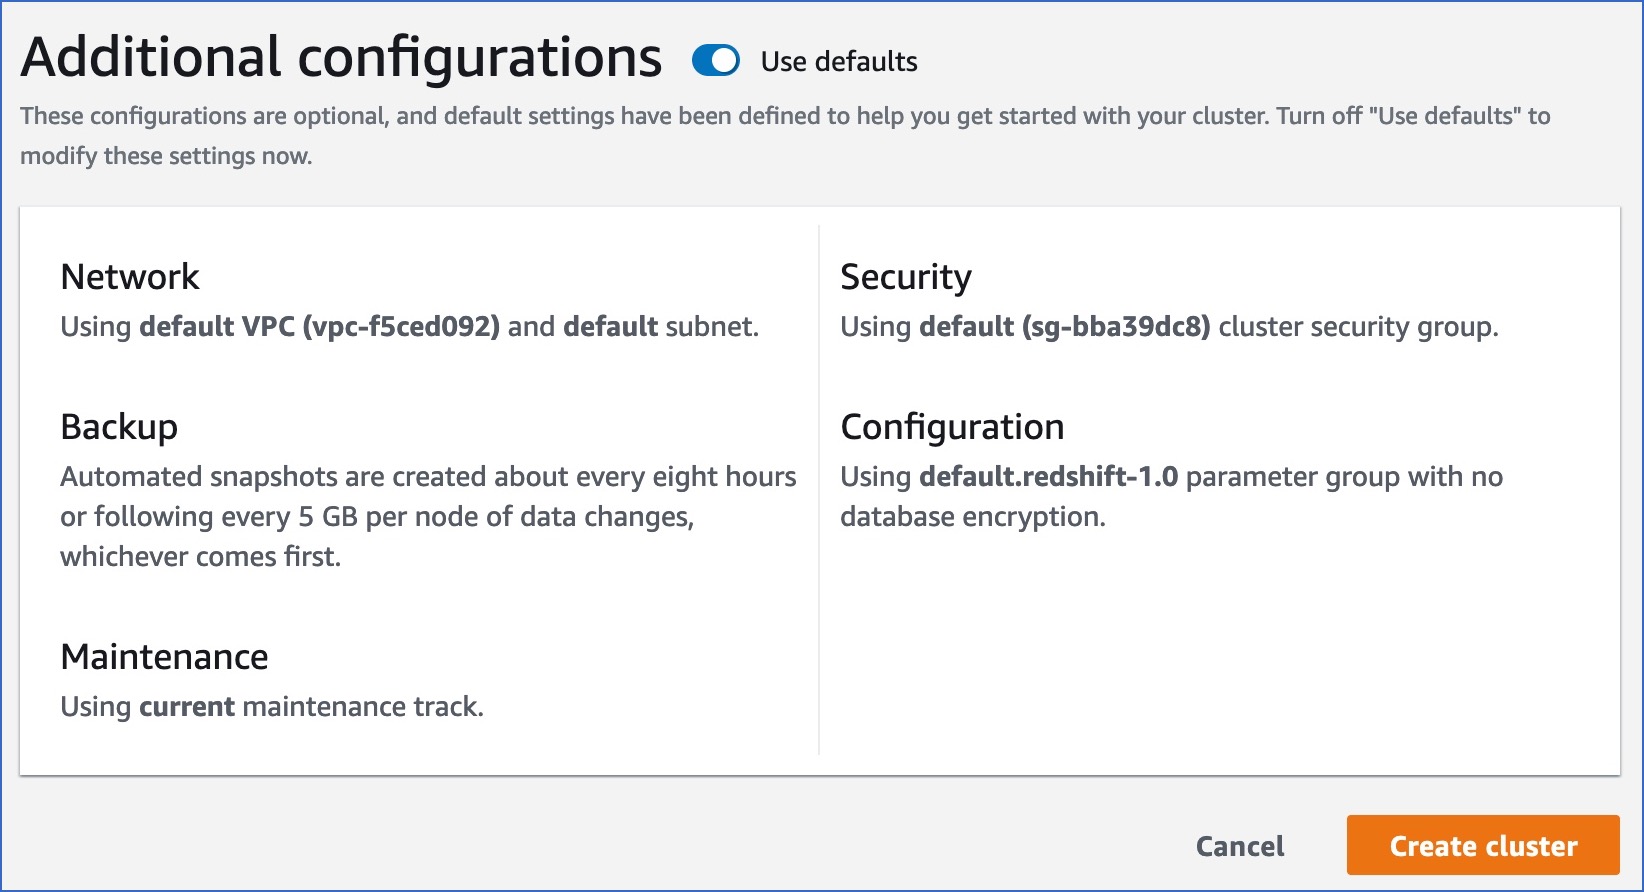
In the Additional configurations section, specify any additional settings you need or enable the Use defaults option to use the default settings provided by AWS.
-
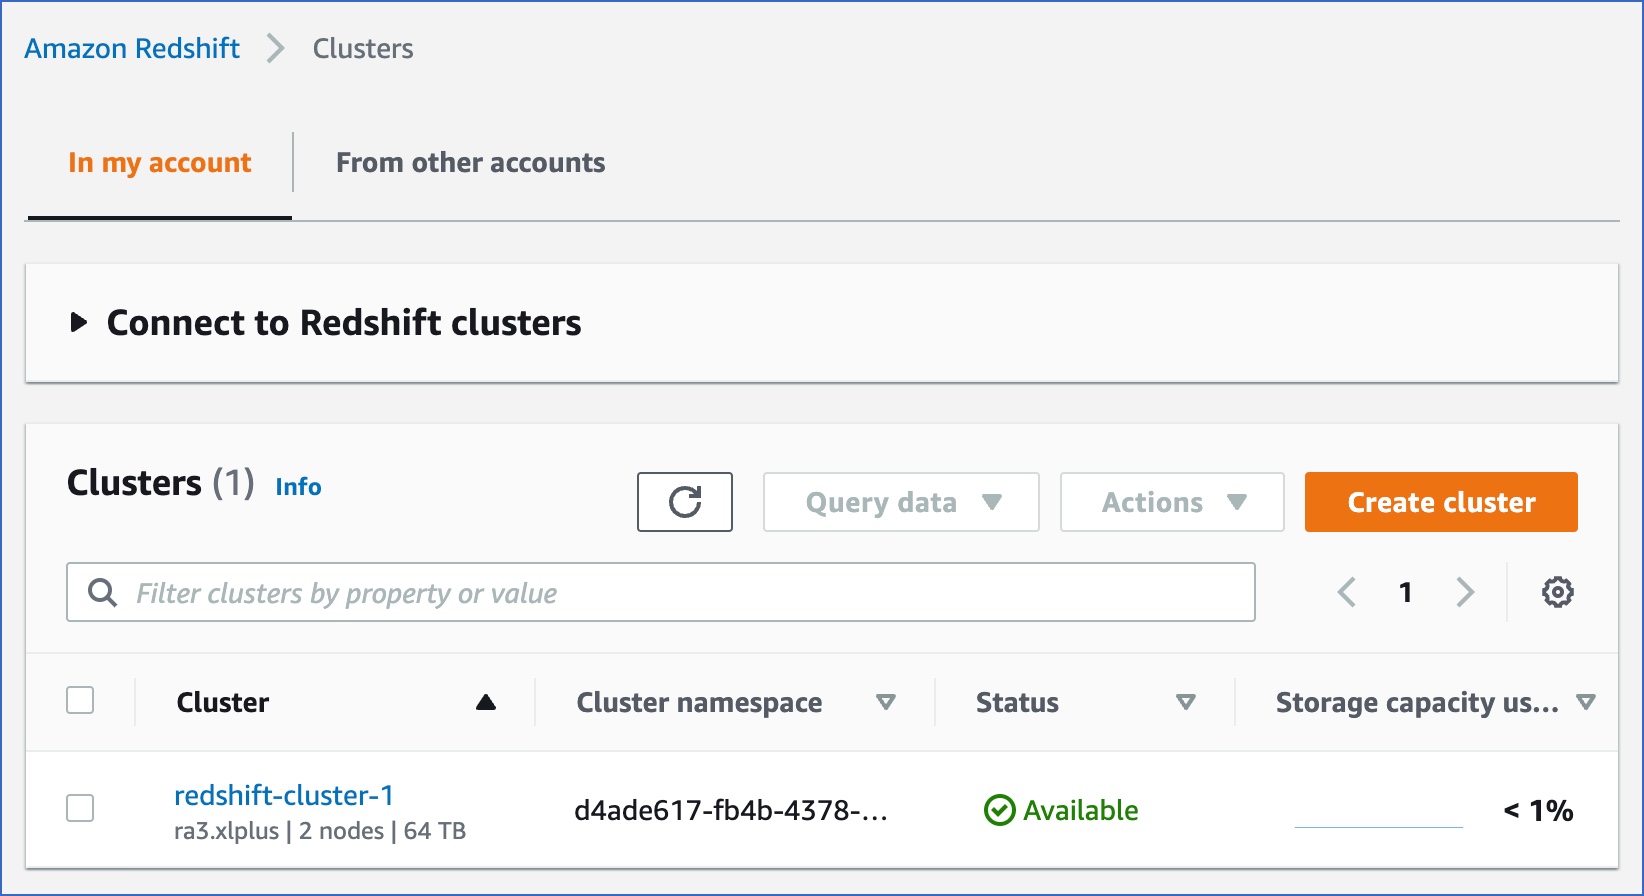
Click Create cluster. You can view the new cluster in the Amazon Redshift, Clusters page. Once the cluster configurations are complete, the status changes to Available.
-
(Optional) Click on the cluster to view its details.
2. Make your Redshift cluster publicly accessible
This is required to be able to connect to your Redshift cluster and create a database.
-
Log in to the Amazon Redshift dashboard.
-
Click the hamburger menu at the top left corner of the dashboard.

-
In the left navigation pane, click Clusters.

-
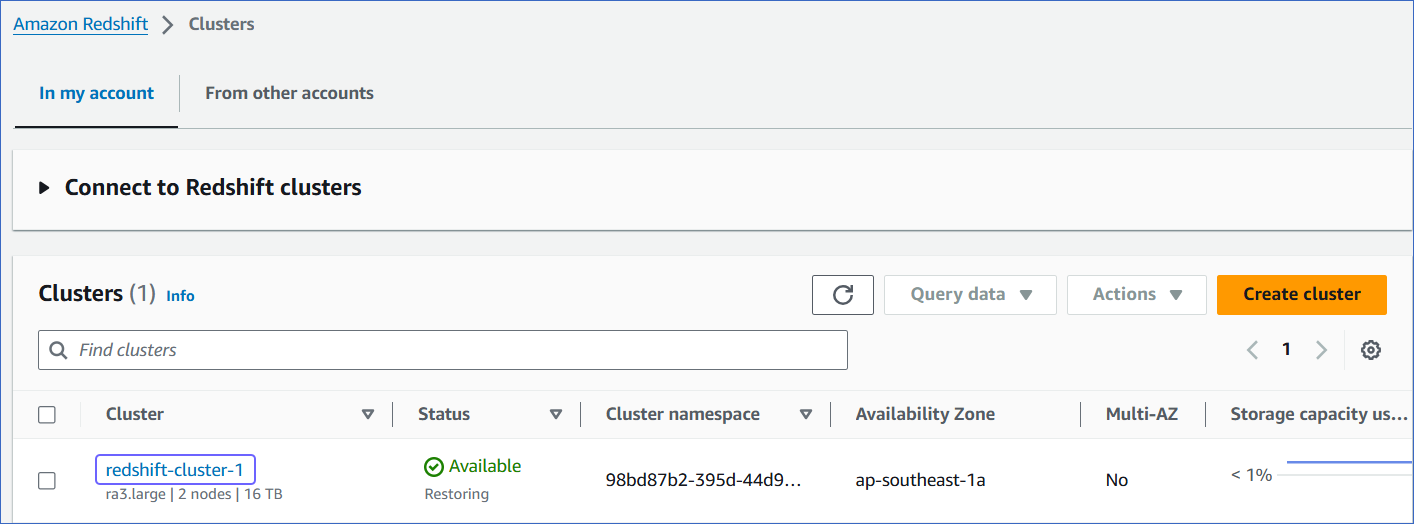
In the In my account tab, Clusters section, click the cluster you want to connect to Hevo.
-
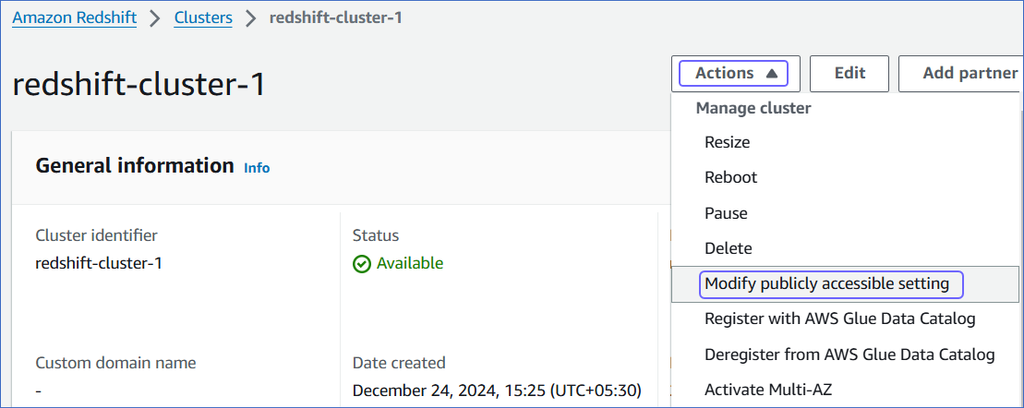
On the <Cluster Name> page, click the Actions drop-down, and select Modify publicly accessible setting.
-
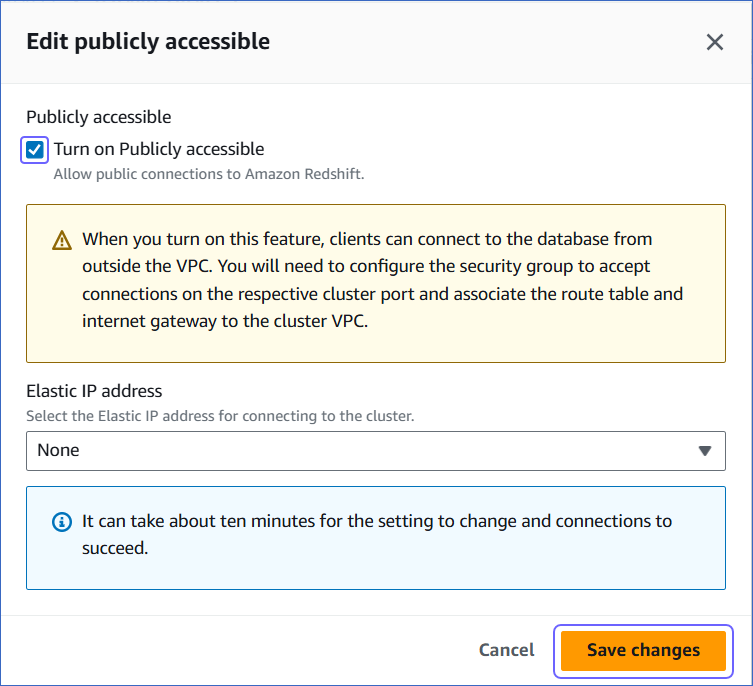
On the Edit publicly accessible pop-up window, select the Turn on Publicly accessible check box and click Save changes.
You can use any tool that can connect to Amazon Redshift, for example, Postico or pgAdmin, to create your Redshift database. Alternatively, use the Amazon Redshift Query Editor V2.
Note: The steps in this section have been performed using Postico.
-
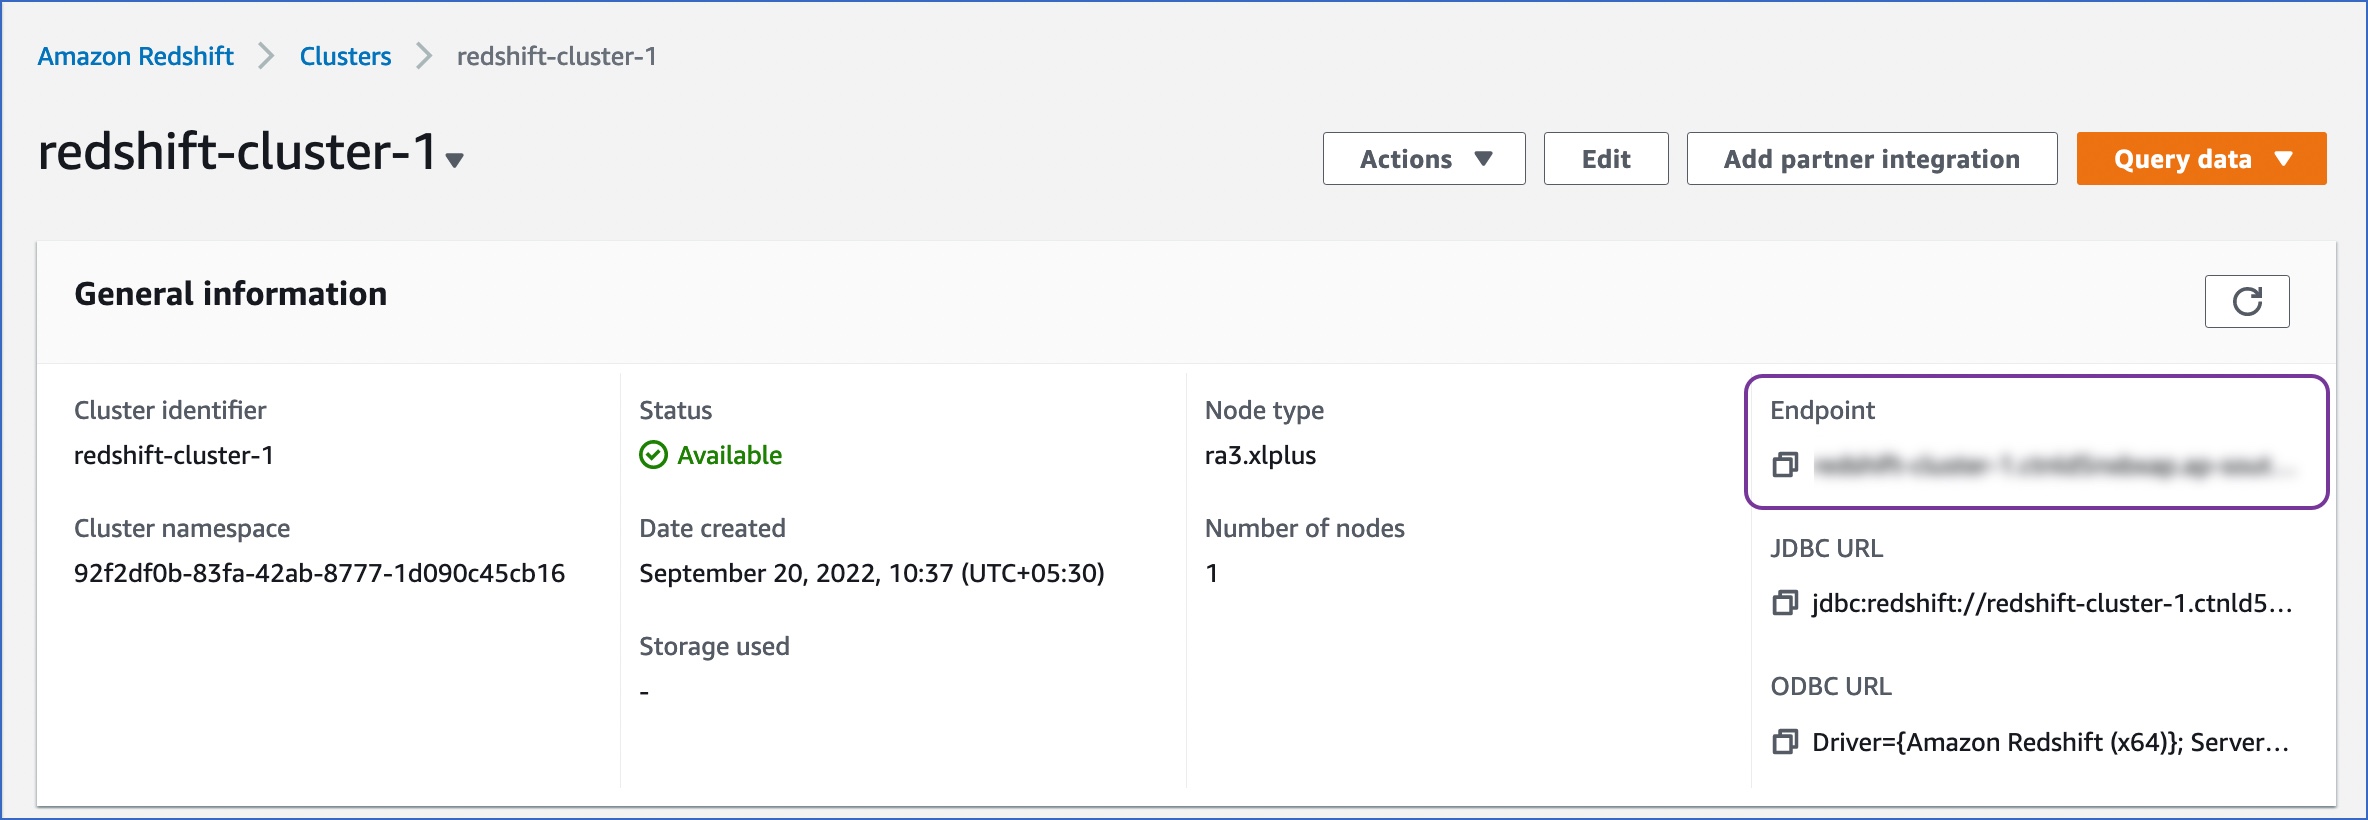
From the Redshift cluster details page, copy the Endpoint.
-
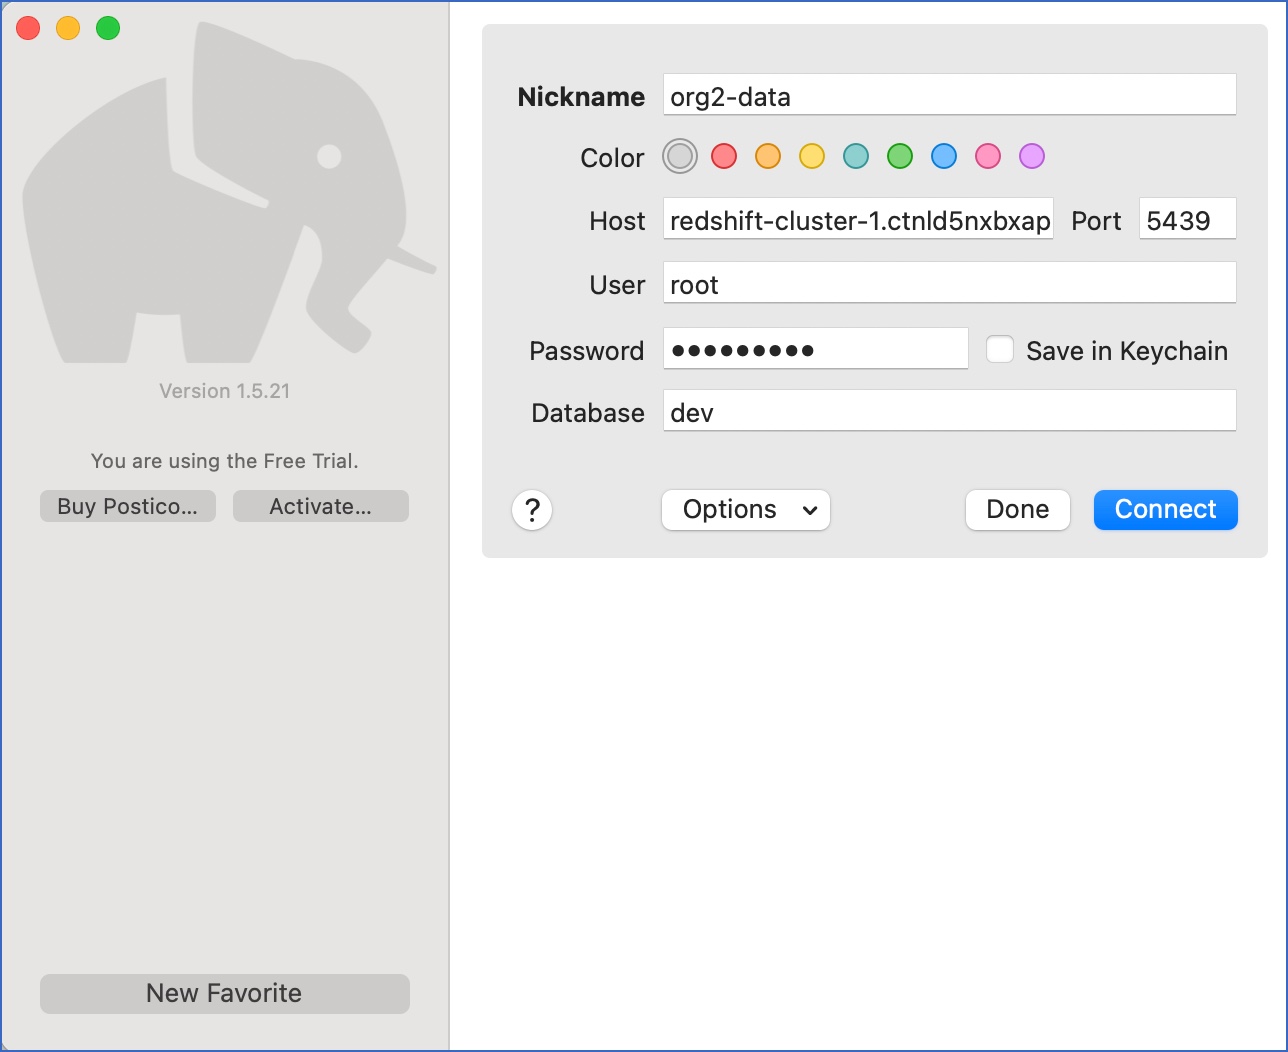
Access the external tool (Postico) and specify the following details:
-
Nickname: A unique, short name for this connection.
-
Host: The Endpoint obtained from your Redshift cluster details page.
Note: Do not include the port information in the host name.
-
User: The admin user for the database. Enter root.
-
Password: The password for the root user.
-
Database: The default database Postico opens in. Enter dev.
-
Click Connect.
4. Create the Redshift database
-
Do one of the following:
-
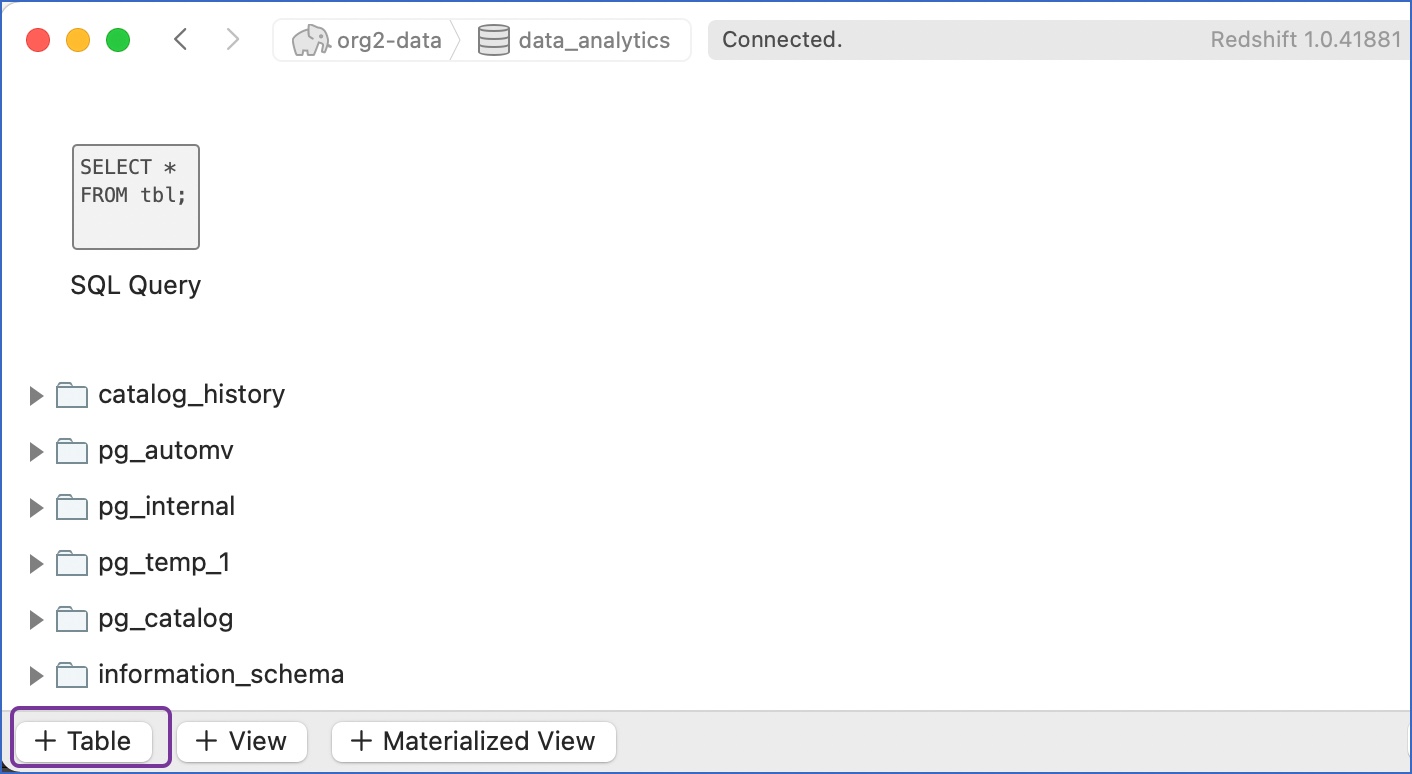
Click the new database to access it.
Note: You may see some additional, unfamiliar databases. These are internal databases created by Redshift.
-
Click + Table at the bottom of the console to create tables in the new database.
-
Specify the table name and click + Row to add a row and + Column to add columns to the row. For example, in the image below, four columns are created for the table, users, with the id column defined as the primary key.
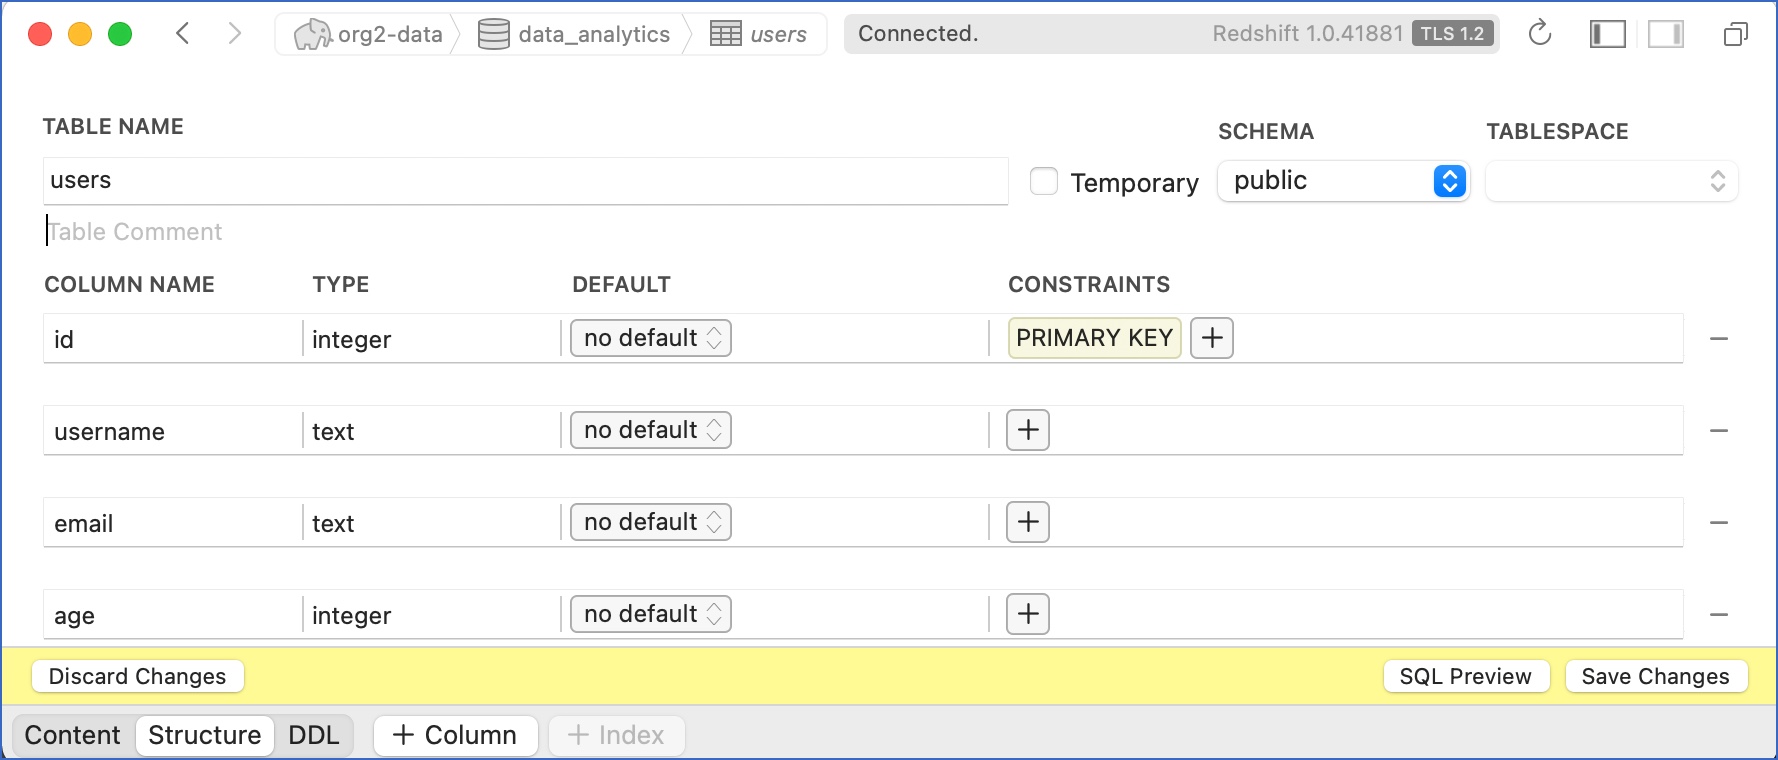
The rows and columns subsequently define the schema of the table.
-
Click Save Changes to create the table.
-
Similarly, create all the tables that you require.
5. View the database in your Amazon Redshift cluster
-
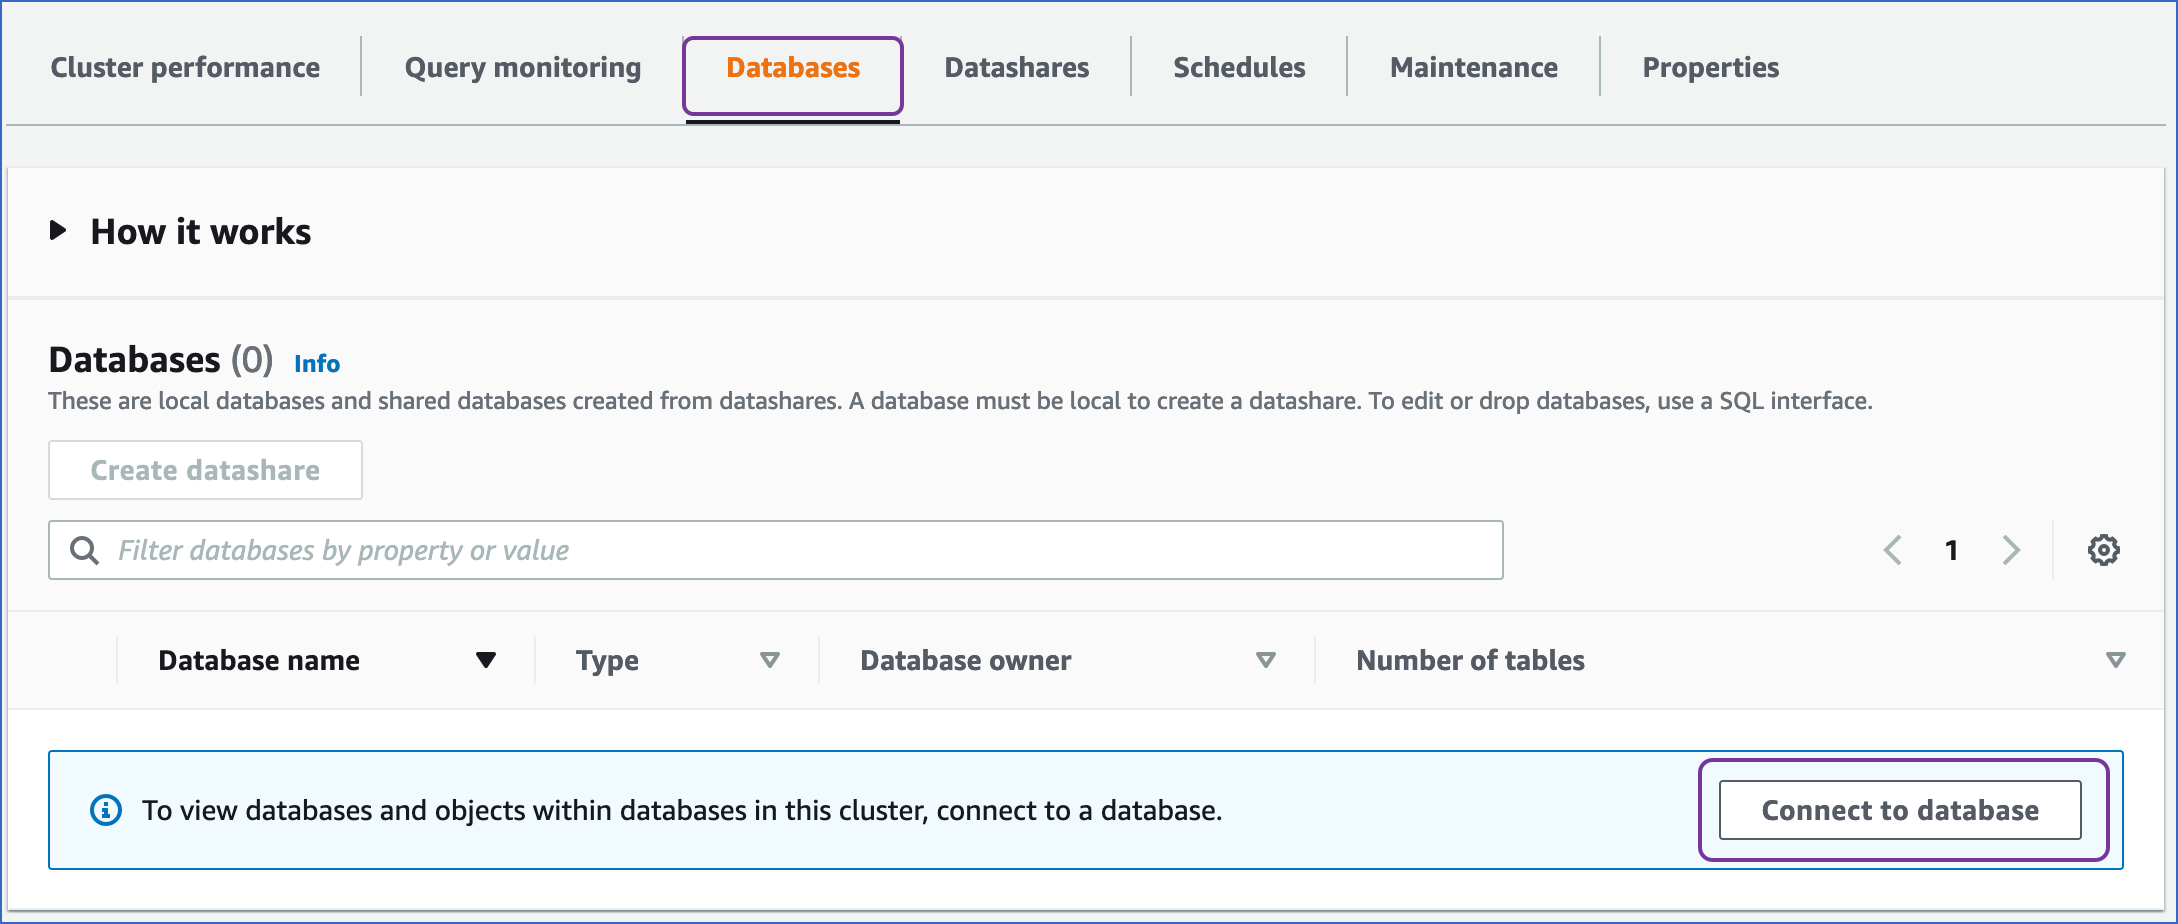
Access your Redshift cluster, and click the Databases tab.
-
Click Connect to database.
-
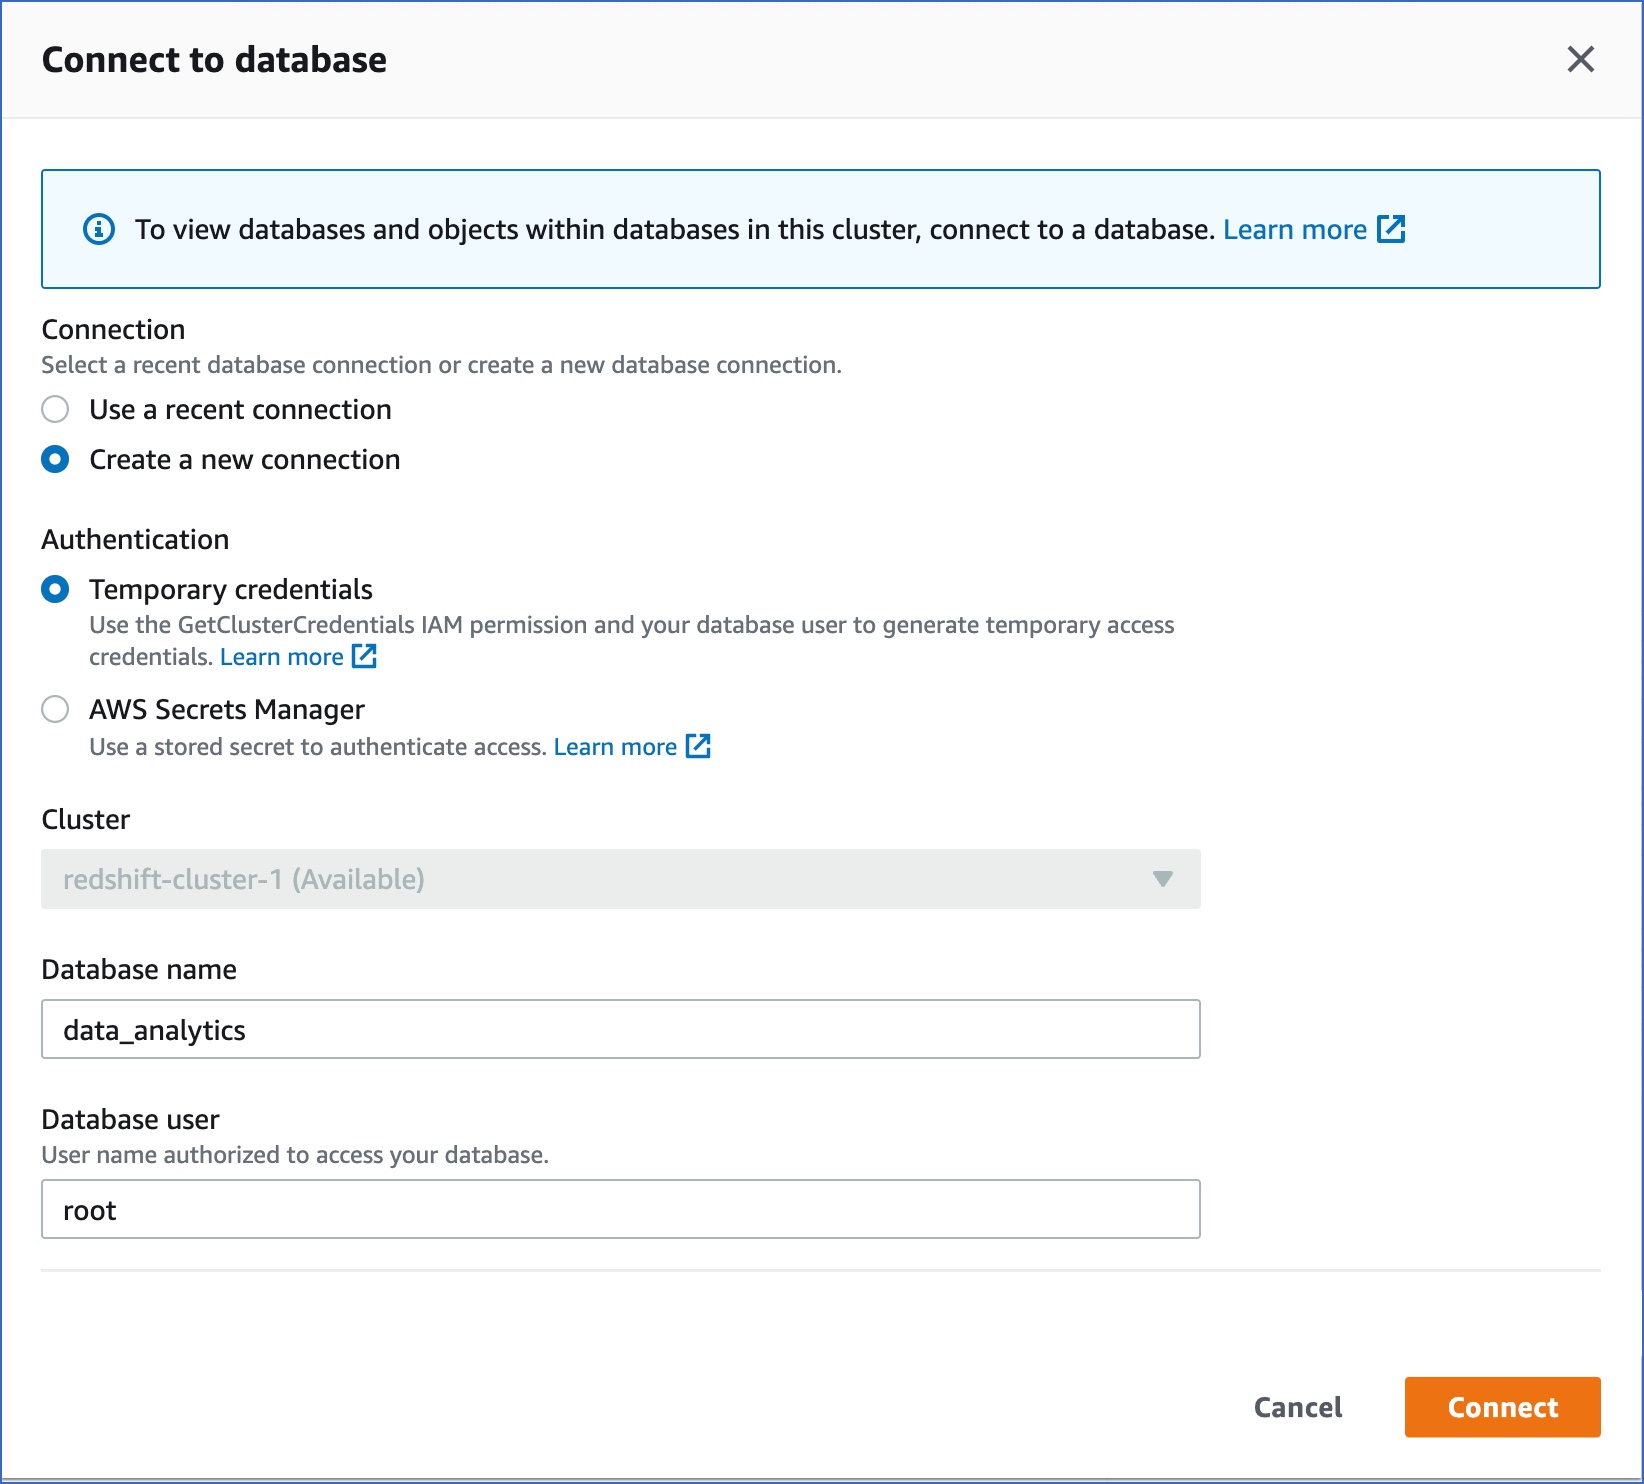
On the Connect to database page, specify the following:
-
Connection: Select Create a new connection.
-
Authentication: Select Temporary credentials if you want to generate your access credentials based on your assigned IAM role. Temporary credentials need to be generated each time you connect to the database. To use a previously saved key (password), select AWS Secrets Manager.
-
Database name: The database you are connecting to. For example, data_analytics.
-
Database user: The user you want to connect as. For example, root.
-
Click Connect.
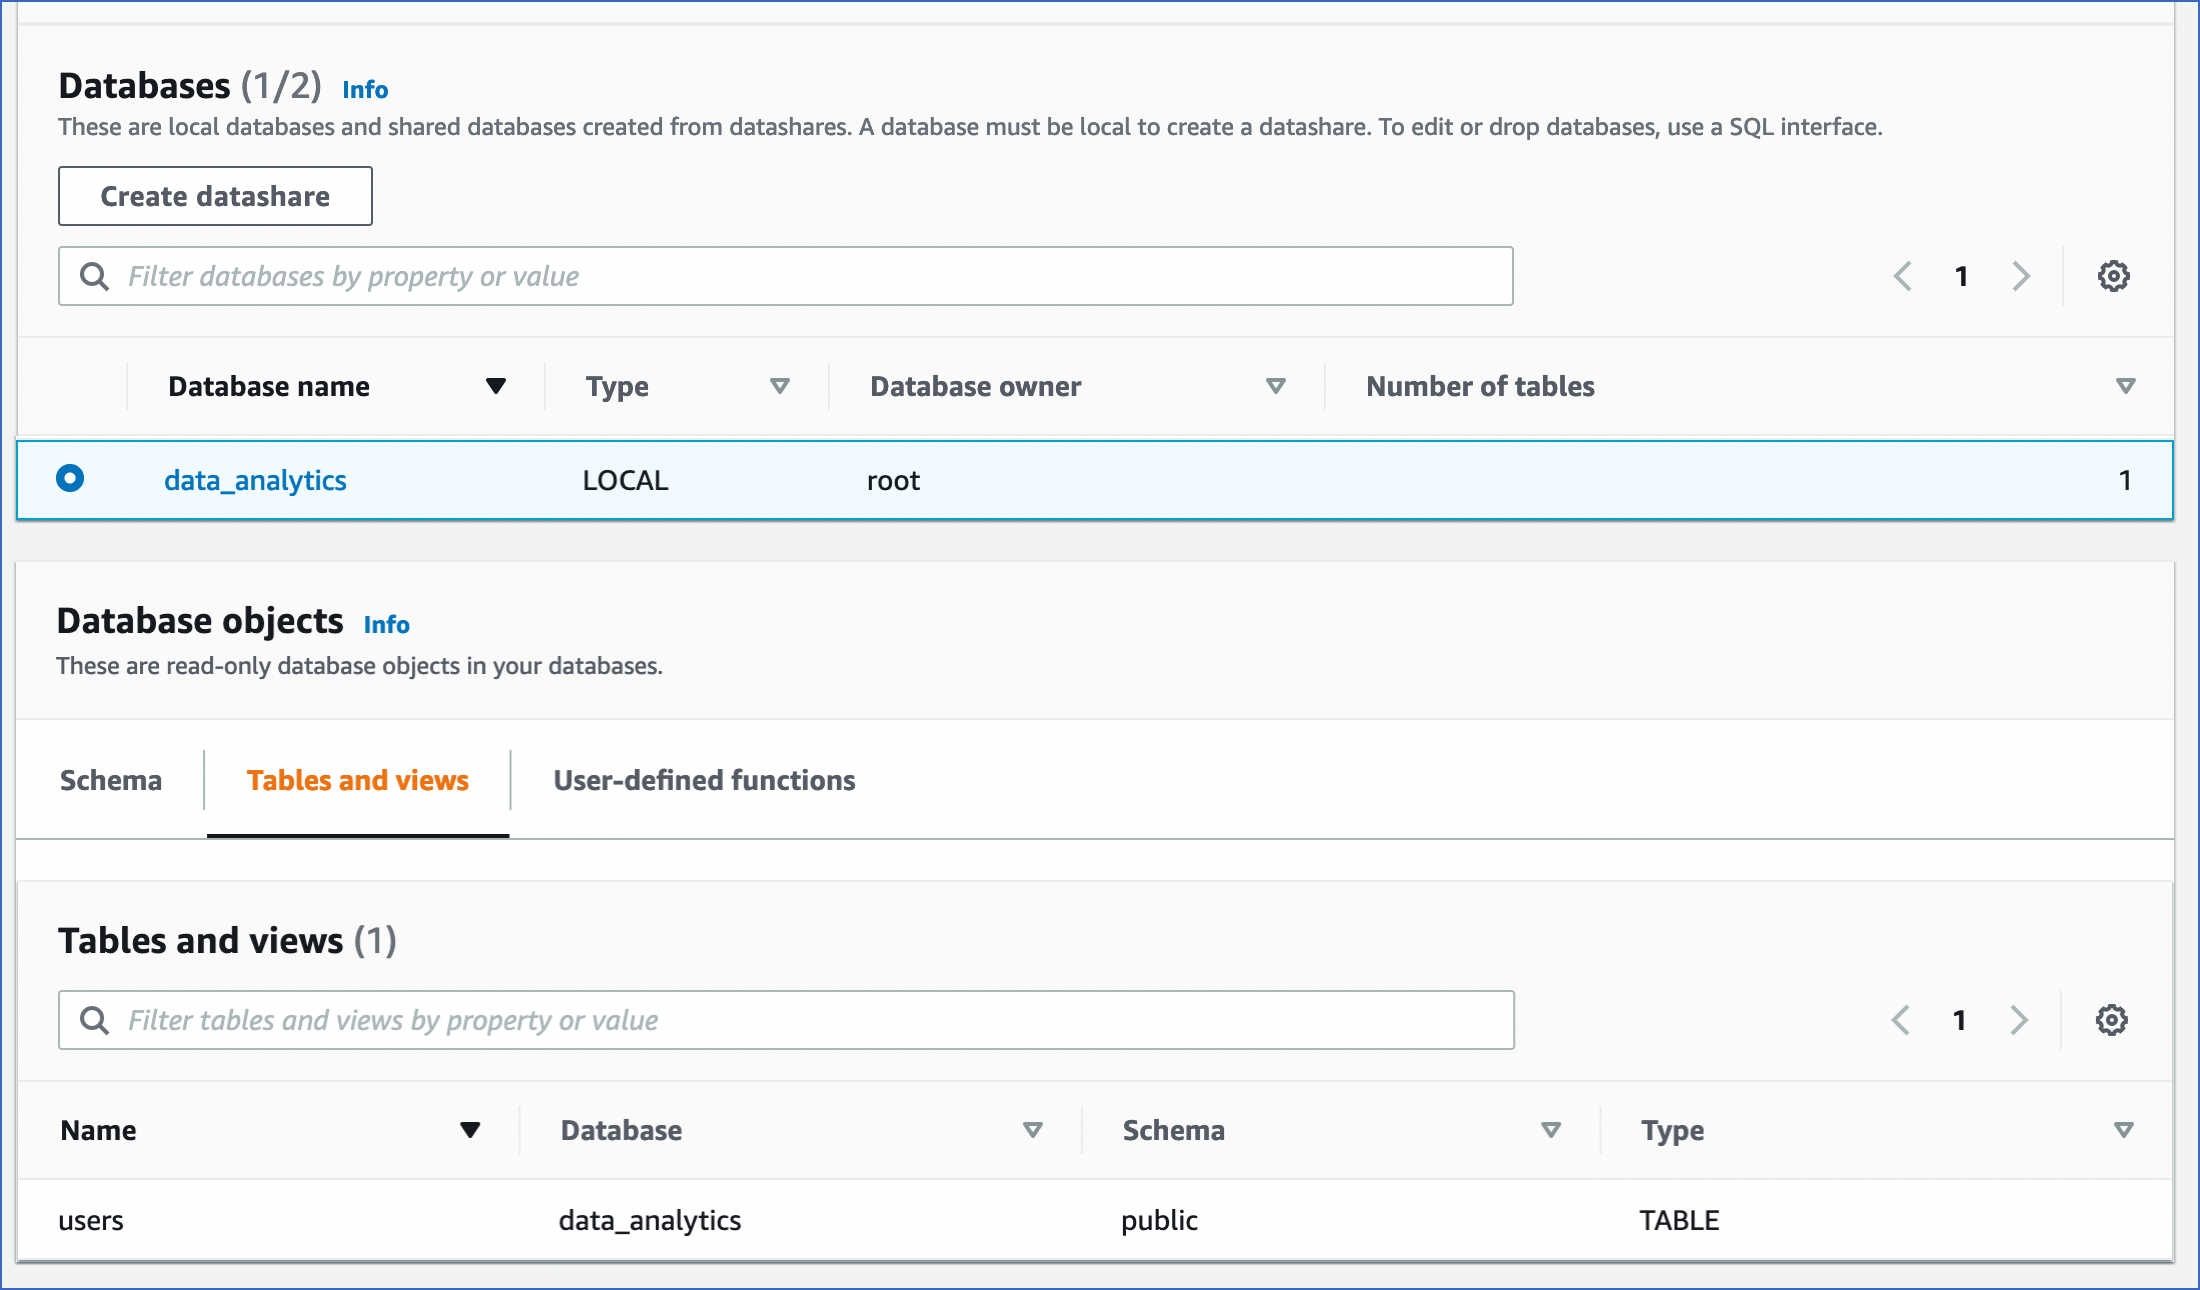
You can access the different tabs of the Database Objects section to view the objects, tables and views within the database:
Retrieve the Hostname and Port Number (Optional)
-
Log in to the Amazon Redshift dashboard.
-
Click the hamburger menu at the top left corner of the dashboard.

-
In the left navigation pane, click Clusters.

-
In the In my account tab, Clusters section, click the cluster you want to connect to Hevo.

-
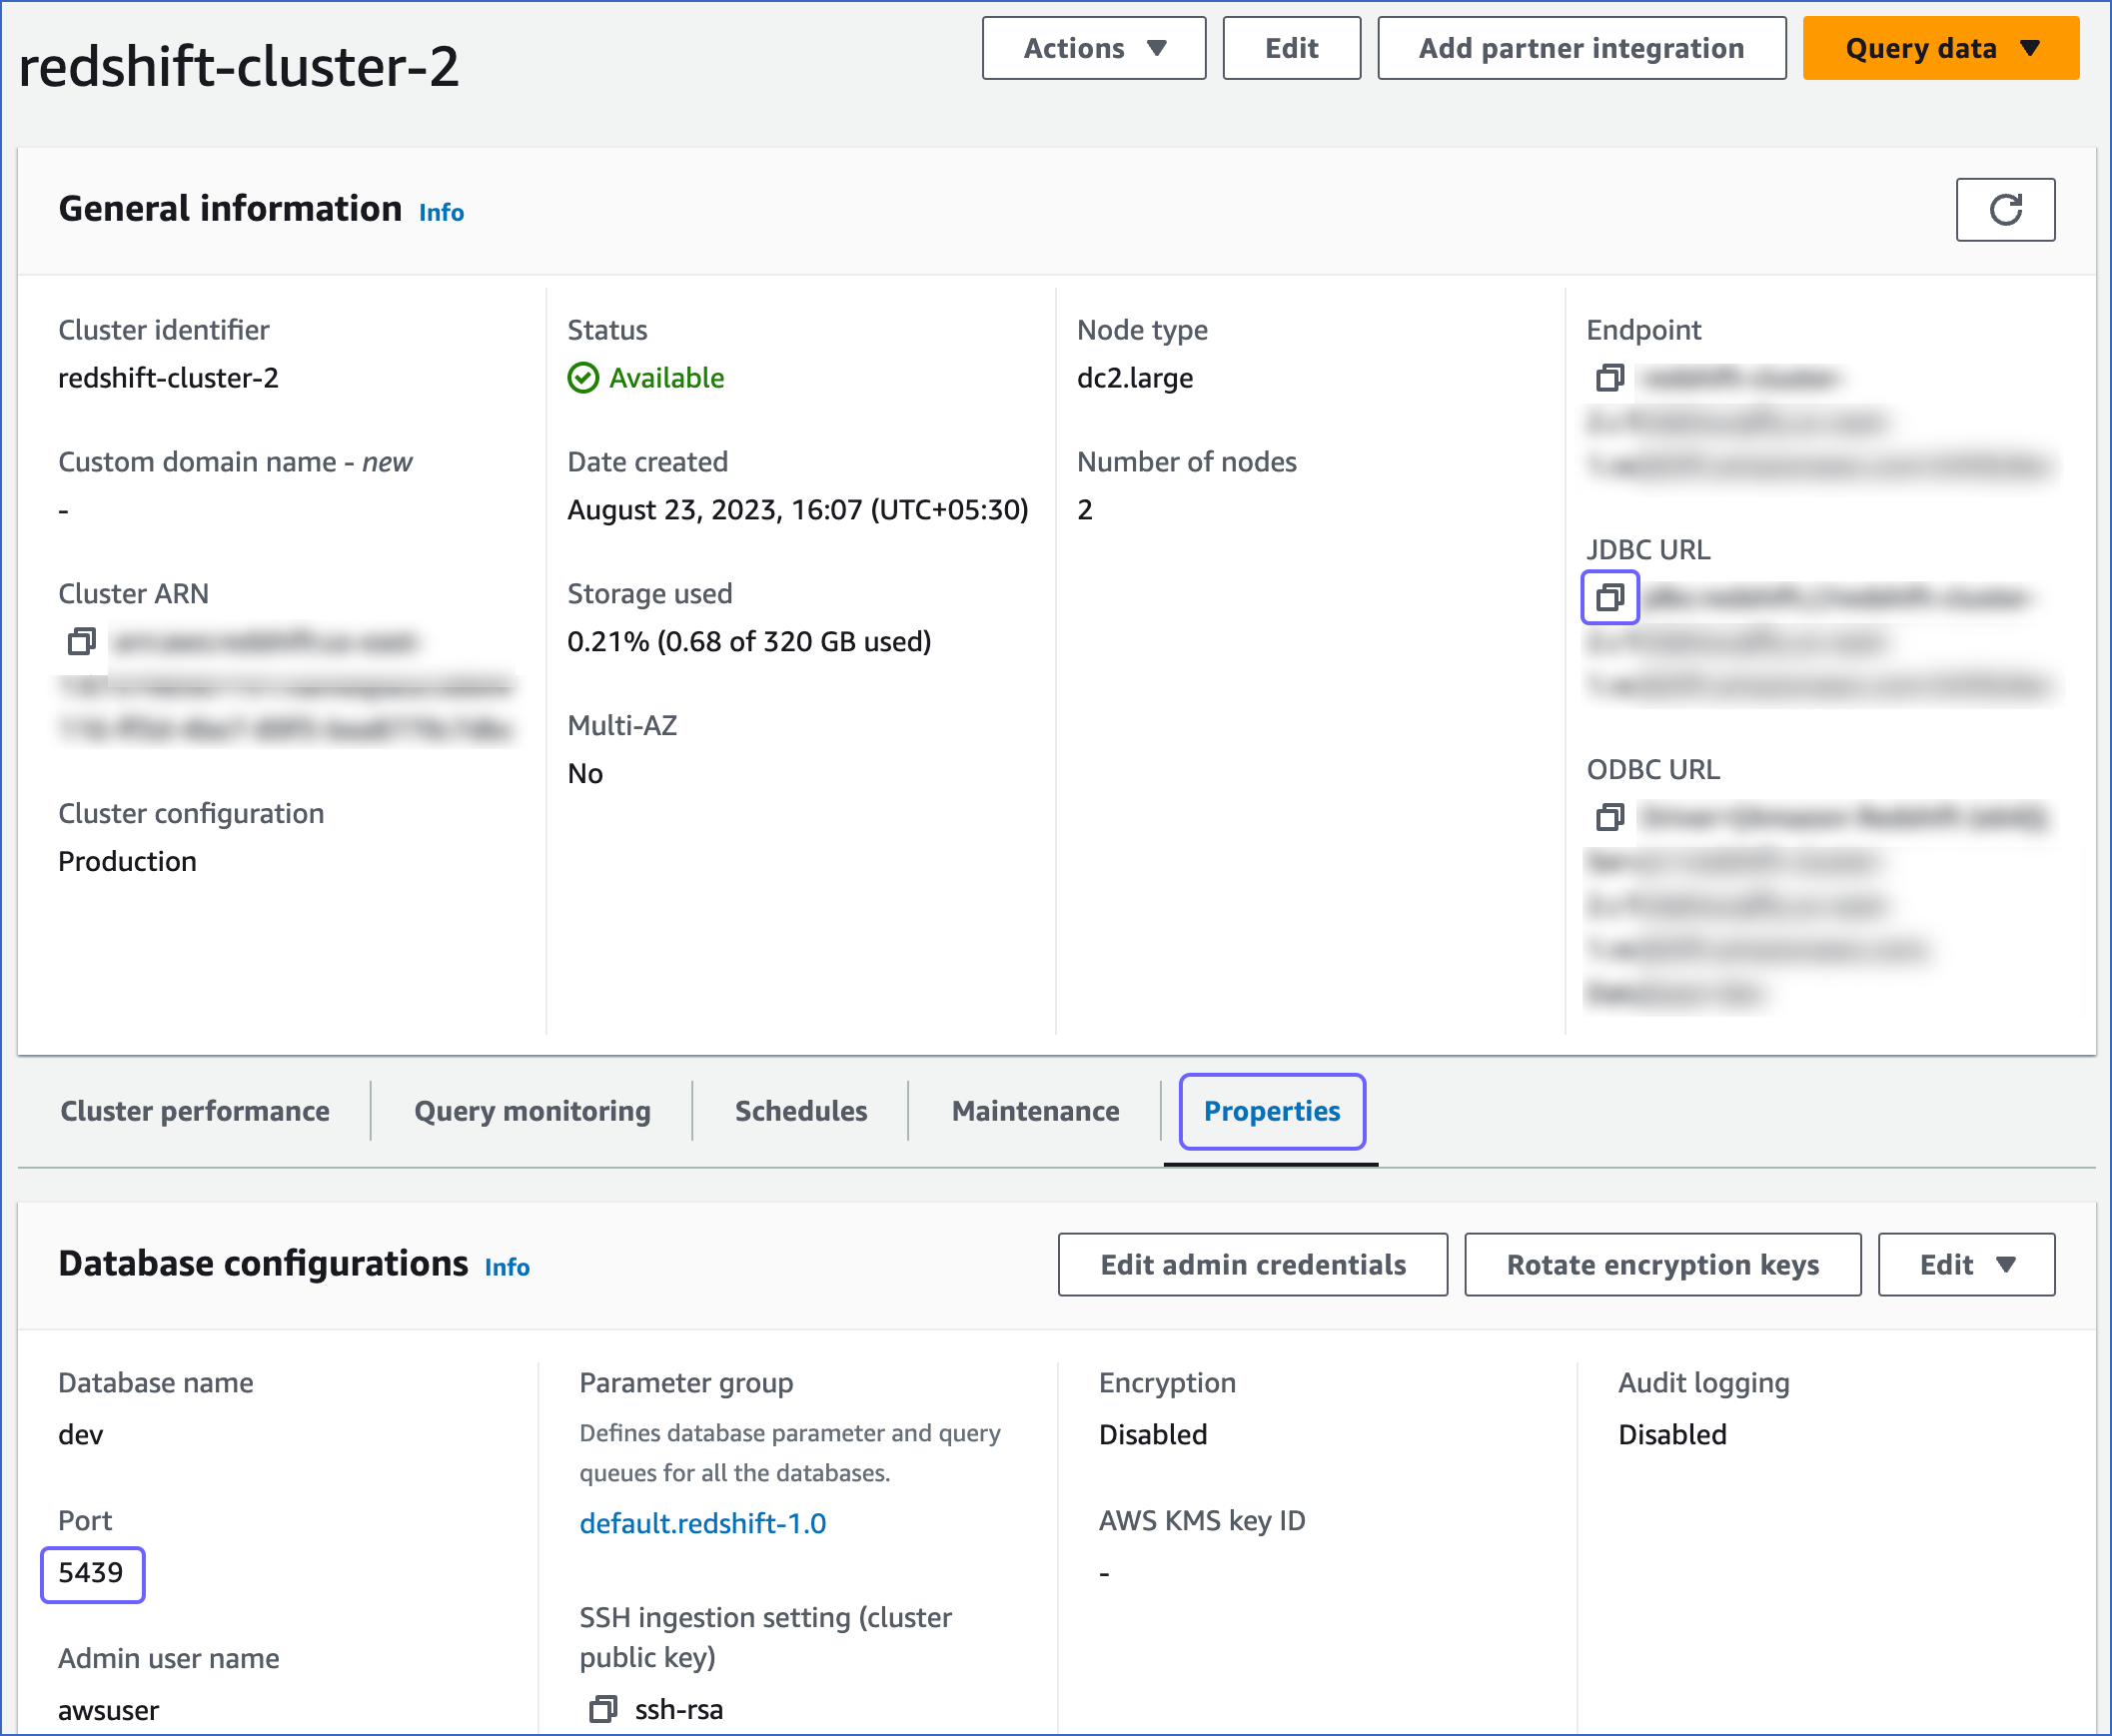
On <Cluster_name> page, do the following:
-
Click the Copy icon to copy the JDBC URL.
-
Navigate to the Properties tab and copy the Port.
Use this JDBC URL (without the jdbc:redshift:// part) as the database host and the Port as the database port in Hevo while creating your Pipeline.
For example, in the JDBC URL jdbc:redshift://examplecluster.abc123xyz789.us-west-2.redshift.amazonaws.com:5439/dev, the database host is examplecluster.abc123xyz789.us-west-2.redshift.amazonaws.com.
Whitelist Hevo’s IP Addresses
You need to whitelist the Hevo IP address(es) for your region to enable Hevo to connect to your Amazon Redshift database.
To do this:
-
Log in to the Amazon Redshift dashboard.
-
Click the hamburger menu at the top left corner of the dashboard.

-
In the left navigation pane, click Clusters.

-
In the In my account tab, Clusters section, click the cluster you want to connect to Hevo.

-
On the <Cluster Name> page, click the Properties tab.
-
Scroll down to the Network and security settings section and click the link text under VPC security group.

-
On the Security Groups page, select the check box for your Security group ID, and from the Actions drop-down, click Edit inbound rules.

-
On the Edit inbound rules page:

-
Click Add Rule.
-
In the Type column, select Redshift from the drop-down.
-
In the Source column, select Custom from the drop-down and enter Hevo’s IP addresses for your region. Repeat steps 1-3 to whitelist all the IP addresses.
-
Click Save rules.
Create a User and Grant Privileges
1. Create a user (optional)
-
Log in to your Amazon Redshift database as a superuser or a user with CREATE privilege.
-
Enter the following command:
CREATE USER hevo WITH PASSWORD '<password>';
2. Grant privileges to the user
-
Log in to your Amazon Redshift database as a superuser.
-
Enter the following commands:
-
Grant CREATE privilege to the database user for an existing database:
GRANT CREATE ON DATABASE <database_name> TO hevo;
GRANT CREATE ON SCHEMA <SCHEMA_NAME> TO <USER>;
GRANT USAGE ON SCHEMA <SCHEMA_NAME> TO <USER>;
-
Grant SELECT privilege to all tables or specific tables:
GRANT SELECT ON ALL TABLES IN SCHEMA <schema_name> TO hevo; #all tables
GRANT SELECT ON TABLE <schema_name>.<table_name> TO hevo; #specific table
Perform the following steps to configure Amazon Redshift as a Destination in Hevo:
-
Click DESTINATIONS in the Navigation Bar.
-
Click + Create Standard Destination in the Destinations List View.
-
On the Add Destination page, select Amazon Redshift.
-
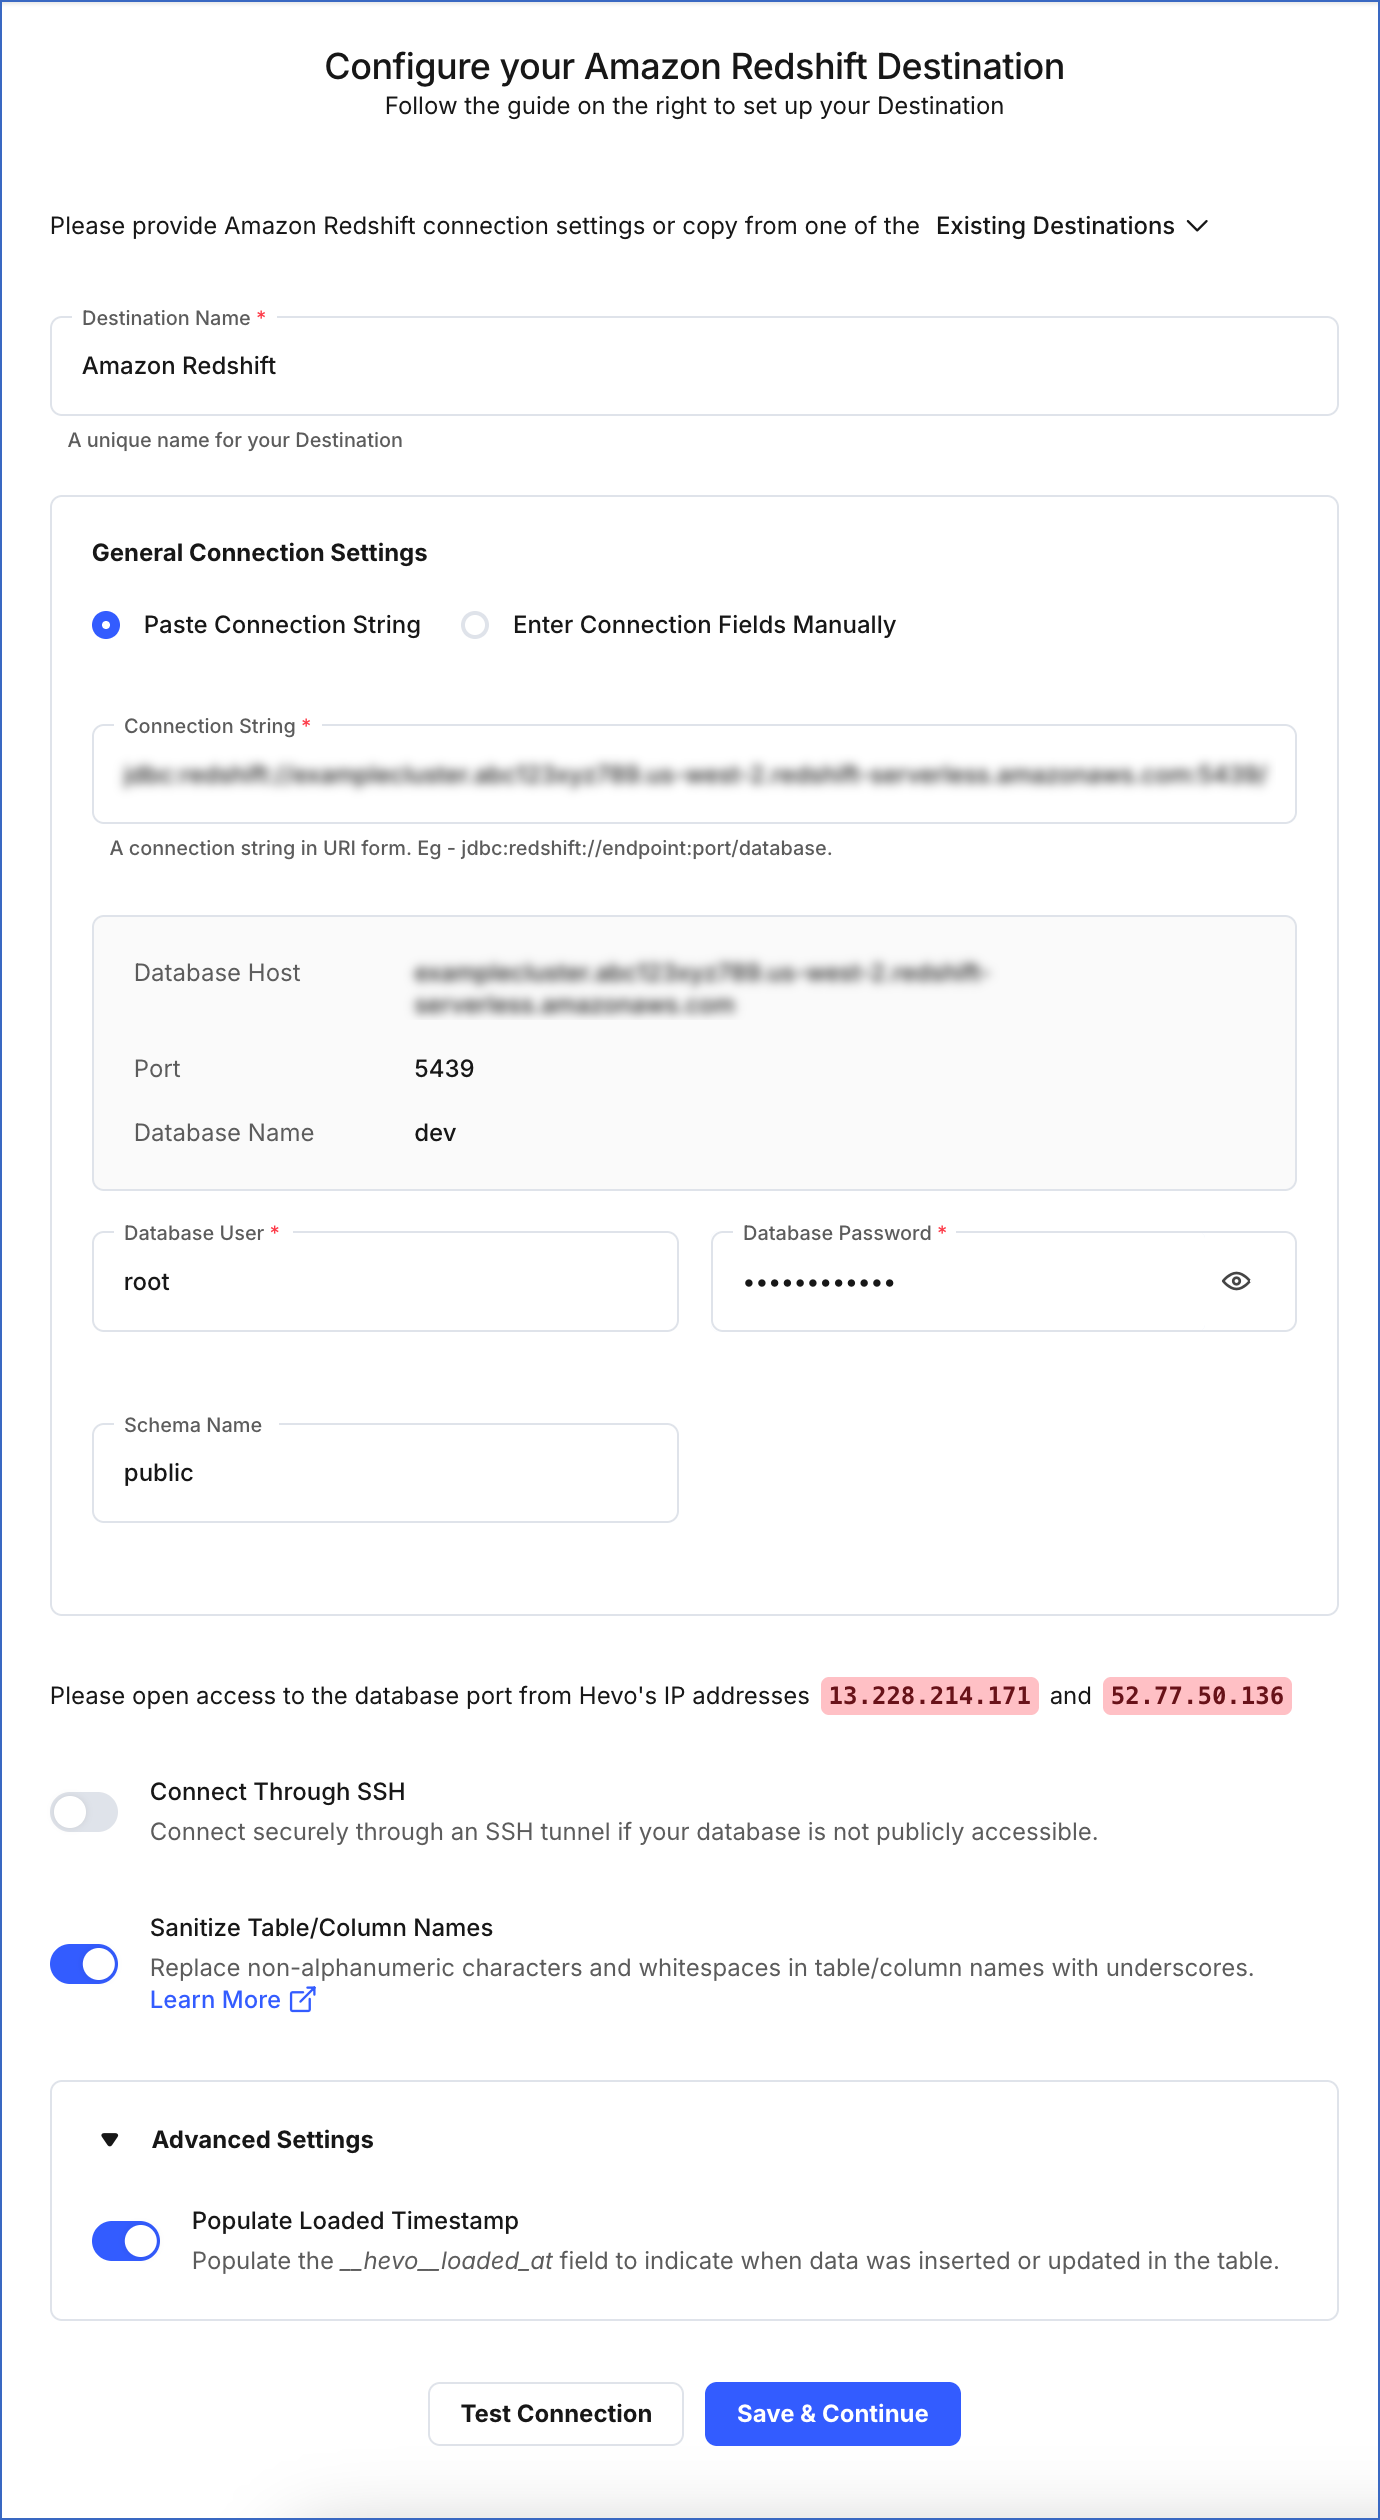
On the Configure your Amazon Redshift Destination page, specify the following:
-
Destination Name: A unique name for your Destination, not exceeding 255 characters.
-
General Connection Settings:
-
Additional Settings:
-
Connect through SSH: Enable this option to connect to Hevo using an SSH tunnel, instead of directly connecting your Amazon Redshift database host to Hevo. This provides an additional level of security to your database by not exposing your Redshift setup to the public. Read Connecting Through SSH.
If this option is disabled, you must whitelist Hevo’s IP addresses.
-
Sanitize Table/Column Names?: Enable this option to remove all non-alphanumeric characters and spaces in a table or column name, and replace them with an underscore (_). Read Name Sanitization.
-
Advanced Settings:
-
Populate Loaded Timestamp: Enable this option to append the __hevo_loaded_at_ column to the Destination table to indicate the time when the Event was loaded to the Destination. Read Loading Data to a Data Warehouse.
-
Click Test Connection. This button is enabled once all the mandatory fields are specified.
-
Click Save & Continue. This button is enabled once all the mandatory fields are specified.
Read the detailed Hevo documentation for the following related topics:
Error 1003 - Authentication error
Error Summary
- Hevo is not able to establish connection to the database using the credentials provided by the user.
Potential Causes
- The credentials of the database user authorizing the connection are incorrect.
Suggested Action(s)
-
Verify that the password entered in the Configure your Amazon Redshift Destination page for the authorizing user is correct.
-
Invite another team member with the required privileges to set up the Pipeline. Read Inviting and Moderating Team Members.
See Also
Error 1006 - Invalid database hostname
Error Summary
- Hevo is unable to establish connection to the database using the credentials provided by the user.
Potential Causes
- The database hostname is incorrect.
Suggested Action(s)
-
Verify that the hostname entered in the Configure your Amazon Redshift Destination page is correct.
To do this:
-
Log in to the AWS Console.
-
In the global search bar, enter Redshift.
-
In the left navigation pane, click on Provisioned clusters dashboard.
-
In the Provisioned clusters dashboard, under the Cluster overview section, select the cluster that you are using for configuring the Redshift Destination in Hevo.
-
In the Configuration tab, under the Cluster Database Properties section, locate and verify the Port and JDBC URL. The default Amazon Redshift port is 5439. In case you want to change or correct the values, you can do it in the Configure your Amazon Redshift Destination page.

Note: For URL-based hostnames, exclude the jdbc:redshift:// part. For example, if the hostname URL is jdbc:redshift://examplecluster.abc123xyz789.us-west-2.redshift.amazonaws.com:5439/dev, enter examplecluster.abc123xyz789.us-west-2.redshift.amazonaws.com in the Database Host field in Hevo.
-
Use the Connect via SSH option in the Configure your Amazon Redshift Destination page to set up the Destination if the Redshift instance is on a local IP address.
-
Invite another team member with the required privileges to set up the Pipeline. Read Inviting and Moderating Team Members.
Handling Source Data with Different Data Types
For teams created in or after Hevo Release 1.60, Hevo automatically modifies the data type of an Amazon Redshift Destination table column to accommodate Source data with a different data type. Read Handling Different Data Types in Source Data.
Note: Your Hevo release version is mentioned at the bottom of the Navigation Bar.
Handling Source Data with JSON Fields
For Pipelines created in or after Hevo Release 1.74, Hevo uses Replicate JSON fields to JSON columns as the default parsing strategy to load the Source data to the Amazon Redshift Destination.
With the changed strategy, you can query your JSON data directly, eliminating the need to parse it as JSON strings. This change in strategy does not affect the functionality of your existing Pipelines. Therefore, if you want to apply the changed parsing strategy to your existing Pipelines, you need to recreate them.
In addition, the replication strategies, Flatten structs and split arrays to new Events and Replicate JSON fields as JSON strings and array fields as strings have been deprecated for newer Pipelines, and are no longer visible in the UI.
Read Parsing Nested JSON Fields in Events.
Destination Considerations
-
Amazon Redshift supports a maximum length of 65,535 bytes for VARCHAR field values. As a result, if a Source object has any ARRAY, JSON, XML, STRING, or VARCHAR field values that exceed this limit, Hevo fails those Events.
-
Amazon Redshift is case-insensitive to names of database objects, including tables and columns. For example, if your JSON field names are either in mixed or uppercase, such as Product or ITEMS, Amazon Redshift does not recognize these field names. Hence, it is unable to fetch data from them. Therefore, to enable Amazon Redshift to identify such JSON field names, you must set the session parameter enable_case_sensitive_identifier to TRUE. Read SUPER configurations.
-
Hevo stages the ingested data in an Amazon S3 bucket, from where it is loaded to the Destination tables using the COPY command. Hence, if you have enabled enhanced VPC routing, ensure that your VPC is configured correctly. Enhanced VPC routing affects the way your Amazon Redshift cluster accesses other resources in your AWS network, such as the S3 bucket, specifically for the COPY and UNLOAD commands. Read Enhanced VPC Routing in Amazon Redshift.
-
Hevo uses the Amazon Redshift COPY command to load data into the Destination tables. If a Source object has a row size exceeding 4 MB, Hevo cannot load the object, as the COPY command supports a maximum row size of 4 MB. For example, an object having a VARBYTE row with 6 MB of data cannot be loaded, even though the VARBYTE data type supports up to 16 MB. To avoid such a scenario, ensure that each row in your Source objects contains less than 4 MB of data.
-
Redshift may forcibly terminate a load operation if it runs longer than the workload management (WLM) query timeout limits set for the queue, typically due to high data volume, cluster load, or WLM constraints. These terminations can occur even when Hevo initiates data loading correctly, resulting in persistent load failures despite multiple retries. These failures may impact any downstream processes that rely on the affected Redshift tables, such as SQL Models that query these tables, resulting in incomplete query outputs or potential runtime errors.
Hevo automatically retries the load operation. If a retry succeeds, the data is loaded as expected. To reduce the risk of termination, review and optimize your Redshift WLM configuration:
Limitations
-
Hevo replicates a maximum of 1600 columns to each Amazon Redshift table. Read Limits on the Number of Destination Columns.
-
Hevo does not support writing to tables that have IDENTITY columns.
Let us suppose you create a table with a default IDENTITY column and manually map a Source table to it. When the Pipeline runs, Hevo issues insert queries to write all the values from the Source table to this table. However, the writes would fail, as Amazon Redshift does not permit writing values to the IDENTITY column.
-
Hevo supports mapping of only JSON fields to the SUPER data type that Amazon Redshift uses to support JSON columns.
Read SUPER type.
See Also
Revision History
Refer to the following table for the list of key updates made to this page:
| Date |
Release |
Description of Change |
| Nov-12-2025 |
NA |
Updated the document as per the latest Hevo UI. |
| Nov-05-2025 |
NA |
Updated section, Log in to your AWS instance as per the latest Amazon Redshift UI. |
| Jul-14-2025 |
NA |
- Updated the Destination Considerations section to add information about the size limit for the VARCHAR data type. |
| Jul-10-2025 |
NA |
Updated section, Destination Considerations to add information about COPY command terminating due to WLM constraints. |
| Feb-24-2025 |
NA |
Updated sections, Create a Database (Optional), Retrieve the Hostname and Port Number (Optional), and Whitelist Hevo’s IP Addresses as per the latest Amazon Redshift UI. |
| Feb-18-2025 |
NA |
Updated the Destination Considerations section to:
- Remove the consideration about the Super data type.
- Add the consideration about the COPY command. |
| Sep-02-2024 |
NA |
Updated section, Create a Database (Optional) as per the latest Amazon Redshift UI. |
| Sep-04-2023 |
NA |
Updated the page contents to reflect the latest Amazon Redshift user interface (UI). |
| Aug-11-2023 |
NA |
Fixed broken links. |
| Apr-25-2023 |
2.12 |
Updated section, Configure Amazon Redshift as a Destination to add information that you must specify all fields to create a Pipeline. |
| Feb-20-2023 |
2.08 |
Updated section, Configure Amazon Redshift as a Destination to add steps for using the connection string to automatically fetch the database credentials. |
| Oct-10-2022 |
NA |
Added sections:
- Set up an Amazon Redshift Instance
- Create a Database
|
| Sep-21-2022 |
NA |
Added a note in section, Configure Amazon Redshift as a Destination. |
| Mar-07-2022 |
NA |
Updated the section, Destination Considerations for actions to be taken when Enhanced VPC Routing is enabled. |
| Feb-07-2022 |
1.81 |
Updated section, Whitelist Hevo’s IP Address to remove details about Outbound rules as they are not required. |
| Nov-09-2021 |
NA |
Updated section, Step 2. Create a Database User and Grant Privileges, with the list of commands to be run for granting privileges to the user. |
| Oct-25-2021 |
1.74 |
Added sections:
- Handling Source Data with JSON Fields.
- Destination Considerations.
Updated sections:
- Limitations to add the limitation about Hevo mapping only JSON fields.
- See Also. |
| Apr-06-2021 |
1.60 |
- Added section, Handling Source Data with Different Data Types. |
| Feb-22-2021 |
NA |
- Added the limitation that Hevo does not support writing to tables that have identity columns.
- Updated the page overview to state that the Pipeline stages the ingested data in Hevo’s S3 bucket, from where it is finally loaded to the Destination.
- Revised the procedural sections to include detailed steps for configuring the Amazon Redshift Destination. |


