Amazon RDS for Oracle is a fully managed commercial database that makes it easy to set up, operate, and scale Oracle deployments in the cloud. Amazon RDS frees you up to focus on innovation and application development by managing time-consuming database administration tasks including provisioning, backups, software patching, monitoring, and hardware scaling.
Refer to Oracle on Amazon RDS for the supported Oracle database versions.
Prerequisites
-
Oracle database version is 12c or above.
-
Redo Log replication is enabled, if ingestion mode is RedoLog.
Note: Hevo supports Redo Log ingestion mode for Oracle database 19c and higher in Pipelines created after Release 1.96.
-
Hevo’s IP addresses are whitelisted. The database user must have
CREATE/MANAGE SECURITY GROUPSprivileges in Amazon RDS to do this. -
Database hostname and port number of the Source instance are available.
-
You are assigned the Team Administrator, Team Collaborator, or Pipeline Administrator role in Hevo, to create the Pipeline.
Perform the following steps to configure your Amazon RDS Oracle Source:
Set up Redo Logs for Replication
A redo log is a collection of log files that record information about modifications made to data objects on an Oracle server instance. Oracle LogMiner uses redo logs to track these modifications and determine the rows requiring updates in the Destination system.
To set up redo logs for replication, connect to your Oracle server and perform the following steps:
1. Enable ARCHIVE Log
You need to enable archiving for redo logs.
To do this:
-
Check the current log mode. This should be
ARCHIVELOG.SELECT LOG_MODE FROM "V$DATABASE"; -
Enable
ARCHIVELOGmode if the current log mode isNOARCHIVELOG.BEGIN rdsadmin.rdsadmin_util.set_configuration('archivelog retention hours', 72); END;Note: The minimum value for
archivelog retention hoursis 72. The archive log retention must be 72 hours at a minimum. This avoids any data loss that may occur due to downtimes in the Source database.
2. Enable supplemental logging
Supplemental logging ensures that the Oracle server logs all the columns of every changed Event.
-
Check if supplemental logging is enabled:
SELECT SUPPLEMENTAL_LOG_DATA_MIN FROM "V$DATABASE";This returns either of the following values:
-
YES: Represents that the supplemental logging is enabled. -
IMPLICIT: Represents that the supplemental logging is disabled.
-
-
If the value returned in the previous step is
IMPLICIT, enable supplemental logging of primary key columns :BEGIN rdsadmin.rdsadmin_util.alter_supplemental_logging('ADD','ALL'); END; -
Optionally, if you’re using Oracle 12, grant the following permission:
GRANT LOGMINING TO "<user_name>";
Whitelist Hevo’s IP Addresses
You need to whitelist the Hevo IP address for your region to enable Hevo to connect to your Amazon RDS Oracle database. You can do this by creating a VPC security group and adding inbound and outbound access rules for the Hevo IP addresses. A VPC group controls access to the database instances and virtual server instances inside a VPC. To do this:
1. Create a VPC security group
-
Access the Amazon RDS console.
-
In the left navigation pane, under Dashboard, select Databases (or Instances if you are using an older version).
-
In the Databases section on the right, select the read replica or master database instance that you want to connect.

-
In the Connectivity & security tab, click the hyperlink under Security, VPC security groups.

-
On the Security Groups page, click Create security group.
You can also select an existing group, which you have used for other database instances, and modify it.

-
On the Create security group page, specify the following:
-
Security group name: An appropriate name for the security group.
-
Description: A brief description of the security group.
-
VPC ID: A unique identifier for the VPC.
-
2. Add inbound rules
In the Inbound Rules section:
-
Click Add rule and specify the following:

-
Port range: The port of your Amazon RDS Oracle instance. For example, 1521.
-
Source: Select Custom from the drop-down and enter Hevo’s IP addresses for your region.
-
-
Add more rules for all the Hevo IPs you want to whitelist.
-
Click Create security group.
Create a Database User and Grant Privileges
You can log in to Oracle as a masteruser or create a new database user for Hevo.
1. Create a database user (optional)
If a database user does not exist already, create a database user by logging in to Oracle as a masteruser and entering the following commands:
CREATE USER "hevo" IDENTIFIED BY "password";
GRANT CONNECT, CREATE SESSION TO "hevo";
2. Grant privileges to the user
The database user you specify in the Hevo Pipeline must have the SELECT privilege.
To assign this privilege, log in to Oracle as a masteruser or a user with GRANT privilege and enter the following commands:
-
Grant SELECT privilege to all or specific tables:
-- Grant access to all tables GRANT SELECT ANY TABLE TO "hevo"; -- Grant access to specific tables GRANT SELECT ON "<schema>"."<table>" TO "hevo"; -
Optionally, if you are using Redo Logs as the Pipeline mode, grant access to Oracle LogMiner:
GRANT SELECT ON SYS.V_$DATABASE TO "hevo";
GRANT SELECT ON SYS.V_$ARCHIVED_LOG TO "hevo";
GRANT SELECT ON SYS.V_$LOGMNR_CONTENTS TO "hevo";
GRANT EXECUTE ON DBMS_LOGMNR TO "hevo";
GRANT EXECUTE ON DBMS_LOGMNR_D TO "hevo";
Now you can try connecting to Oracle using Redo Logs pipeline mode, with the user configured in the above steps.
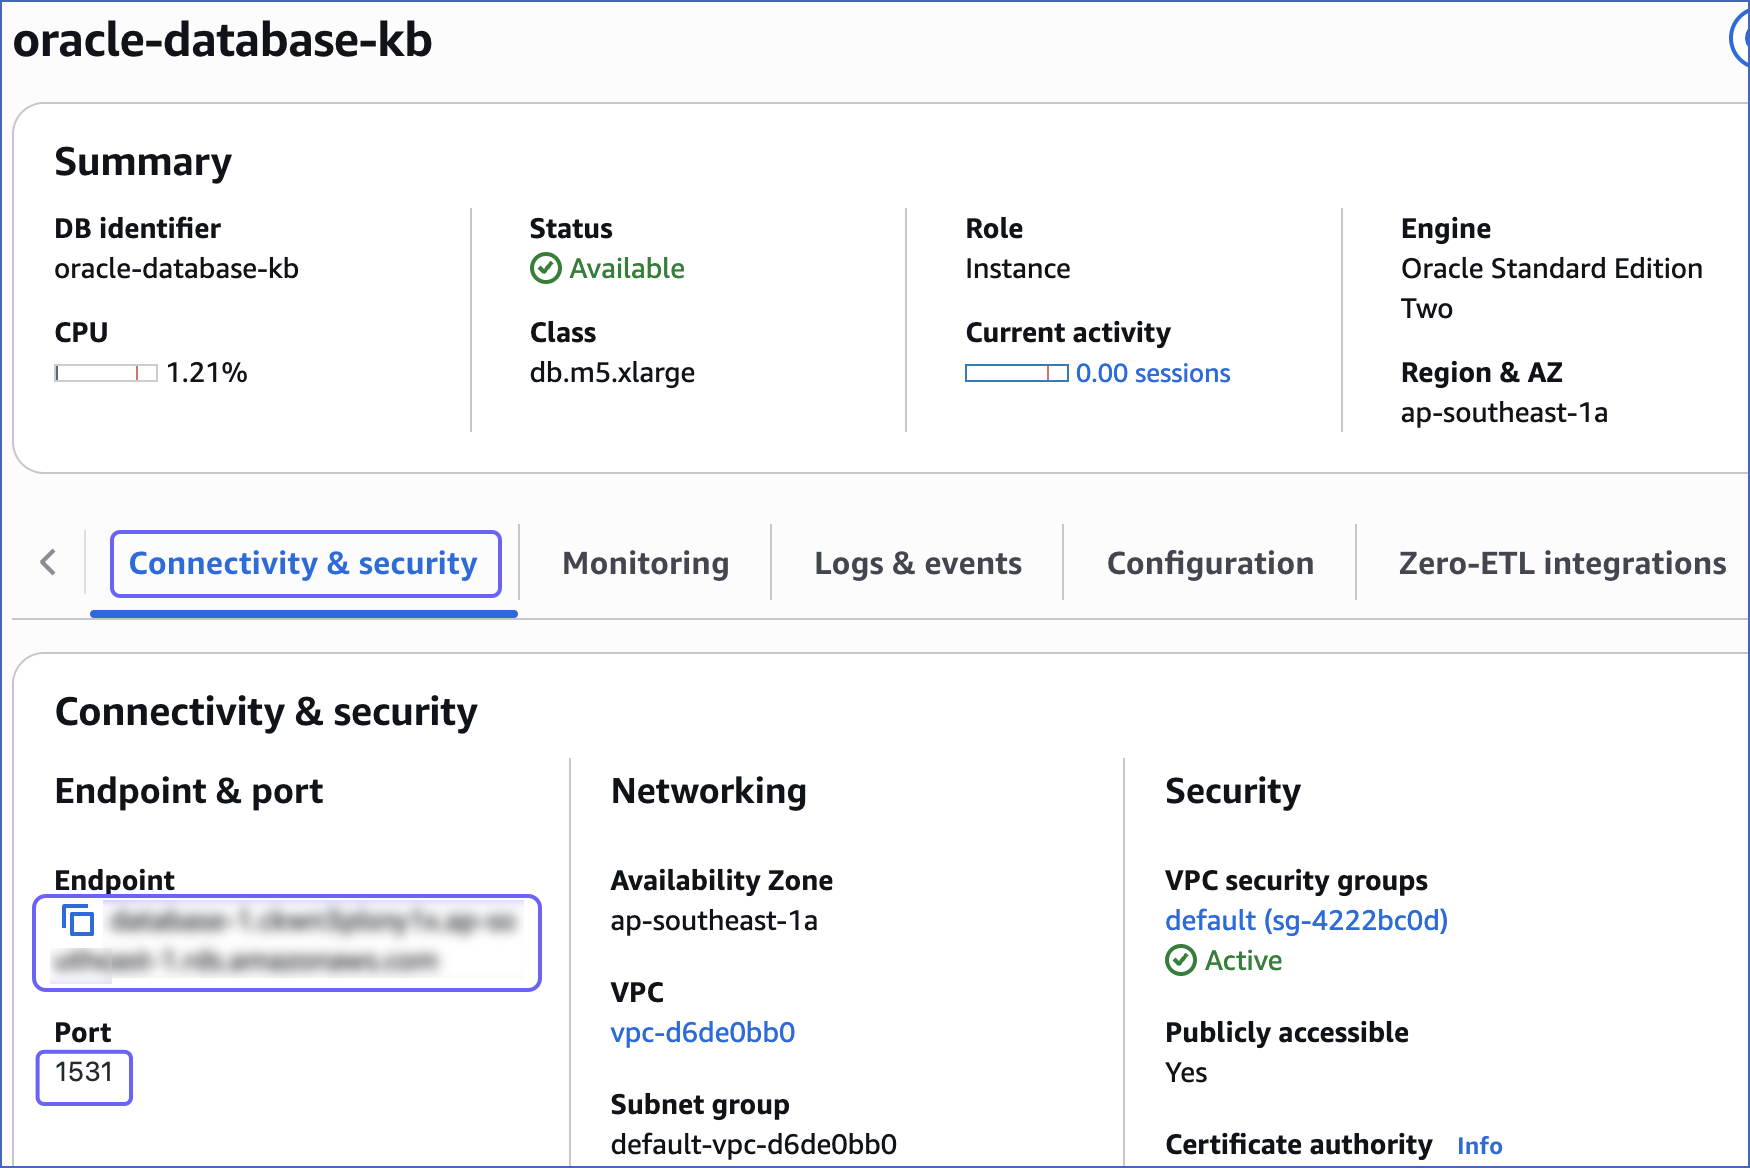
Retrieve the Hostname, Service ID, and Port Number
Note: The RDS hostnames start with your database name and end with rds.amazonaws.com.
For example:
Host: oracle-database-1.xxxxxxxxx.rds.amazonaws.com
Service ID: ORCL
Port: 1521
-
In the left navigation pane of the Amazon RDS console, click Databases (or Instances if you are using an older version).
-
In the Databases section on the right, click the DB identifier of the Amazon RDS Oracle instance.
-
Click the Connectivity & security tab, and copy the values under Endpoint and Port as the hostname and port number. You will specify these while creating your Hevo Pipeline.
-
Click the Configuration tab, and copy the value under DB name. You will use this DB name as the Service Name while creating your Pipeline.

Specify Amazon RDS Oracle Connection Settings
Perform the following steps to configure Amazon RDS Oracle as a Source in Hevo:
-
Click PIPELINES in the Navigation Bar.
-
Click + Create Pipeline in the Pipelines List View.
-
On the Select Source Type page, select Amazon RDS Oracle.
-
On the Select Destination Type page, select the type of Destination you want to use.
-
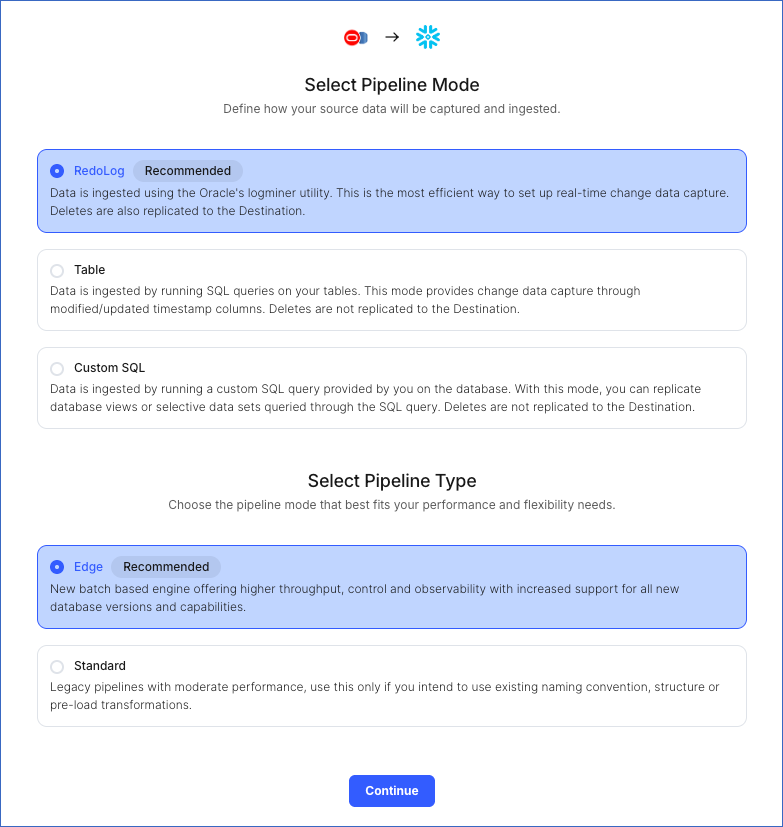
On the page that appears, do the following:
-
Select Pipeline Mode: Choose the mode for ingesting data from the Source. Default value: RedoLog. The available modes are RedoLog, Table, and Custom SQL.
Depending on the Pipeline mode you select, you must configure the objects to be replicated. Refer to section, Object and Query Mode Settings for the steps to do this.
Note: For Custom SQL Pipeline mode, all Events loaded to the Destination are billable.
-
Select Pipeline Type: Choose the type of Pipeline you want to create based on your requirements, and then click Continue.
-
If you select Edge, read Amazon RDS Oracle to configure your Edge Pipeline.
-
If you select Standard, skip to step 6 below.
This section is displayed only if all the following conditions are met:
-
The selected Destination type is supported in Edge.
-
The Pipeline mode is set to RedoLog.
-
Your Team was created before September 15, 2025, and has an existing Pipeline created with the same Destination type and Pipeline mode.
For Teams that do not meet the above criteria, if the selected Destination type is supported in Edge and the Pipeline mode is set to RedoLog, you can proceed to create an Edge Pipeline. Read Amazon RDS Oracle to configure your Edge Pipeline. Otherwise, you can proceed to create a Standard Pipeline.
-
-
-
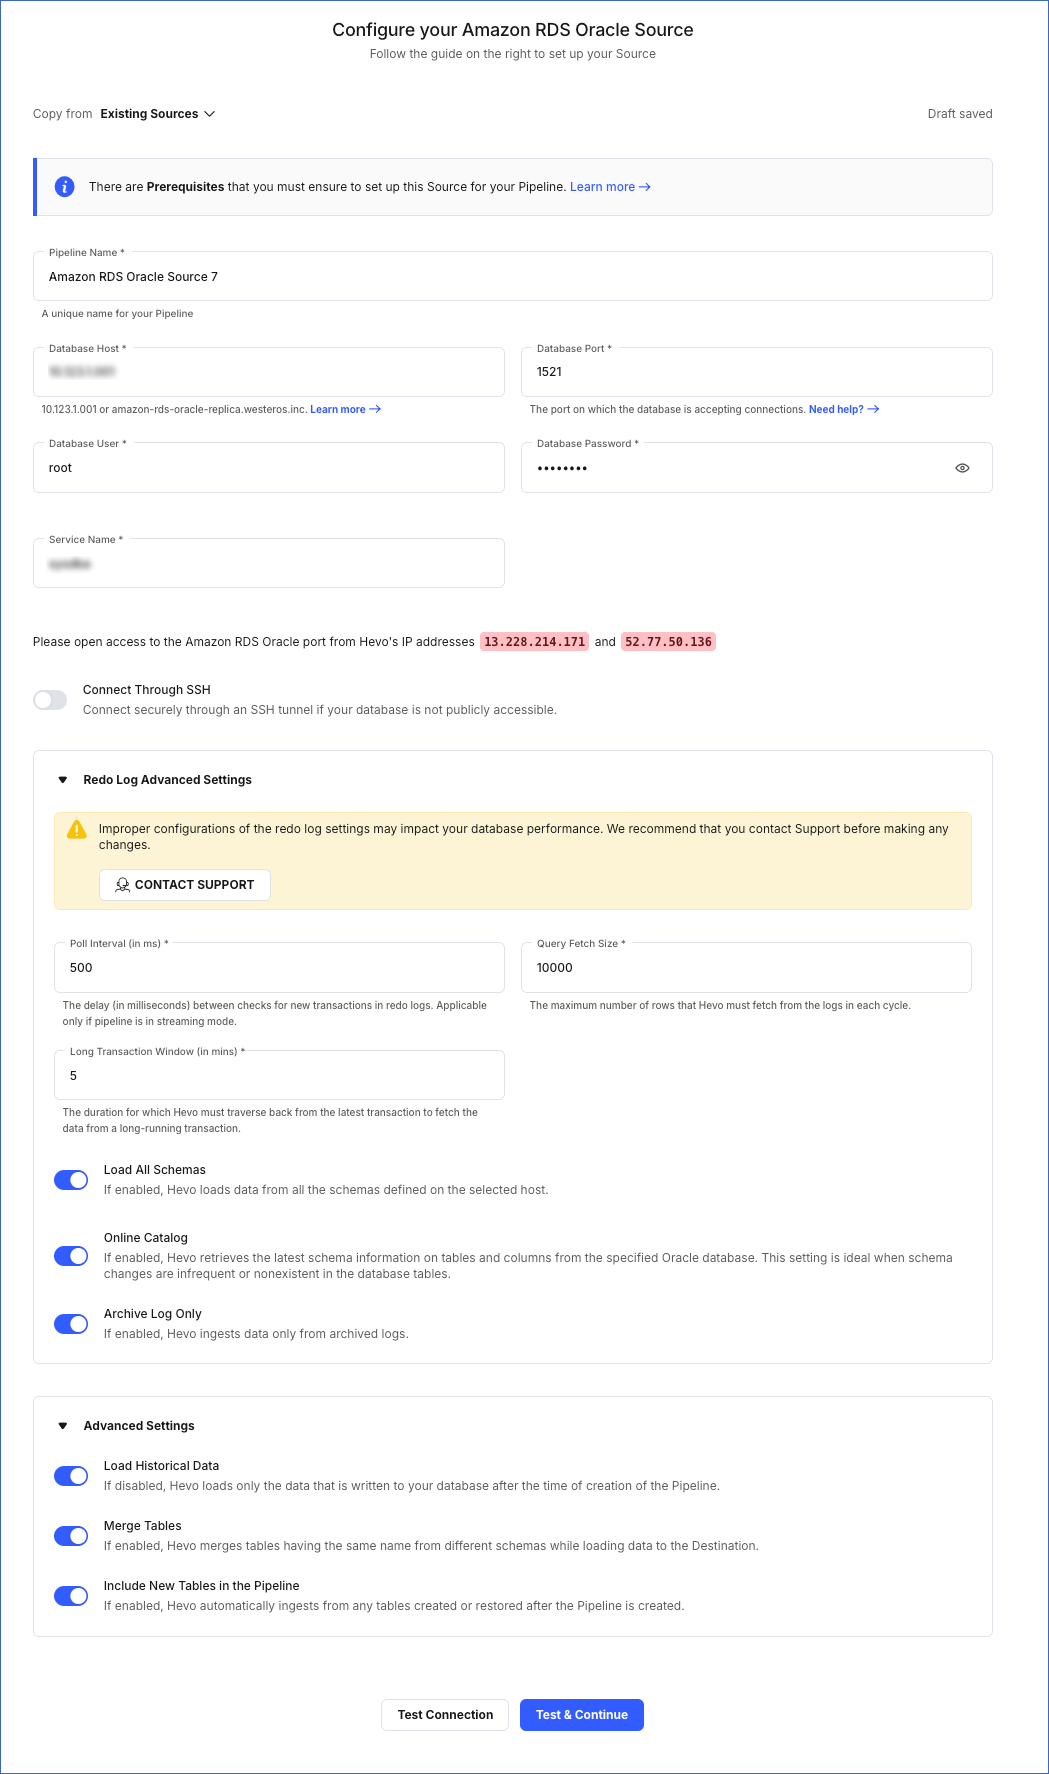
On the Configure your Amazon RDS Oracle Source page, specify the following:
-
Pipeline Name: A unique name for your Pipeline, not exceeding 255 characters.
-
Database Host: The Oracle database host’s IP address or DNS.
The following table lists a few examples of Oracle hosts:
Variant Host Amazon RDS Oracle oracle-rds-1.xxxxx.rds.amazonaws.com Generic Oracle 192.168.2.5 Note: For URL-based hostnames, exclude the http:// or https:// part. For example, if the hostname URL is https://oracle-rds-1.xxxxx.rds.amazonaws.com, enter oracle-rds-1.xxxxx.rds.amazonaws.com.
-
Database Port: The port on which your Amazon RDS Oracle server listens for connections. Default value: 1521.
-
Database User: The authenticated user who has the permissions to read tables in your database.
-
Database Password: The password for the database user.
-
Redo Log Advanced Settings: This section is applicable if RedoLog is selected as an ingestion mode:
Note: Any modification in the default value of the following settings may impact your database performance. We recommend that you contact Hevo Support before making any changes.
-
Poll Interval (in ms): The delay in milliseconds between the checks that Hevo makes to search for new transactions in the redo logs. Default value: 500.
-
Query Fetch Size: The maximum number of rows that Hevo fetches from the logs in each query. Default value: 10,000.
-
Long Transaction Window (in mins): The duration in minutes that Hevo must traverse back from the current transaction to fetch the data in a long-running transaction. Default value: 5.
Note: Increasing the default value can lead to increased memory consumption by the Source database during log mining sessions.
-
Load All Schemas: If enabled, Hevo loads data for all the schemas.
If disabled, Hevo loads data from the schema(s) that you specify in a comma-separated list.
-
Online Catalog: If enabled, Hevo retrieves the updated schema information from the specified Oracle database. This setting is ideal when schema changes are infrequent or nonexistent in the database tables.
If disabled, Hevo retrieves the schema information from the copy that Hevo maintains.
Note: This option is non-editable post-Pipeline creation.
-
Archive Log Only: If enabled, Hevo ingests data only from the archived redo logs.
If disabled, Hevo ingests data from the archived and online redo logs.
-
-
Connect through SSH: Enable this option to connect to Hevo using an SSH tunnel, instead of directly connecting your Oracle database host to Hevo. This provides an additional level of security to your database by not exposing your Oracle setup to the public. Read Connecting Through SSH. To set up an SSH tunnel for your Amazon RDS Oracle database hosted on Amazon Web Services (AWS), read Configuring an SSH Tunnel.
If this option is disabled, you must whitelist Hevo’s IP addresses to allow Hevo to connect to your Oracle database host. Refer to the content for your Oracle variant for steps to do this.
-
Advanced Settings:
-
Load Historical Data: Applicable for Pipelines created with RedoLog or Table mode. If this option is enabled, the entire table data is fetched during the first run of the Pipeline. If disabled, Hevo loads only the records written to your database after the Pipeline was created.
-
Merge Tables: If enabled, Hevo merges tables with the same name from different databases while loading the data to the warehouse. Hevo loads the Database Name field with each record.
If disabled, Hevo adds the database name as prefix to each table name. Read How does the Merge Tables feature work?.
This option is applicable only for Pipelines with RedoLog mode.
-
Include New Tables in the Pipeline: Applicable for all ingestion modes except Custom SQL.
If enabled, Hevo automatically ingests data from tables created in the Source after the Pipeline has been built. These may include completely new tables or previously deleted tables that have been re-created in the Source. All data for these tables is ingested using database logs, making it incremental.
If disabled, new and re-created tables are not ingested automatically. They are added in SKIPPED state in the objects list, on the Pipeline Overview page. You can update their status to INCLUDED to ingest data.
You can change this setting later.
-
-
-
Click Test Connection. This button is enabled once you specify all the mandatory fields. Hevo’s underlying connectivity checker validates the connection settings you provide.
-
Click Test & Continue to proceed for setting up the Destination. This button is enabled once you specify all the mandatory fields.
Object and Query Mode Settings
Once you have specified the Source connection settings in Step 5 above, do one of the following:
-
For Pipelines configured with the Table or RedoLog mode:
-
On the Select Objects page, select the objects you want to replicate and click Continue.

Note:
-
Each object represents a table in your database.
-
From Release 2.19 onwards, for log-based Pipelines, you can keep the objects listed on the Select Objects page deselected by default. In this case, when you skip object selection, all objects are skipped for ingestion, and the Pipeline is created in the Active state. You can include the required objects post-Pipeline creation. Contact Hevo Support to enable this option for your teams.
-
-
On the Configure Objects page, specify the query mode you want to use for each selected object.

-
-
For Pipelines configured with the Custom SQL mode:
-
On the Provide Query Settings page, enter the custom SQL query to fetch data from the Source.
-
In the Query Mode drop-down, select the query mode, and click Continue.

-
Data Replication
| For Teams Created | Ingestion Mode | Default Ingestion Frequency | Minimum Ingestion Frequency | Maximum Ingestion Frequency | Custom Frequency Range (in Hrs) |
|---|---|---|---|---|---|
| Before Release 2.21 | Table | 15 Mins | 5 Mins | 24 Hrs | 1-24 |
| Log-based | 5 Mins | 5 Mins | 1 Hr | NA | |
| After Release 2.21 | Table | 6 Hrs | 30 Mins | 24 Hrs | 1-24 |
| Log-based | 30 Mins | 30 Mins | 12 Hrs | 1-24 |
Note: The custom frequency must be set in hours as an integer value. For example, 1, 2, or 3 but not 1.5 or 1.75.
-
Historical Data: In the first run of the Pipeline, Hevo ingests all available data for the selected objects from your Source database.
-
Incremental Data: Once the historical load is complete, data is ingested as per the ingestion frequency.
Additional Information
Read the detailed Hevo documentation for the following related topics:
Limitations
-
Hevo does not support the flashback method to track incremental updates.
-
Redo Log does not support user-defined data types. Therefore, fields with such data types are not captured in the log and are lost.
-
Hevo does not load data from a column into the Destination table if its size exceeds 16 MB, and skips the Event if it exceeds 40 MB. If the Event contains a column larger than 16 MB, Hevo attempts to load the Event after dropping that column’s data. However, if the Event size still exceeds 40 MB, then the Event is also dropped. As a result, you may see discrepancies between your Source and Destination data. To avoid such a scenario, ensure that each Event contains less than 40 MB of data.
See Also
Revision History
Refer to the following table for the list of key updates made to this page:
| Date | Release | Description of Change |
|---|---|---|
| Nov-12-2025 | NA | Updated the document as per the latest Hevo UI. |
| Oct-27-2025 | NA | Updated sections, Retrieve the Hostname, Service ID, and Port Number and Whitelist Hevo’s IP Address as per the latest Amazon RDS UI. |
| Oct-13-2025 | NA | Updated section, Specify Amazon RDS Oracle Connection Settings to clarify when the Select Pipeline Type section is displayed during Pipeline configuration. |
| Oct-09-2025 | NA | Updated section, Specify Amazon RDS Oracle Connection Settings to mention that the Load Historical Data option is also applicable for Pipelines created with Table mode. |
| Sep-18-2025 | NA | Updated section, Specify Amazon RDS Oracle Connection Settings as per the latest UI. |
| Aug-1-2025 | NA | Added clarification that data ingested from new and re-created tables is billable. |
| Jul-07-2025 | NA | Updated the Limitations section to inform about the max record and column size in an Event. |
| Jan-07-2025 | NA | Updated the Limitations section to add information on Event size. |
| Nov-18-2024 | NA | Updated section, Specify Amazon RDS Oracle Connection Settings as per the latest Hevo UI. |
| Apr-29-2024 | NA | Updated section, Specify Amazon RDS Oracle Connection Settings to include more detailed steps. |
| Mar-05-2024 | 2.21 | Added the Data Replication section. |
| Jan-22-2024 | 2.19.2 | Updated section, Object and Query Mode Settings to add a note about the enhanced object selection flow available for log-based Pipelines. |
| Jan-10-2024 | 2.19 | Updated section, Specify Amazon RDS Oracle Connection Settings as per latest Hevo functionality. |
| Nov-03-2023 | NA | Added section, Object and Query Mode Settings. |
| Apr-21-2023 | NA | Updated section, Specify Amazon RDS Oracle Connection Settings to add a note to inform users that all loaded Events are billable for Custom SQL mode-based Pipelines. |
| Mar-09-2023 | 2.09 | Updated section, Specify Amazon RDS Oracle Connection Settings to mention about SEE MORE in the Select an Ingestion Mode section. |
| Dec-19-2022 | 2.04 | Updated section, Specify Amazon RDS Oracle Connection Settings to add information that you must specify all fields to create a Pipeline. |
| Dec-07-2022 | 2.03 | Updated section, Specify Oracle Connection Settings to mention about including skipped objects post-Pipeline creation. |
| Dec-07-2022 | 2.03 | Updated section, Specify Oracle Connection Settings to mention about the connectivity checker. |
| Feb-07-2022 | 1.81 | Updated section, Whitelist Hevo’s IP Address to remove details about Outbound rules as they are not required. |
| Dec-06-2021 | 1.77 | Added a See Also link to the Pipeline failure due to Redo Log expiry page. |
| Nov-22-2021 | NA | Updated the Limitations section. |
| Mar-09-2021 | 1.58 | Added section Retrieve the Hostname, Service ID, and Port Number. |