Azure Blob Storage is Microsoft’s object storage service for the cloud. It holds large amounts of unstructured data, such as files, as blobs in containers within a storage account.
Hevo replicates data from CSV and TSV files in an Azure Blob Storage container into the Destination of your choice. You define rules that determine the folders to read files from, the format of those files, and how the files are mapped to tables in your Destination. Hevo supports storage accounts with or without a hierarchical namespace, which is the storage type that Azure Data Lake Storage uses.
Hevo supports the following authentication methods to connect to Azure Blob Storage:
-
Microsoft Entra ID: Uses an application that you register in Microsoft Entra ID to connect, with a client secret or a client certificate. The application can read only the containers on which you assign it the Storage Blob Data Reader role, and the connection does not depend on any individual user’s account.
-
Shared Access Signature (SAS): Uses a shared access signature that you generate for your storage account to connect. The SAS grants read and list access to the containers in the storage account until it expires.
Supported Features
| Feature Name | Supported |
|---|---|
| Capture deletes | No |
| Data blocking (skip objects and fields) | Yes |
| Resync (objects and Pipelines) | Yes |
| API configurable | No |
| File encoding | UTF-8 |
Prerequisites
-
An active Azure subscription exists, with a storage account and a container in it that contains the CSV or TSV files from which data is to be ingested.
-
The storage account name and container name are available.
-
If you are connecting to Azure Blob Storage using:
-
Microsoft Entra ID:
-
You have the permission to register an application in Microsoft Entra ID. By default, all users have this permission. If your administrator has restricted it, you need the Application Developer role.
-
You are assigned the Owner, User Access Administrator, or Role Based Access Control Administrator role on the storage account or container to assign the Storage Blob Data Reader role to your application.
-
The application credentials are available to provide Hevo access to your Azure Blob Storage data.
-
-
Shared Access Signature (SAS):
-
Storage account key access is enabled for your storage account, as Azure signs an account SAS with the storage account key.
-
The SAS connection string or Blob service SAS URL is available to provide Hevo access to your Azure Blob Storage data.
-
-
-
If the network settings of your storage account restrict public access, the settings allow connections from Hevo’s IP addresses for your region.
Obtain the Storage Account and Container Names
Hevo reads files from a single container in your storage account. Perform the following steps to obtain the names of the storage account and the container:
-
Log in to the Azure portal.
-
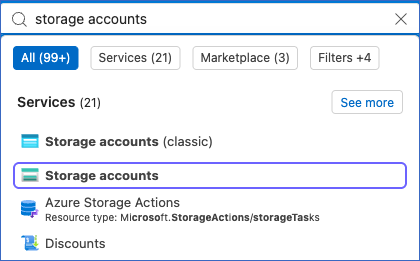
In the top search bar, search for and select Storage accounts.
-
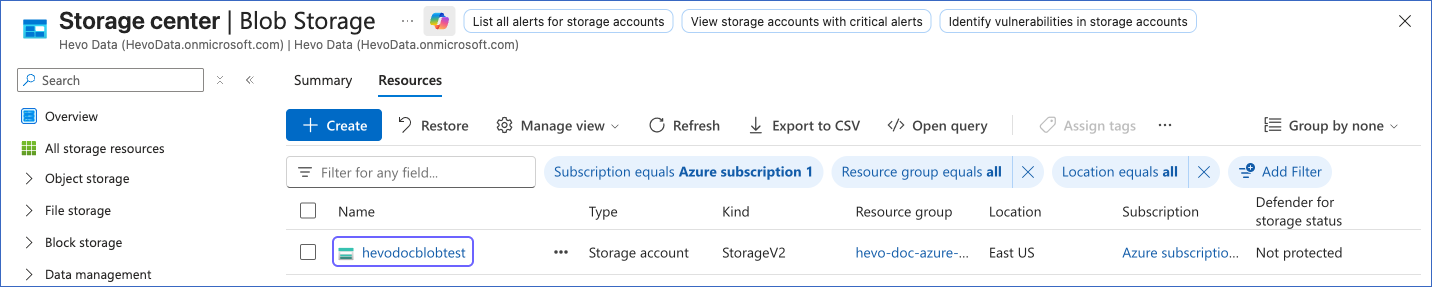
On the Blob Storage page, click the storage account that contains your files. For example, hevodocblobtest. Copy the name of the storage account, and save it securely.
-
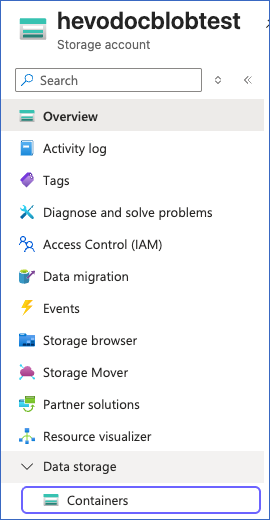
In the left navigation pane of your storage account page, under Data storage, click Containers.
-
On the Containers page, copy the name of the container that contains your files, and save it securely. For example, hevo-doc-test.
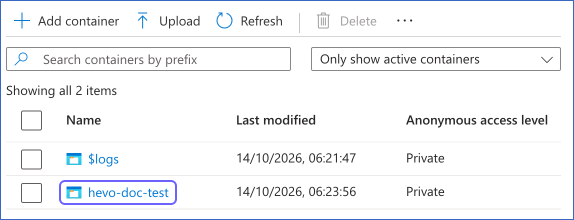
Use these values while configuring your Azure Blob Storage Source in the Hevo Pipeline.
Set up Microsoft Entra ID Authentication
Note: Perform the steps in this section only if you want to connect to Azure Blob Storage using Microsoft Entra ID. Otherwise, skip to the Generate a Shared Access Signature section.
To connect to Azure Blob Storage using Microsoft Entra ID, you need to do the following:
-
Register an application in Microsoft Entra ID that Hevo authenticates as.
-
Generate the application credentials, a client secret or a client certificate, that you want Hevo to use to authenticate as the application.
-
Assign the Storage Blob Data Reader role to the application on your container, so that the application can read your files.
1. Register an Application in Microsoft Entra ID
Microsoft Entra ID is Microsoft’s cloud-based identity and access management service. Register an application in it that you want Hevo to use to connect to your storage account. You can use one application for all your Pipelines. To do this, perform the following steps:
-
Log in to the Azure portal.
-
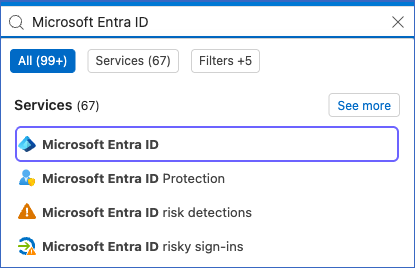
In the top search bar, search for and select Microsoft Entra ID.
-
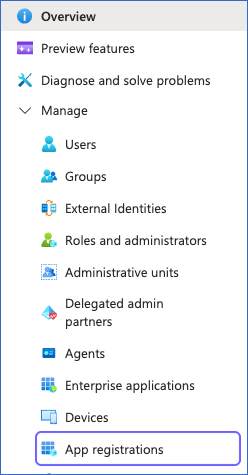
In the left navigation pane, under Manage, click App registrations.
-
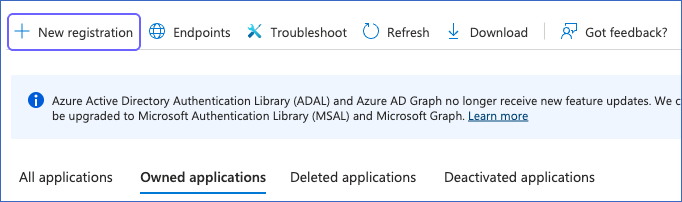
On the App registrations page, click + New registration.
-
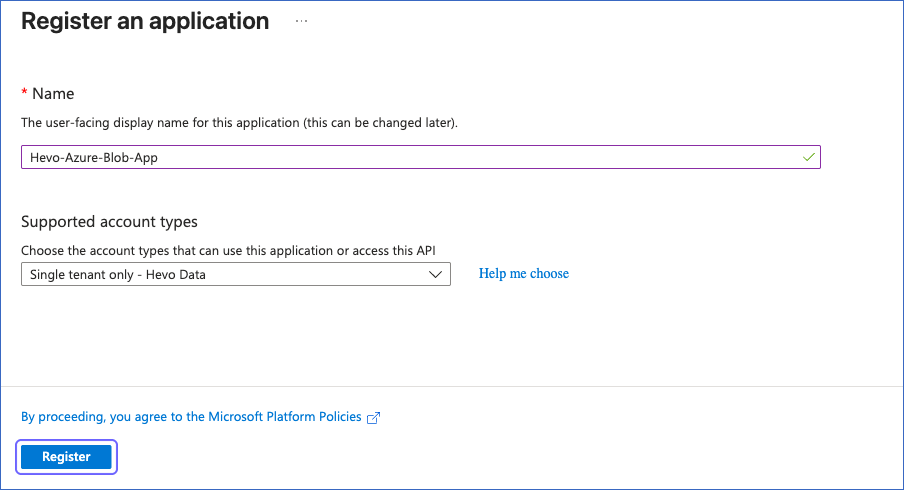
On the Register an application page, do the following:
-
Specify the following:
-
Name: A unique name for your application. For example, Hevo-Azure-Blob-App.
-
Supported account types: Select Single tenant only - <your organization>. This is the default option.
-
-
Click Register.
-
-
On the Overview page of your application, in the Essentials section, copy the Application (client) ID and Directory (tenant) ID, and save them securely like any other password.

Use these values while configuring your Azure Blob Storage Source in the Hevo Pipeline.
You have successfully registered an application. Proceed to generate the application credentials.
2. Generate the Application Credentials
To connect through your application, Hevo uses a client secret or a client certificate. Generate one of these based on your organization’s security policy.
Generate a client secret
A client secret is a confidential string that your application uses to prove its identity to Microsoft Entra ID. You generate it in your application and provide its value to Hevo. You can either use an existing client secret or create one if required.
Perform the following steps to generate a client secret for your application:
-
Log in to the Azure portal.
-
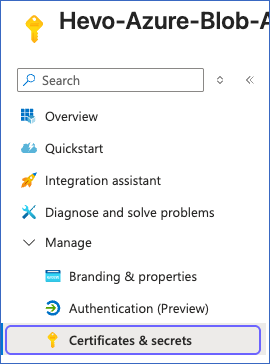
In the left navigation pane of your application page, under Manage, click Certificates & secrets.
-
In the Client secrets tab, click + New client secret.

-
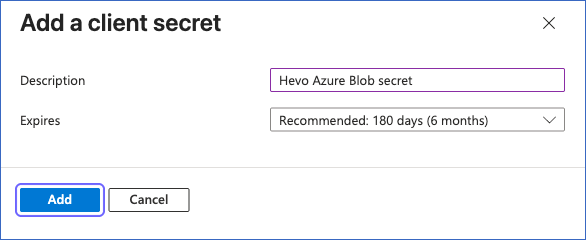
On the Add a client secret slide-in page, do the following:
-
Specify the following:
-
Description: A suitable text to describe the purpose of the client secret.
-
Expires: The period after which the client secret expires. Default value: Recommended: 180 days (6 months).
-
-
Click Add.
-
-
In the Client secrets tab, click the Copy to clipboard icon next to the secret’s Value, and save it securely like any other password. Use this value as the client secret while configuring your Pipeline.

Note: Microsoft displays the secret value only once. If you leave the page without copying it, you must create a new client secret.
You have successfully generated a client secret. Proceed to assign the Storage Blob Data Reader role to your application.
Note: If the client secret configured in the Pipeline expires or is deleted from your application, Hevo cannot authenticate with your storage account. As a result, no data is ingested. To resume data replication, create a client secret and modify the Source configuration in the Pipeline with the new value. Once the updated secret is saved, Hevo re-authenticates the Source, and data ingestion resumes.
Generate a client certificate
A client certificate consists of a public certificate that you upload to your application in Microsoft Entra ID and a private key that you provide to Hevo. You can use an existing certificate or create a self-signed one.
Perform the following steps to create a certificate and upload it to your application:
-
Run the following command in a terminal to create a self-signed certificate and a private key that are valid for 365 days:
openssl req -x509 -newkey rsa:2048 -keyout private_key.pem -out certificate.pem -days 365 -nodes -subj "/CN=Hevo Azure Blob"This command creates the following files:
-
certificate.pem: The public certificate, which you upload to your application in Microsoft Entra ID. It identifies your application and can be shared.
-
private_key.pem: The private key that belongs to the certificate, which you provide to Hevo. Hevo uses it to prove that it holds the certificate. Keep this file confidential.
Note: To protect the private key with a passphrase, remove
-nodesfrom the command. You are prompted to specify the passphrase.
-
-
Log in to the Azure portal.
-
In the left navigation pane of your application page, under Manage, click Certificates & secrets.
-
In the Certificates tab, click Upload certificate.

-
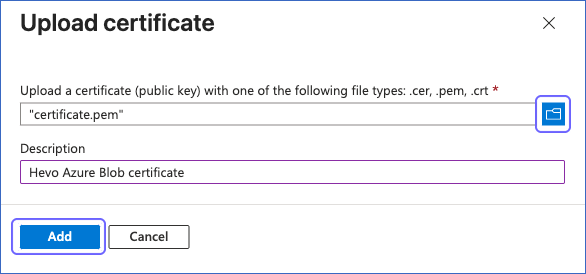
On the Upload certificate slide-in page, do the following:
-
Select the certificate.pem file and specify a Description for it.
-
Click Add.
-
Save the private_key.pem file in a secure location. Provide it, along with the certificate.pem file and the passphrase, if you specified one, while configuring your Azure Blob Storage Source in the Hevo Pipeline.
You have successfully generated a client certificate. Proceed to assign the Storage Blob Data Reader role to your application.
3. Assign the Storage Blob Data Reader Role to the Application
The Storage Blob Data Reader role allows your application to list and read the blobs in a container. Assign this role to your application on the container from which you want to ingest data. You must do this once for each container.
Perform the following steps to assign the role:
-
Log in to the Azure portal.
-
In the top search bar, search for and select Storage accounts.
-
On the Blob Storage page, click the storage account that contains your files.
-
In the left navigation pane of your storage account page, under Data storage, click Containers.
-
On the Containers page, click the container that contains your files.
-
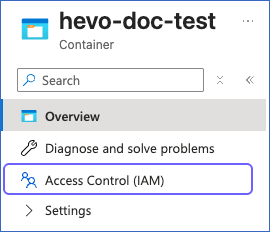
In the left navigation pane of your container page, click Access Control (IAM).
-
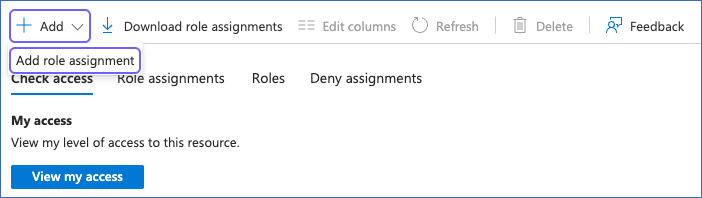
On the Access Control (IAM) page, click + Add, and then click Add role assignment.
-
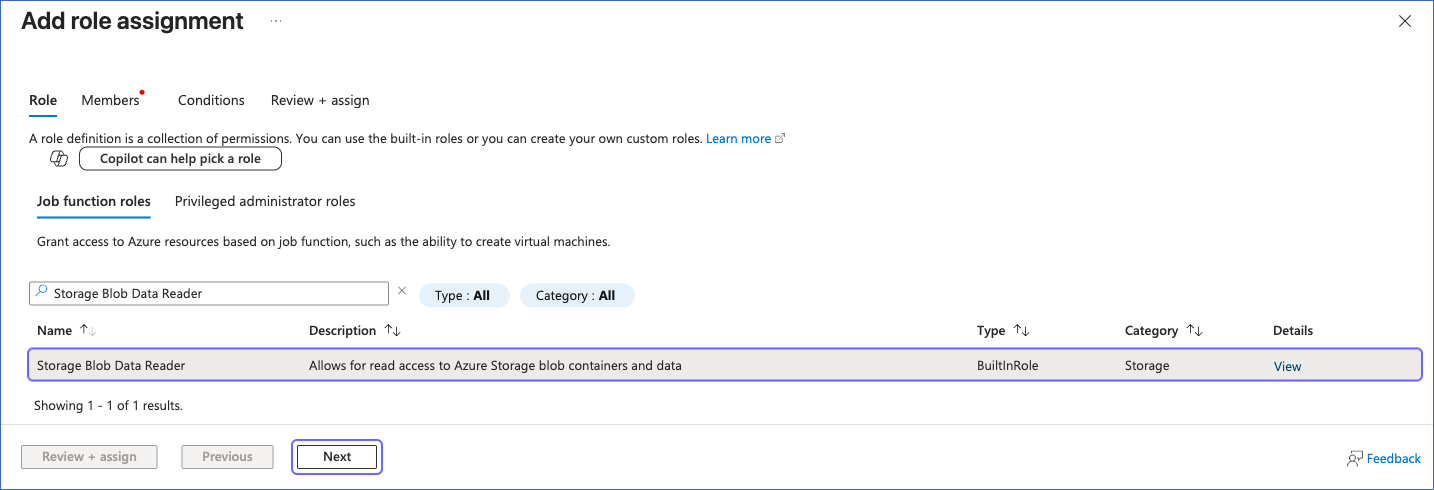
In the Role tab of the Add role assignment page, search for and select Storage Blob Data Reader, and then click Next.
-
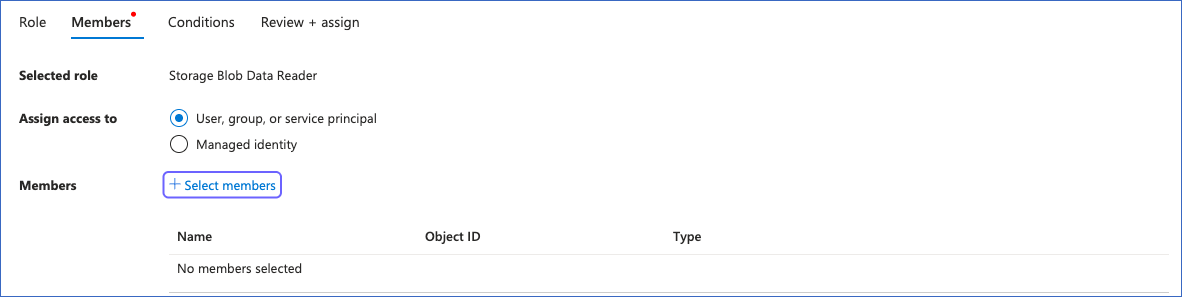
In the Members tab, ensure that User, group, or service principal is selected, and then click + Select members.
-
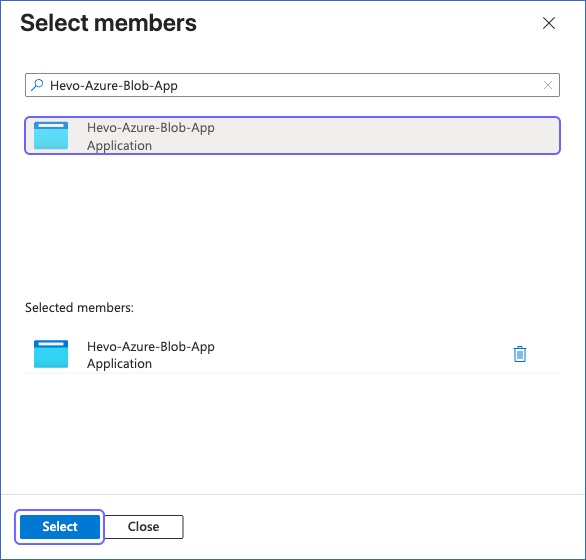
On the Select members slide-in page, search for and select the application that you registered in the Register an Application in Microsoft Entra ID section, and then click Select.
-
Click Review + assign to review the role assignment, and then click Review + assign again to assign the role.
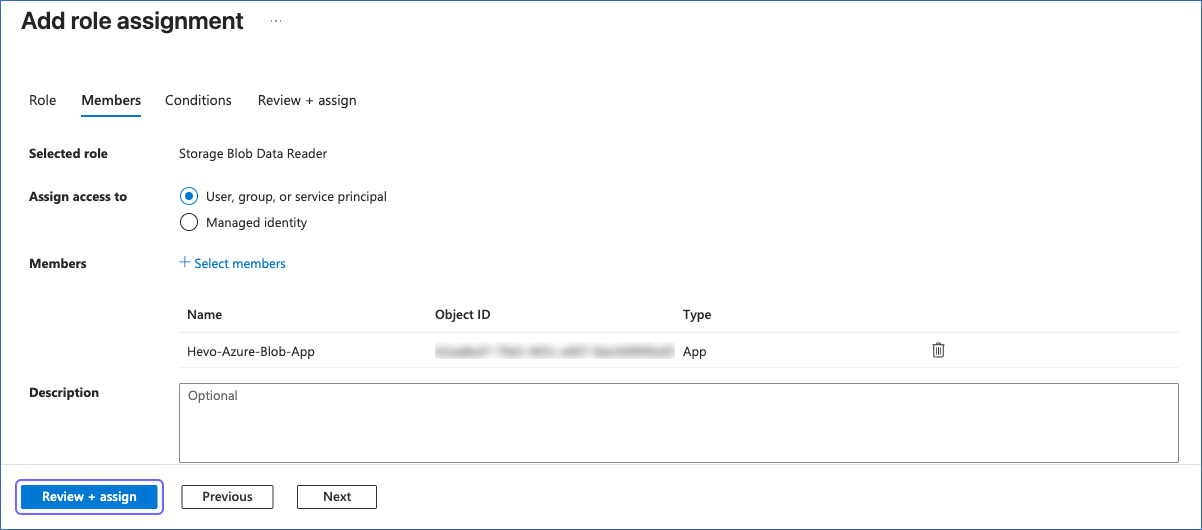
You have successfully assigned the Storage Blob Data Reader role to your application. Proceed to configure Azure Blob Storage as a Source in your Pipeline.
Note: A role assignment can take a few minutes to take effect. When you configure Azure Blob Storage as a Source in your Pipeline right after you assign the role, the connection test may fail with an access denied error. In this case, wait a few minutes and try again. Read Role assignment changes are not being detected for more information.
Generate a Shared Access Signature
Note: Perform the steps in this section only if you want to connect to Azure Blob Storage using a shared access signature (SAS).
A shared access signature (SAS) is a token that grants restricted access to the resources in your storage account for a specified period. Hevo uses an account SAS with read and list permissions on the blobs in your storage account. Perform the following steps to generate it:
-
Log in to the Azure portal.
-
In the top search bar, search for and select Storage accounts.
-
On the Blob Storage page, click the storage account that contains your files.
-
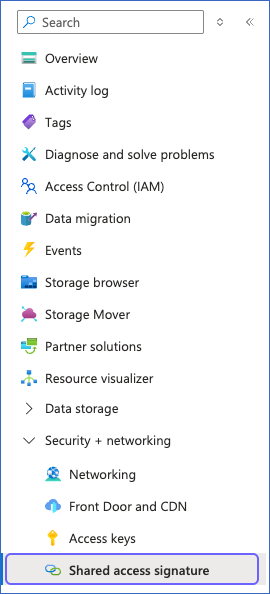
In the left navigation pane of your storage account page, under Security + networking, click Shared access signature.
-
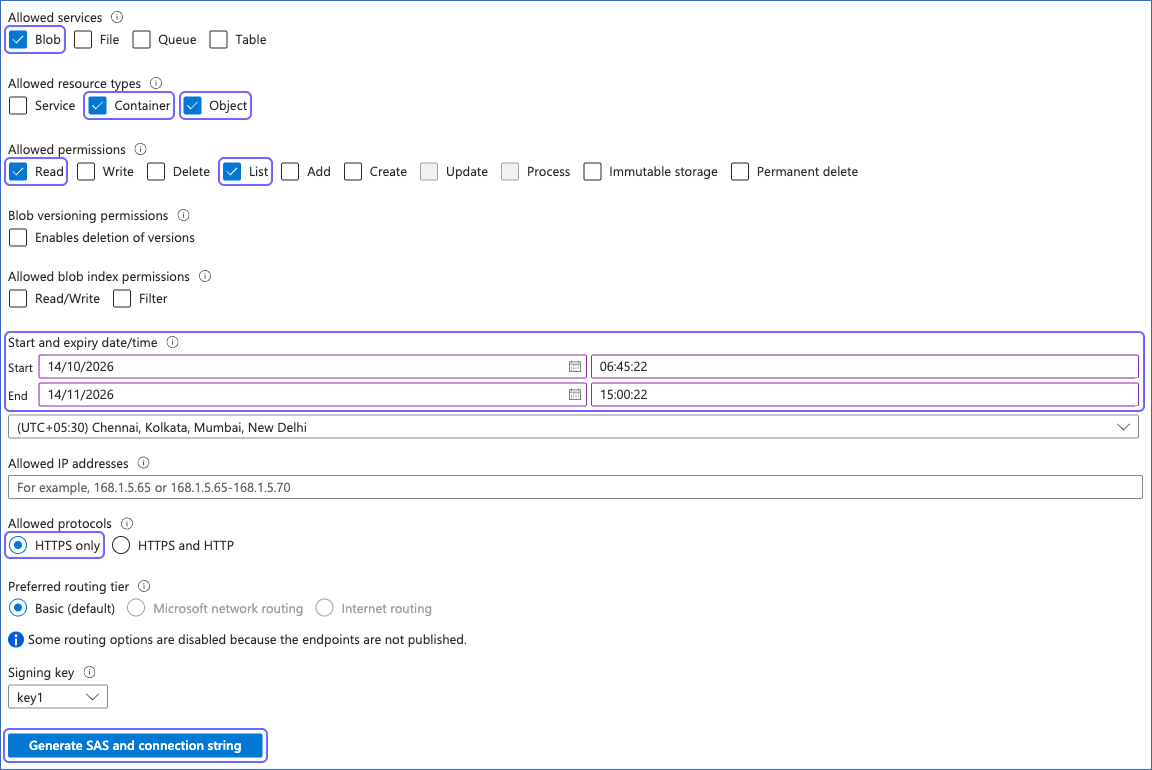
On the Shared access signature page, do the following:
-
Under Allowed services, select the Blob check box.
-
Under Allowed resource types, select the Container and Object check boxes.
-
Under Allowed permissions, select only the Read and List check boxes.
-
Under Blob versioning permissions and Allowed blob index permissions, deselect all the check boxes.
-
Under Start and expiry date/time, specify the date and time until which the SAS must remain valid.
-
Under Allowed protocols, ensure that HTTPS only is selected.
-
Click Generate SAS and connection string.
-
-
Click the Copy to clipboard icon next to the Connection string or the Blob service SAS URL, and save it securely like any other password. Use this value while configuring your Pipeline.

Note: Azure does not save the SAS that you generate. If you leave the page without copying it, you must generate a new one.
You have successfully generated a SAS. Proceed to configure Azure Blob Storage as a Source in your Pipeline.
Note: Once the SAS expires, Hevo cannot connect to your storage account, and no data is ingested. To resume data replication, generate a new SAS and modify the Source configuration in the Pipeline with the new value.
Configure Azure Blob Storage as a Source in your Pipeline
Perform the following steps to configure your Azure Blob Storage Source:
-
Click Pipelines in the Navigation Bar.
-
Click + Create Pipeline in the Pipelines List View.
-
On the Select Source Type page, select Azure Blob Storage.
-
On the Select Destination Type page, select the type of Destination you want to use.
-
On the Select Pipeline Type page, click Edge, and then click Continue.

This page appears only if the selected Destination type is supported in Edge and your Team has an existing Azure Blob Storage Pipeline with the same Destination type. Otherwise, you can proceed to create an Edge Pipeline.
-
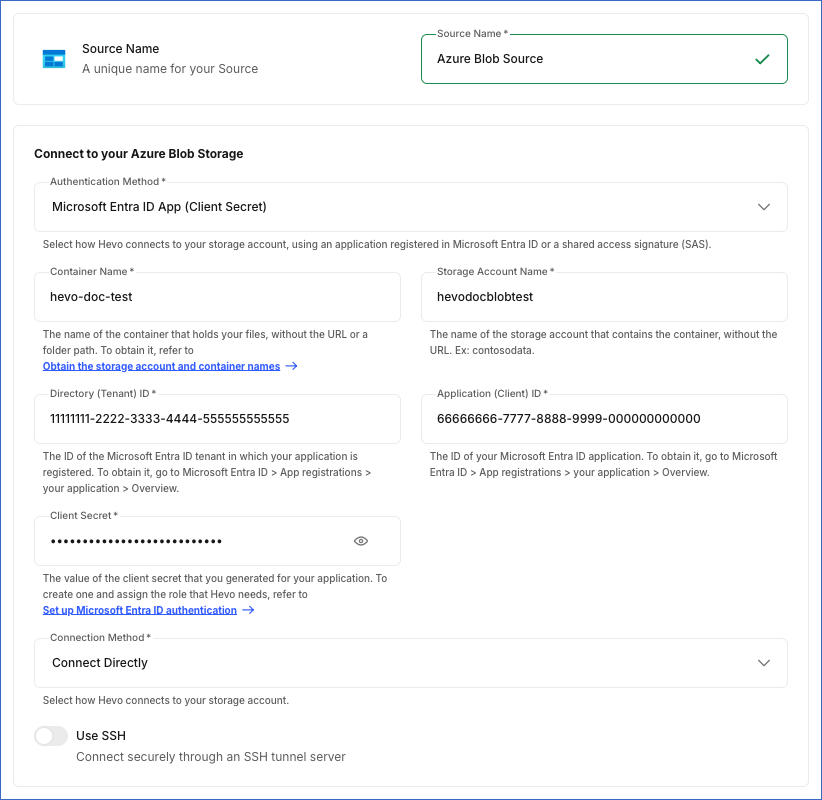
On the Configure Source page, specify the following:
-
Source Name: A unique name for your Source, not exceeding 255 characters. For example, Azure Blob Source.
-
In the Connect to your Azure Blob Storage section:
-
Authentication Method: The method you want Hevo to use to connect to your storage account. Select one of the following:
-
Microsoft Entra ID App (Client Secret): Connects using the client secret that you generated for your application.
-
Container Name: The name of the container that you obtained in the Obtain the Storage Account and Container Names section. For example, hevo-doc-test. Specify only the name, without a URL or folder path.
-
Storage Account Name: The name of the storage account that you obtained in the Obtain the Storage Account and Container Names section. For example, hevodocblobtest.
-
Directory (Tenant) ID: The directory (tenant) ID that you obtained in the Register an Application in Microsoft Entra ID section.
-
Application (Client) ID: The application (client) ID that you obtained in the Register an Application in Microsoft Entra ID section.
-
Client Secret: The client secret value that you obtained in the Generate a client secret section.
-
-
Microsoft Entra ID App (Client Certificate): Connects using the certificate that you uploaded to your application and its private key.

-
Container Name: The name of the container that you obtained in the Obtain the Storage Account and Container Names section. For example, hevo-doc-test.
-
Storage Account Name: The name of the storage account that you obtained in the Obtain the Storage Account and Container Names section. For example, hevodocblobtest.
-
Directory (Tenant) ID: The directory (tenant) ID that you obtained in the Register an Application in Microsoft Entra ID section.
-
Application (Client) ID: The application (client) ID that you obtained in the Register an Application in Microsoft Entra ID section.
-
Client Certificate: The certificate file that you obtained in the Generate a client certificate section, in the .pem, .crt, or .cer format. You can also upload a .pem file that contains both the certificate and its private key.
-
Client Private Key (Optional): The private key file that you obtained in the Generate a client certificate section, such as private_key.pem. Leave this field blank if your certificate file also contains the private key.
-
Private Key Passphrase (Optional): The passphrase for the private key. Leave this field blank if you did not specify a passphrase while creating the private key.
-
-
Shared Access Signature (SAS): Connects using the shared access signature that you generated for your storage account.

-
Container Name: The name of the container that you obtained in the Obtain the Storage Account and Container Names section. For example, hevo-doc-test.
-
SAS URL or Connection String: The connection string or Blob service SAS URL that you obtained in the Generate a Shared Access Signature section.
-
-
-
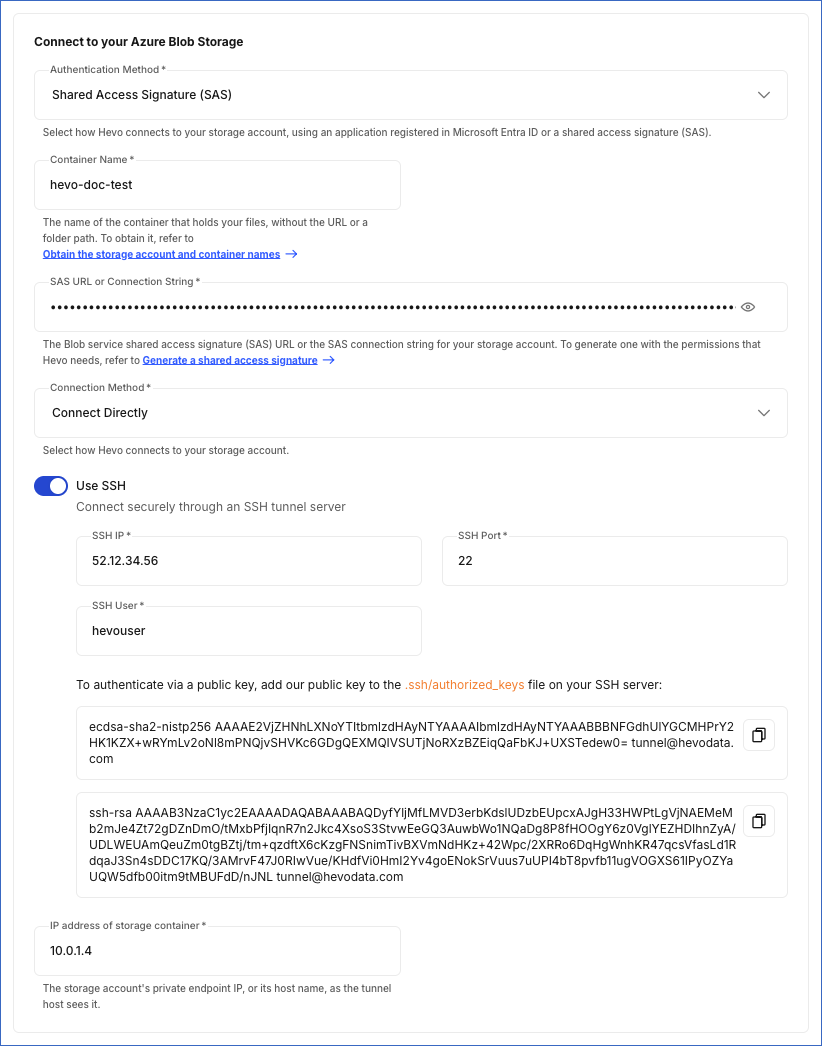
Connection Method: The way Hevo connects to your storage account. The Connect Directly option connects to the public endpoint of your storage account.
-
Use SSH: Enable this option to connect to your storage account through an SSH tunnel, instead of directly. Use it when your storage account does not allow public network access and is available only through a private endpoint in your Azure virtual network. Hevo connects to an SSH server in that network, and the server forwards Hevo’s requests to your storage account. Read Create a Linux virtual machine in the Azure portal for the steps to set up an SSH server in Azure. If you enable this option, specify the following:
-
SSH IP: The public IP address of the SSH server. For example, 52.12.34.56. The server must allow connections from Hevo’s IP addresses for your region. To do this, add an inbound security rule for these IP addresses on the SSH port. Read Create a security rule for the steps.
-
SSH Port: The port on which the SSH server listens for connections. Default value: 22.
-
SSH User: The name of the user on the SSH server that Hevo connects as. For example, hevouser.
-
IP address of storage container: The private IP address of the private endpoint of your storage account, as the SSH server sees it. For example, 10.0.1.4. Hevo connects to this address on port 443, so the SSH server must be able to access it on that port.
To allow Hevo to connect to your SSH server, add the public keys displayed on the page to the ~/.ssh/authorized_keys file of the SSH user on the server. Read Create an SSH user and group for the steps.
-
-
-
-
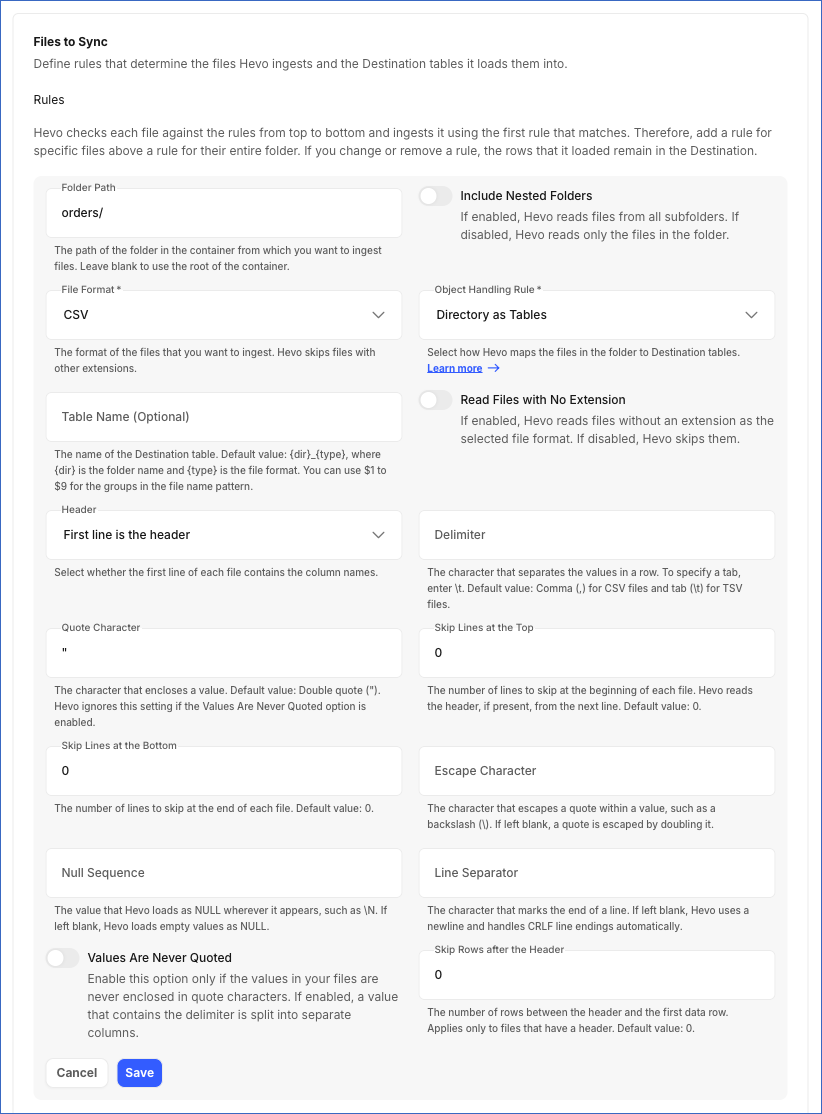
In the Files to Sync section, define rules that determine the files Hevo ingests and the tables it loads them into. Hevo checks each file against the rules from top to bottom and ingests it using the first rule that matches. Therefore, add a rule for specific files above a rule that reads their entire folder. For example, to load the daily order files in the orders folder into one table and all other CSV files in that folder into another, add the Pattern as Table rule for the daily files first, and then the Directory as Tables rule for the folder. You can add up to 20 rules.
To add a rule, perform the following steps:
-
Click Add Rule.
-
Specify the following:
-
Folder Path: The path of the folder in the container from which you want to ingest files. For example, orders/. If you leave this field blank, Hevo reads files from the top level of the container.
-
Include Nested Folders: If enabled, Hevo also reads files from all the subfolders of the specified folder. If disabled, Hevo reads only the files present directly in it. For example, if the folder path is orders/ and this option is enabled, Hevo also reads files in orders/archive/. Default value: Disabled.
-
File Format: The format of the files that you want to ingest. Select one of the following:
-
CSV: Files with the .csv extension.
-
TSV: Files with the .tsv or .tab extension.
Hevo identifies the format of a file from its extension. Files in any other format in the folder are not ingested by this rule. Default value: CSV.
-
-
Object Handling Rule: The way Hevo maps the files to Destination tables. Select one of the following:
-
Directory as Tables: Hevo loads all the files from the folder into a single table. This is the default option.
-
Files as Tables: Hevo loads each file into a separate table named after the file. Hevo can create up to 50,000 tables for this rule. If the folder contains more files, the remaining files are not ingested. If you delete a file, Hevo marks the corresponding object as Deleted. The rows loaded from the file remain in the Destination. If you add the file again, Hevo marks the object as active, but does not ingest the file until you resync the object.
-
Pattern as Table: Hevo loads the files whose names match a regular expression into a single table. If you select this option, specify the File Name Pattern. This is a regular expression that must match the entire file name, excluding the folder path. The match is case-sensitive. For example, orders_\d{8}\.csv matches orders_20261001.csv.
-
-
Table Name (Optional): The name of the Destination table. If you leave this field blank, Hevo names the table {dir}_{type}, where {dir} is the name of the folder and {type} is the file format. For example, orders_csv.
You can use the placeholders {dir}, {type}, and $1 to $9 for the groups captured by the file-name pattern. For example, with the file-name pattern sales_(\w+)_\d{8}\.csv and the table name sales_$1, Hevo loads sales_east_20261001.csv into the sales_east table. This field is not displayed if you select Files as Tables. -
Read Files with No Extension: If enabled, Hevo ingests files that do not have an extension, such as orders_export instead of orders_export.csv, using the selected file format. If disabled, Hevo skips such files. Default value: Disabled. This option is displayed only if you select Directory as Tables.
-
Header: Select First line is the header if the first line of each file contains the column names. Otherwise, select Headerless: Name the columns column_1, column_2, and so on, and Hevo names the columns column_1, column_2, and so on. Default value: First line is the header.
-
Delimiter: The character that separates the values in a row. For example, enter
|for pipe-delimited files. To specify a tab, enter\t. Default value: A comma (,) for CSV files and a tab for TSV files. -
Quote Character: The character that encloses a value. For example, enter
'if the values in your files are enclosed in single quotes. Default value: A double quote (“). -
Skip Lines at the Top: The number of lines to skip at the beginning of each file. Hevo reads the header, if any, from the line after these lines. For example, enter 2 if each file starts with a two-line report title above the header. Default value: 0.
-
Skip Lines at the Bottom: The number of lines to skip at the end of each file. For example, enter 1 if each file ends with a totals row. Default value: 0.
-
Escape Character: The character used to escape a quote character within a value. If you leave this field blank, a quote within a value is escaped by doubling it. For example, the value 5” monitor is written as
"5"" monitor"in the file. -
Null Sequence: The value that Hevo must load as NULL wherever it appears, such as
\N. If you leave this field blank, Hevo loads empty values as NULL. -
Line Separator: The character that marks the end of a line. If you leave this field blank, Hevo uses a newline, and handles carriage return and line feed (CRLF) line endings automatically.
-
Values Are Never Quoted: Enable this option only if the values in your files are never enclosed in quote characters. If enabled, a value that contains the delimiter is split into separate columns. For example, with a comma delimiter, the value New York, NY is loaded as two values, New York and NY. Default value: Disabled.
-
Skip Rows after the Header: The number of rows between the header and the first data row, such as a row containing units. Default value: 0.
-
-
Click Save.
Repeat the steps above to add more rules.
Note: After you create the Pipeline, you cannot change the File Format or Include Nested Folders setting of a rule. Any rule that you add later reads only the CSV files present directly in its folder.
-
-
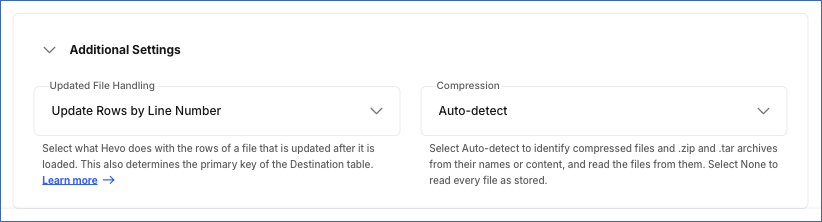
In the Additional Settings section:
-
Updated File Handling: The way Hevo loads the rows of a file that is updated after it is ingested. This also determines the primary key of the Destination table. Select one of the following:
-
Update Rows by Line Number: Hevo replaces the rows previously loaded from the file with its current rows, using the file path and line number of each row as the primary key. This is the default option.
-
Keep Every Version: Hevo loads the rows of each version of the file into the Destination table and keeps the rows loaded earlier.
-
-
Compression: The way Hevo reads compressed files. Select one of the following:
-
Auto-detect: Hevo identifies compressed files and archives from their file names, or from their content if the name does not indicate the compression type. Hevo then reads the files from them. This is the default option. Read Supported Compression Formats for the formats that Hevo supports.
-
None: Hevo reads every file as it is stored, without decompressing it.
-
-
-
Click Test & Continue to test the connection to your Azure Blob Storage Source. Hevo verifies that it can list and read the files in your container, and displays the files that each rule matches. If a rule does not match any file, Hevo displays a warning. Click Continue to set up your Destination.
Data Replication
Hevo ingests the following types of data from the files that match your rules:
-
Historical Data: The first run of the Pipeline ingests all the files that match your rules and loads them into the Destination.
-
Incremental Data: Once the historical load is complete, Hevo checks the container for new and updated files as per the sync frequency and ingests them. As it is not possible to identify individual changes within a file, Hevo re-ingests the entire content of each updated file. It then replaces the rows previously loaded from that file in the Destination with the file’s current rows.
Hevo detects an update when the entity tag (ETag) of a file changes. An ETag is an identifier that Azure assigns to each blob. Azure changes it when the content of the blob is updated, and also when you update its properties or metadata. As a result, Hevo re-ingests a file even if only its properties or metadata change.
Hevo identifies each file by its path. As a result, if you rename a file or move it to another folder, Hevo ingests it as a new file. The rows loaded from the file under its earlier name remain in the Destination.
Note: Azure limits the rate of requests that a storage account can handle. If the limit is exceeded, Azure rejects the requests, and a rate limit exception occurs. To understand how Hevo handles such scenarios, read Handling Rate Limit Exceptions.
Schema and Primary Keys
Hevo creates a table in the Destination for each set of files that a rule maps to a table. On the Configure Objects page, the tables are grouped by the folder path of their rule, which is displayed as the schema name. If the folder path of a rule is blank, the schema name is root.
The name of each table depends on the object handling rule:
| Object Handling Rule | Table Name |
|---|---|
| Directory as Tables | The table name that you specify in the rule. If you do not specify one, Hevo names the table {dir}_{type}. For example, orders_csv for CSV files in the orders folder. If the folder path is blank, {dir} is root. |
| Files as Tables | The name of the file, without its extension. For example, region_summary for the file region_summary.tsv. |
| Pattern as Table | The table name that you specify in the rule. If you do not specify one, Hevo names the table {dir}_{type}. |
Hevo replaces any character other than letters, digits, and underscores in a table name with an underscore (_). If a table name starts with a digit, Hevo adds an underscore at the beginning.
In addition to the columns in your files, Hevo adds the following columns to each table:
| Column | Description |
|---|---|
| __file | The path of the file in the container from which the row was ingested. For example, orders/orders_20261001.csv. This column is not added to the tables created using the Files as Tables rule. |
| __line | The position of the row in the file, starting from 0 for the first data row. The header row is not counted. |
| __modified | The date and time when the file was last modified in your container. |
Hevo uses the __file and __line columns as the primary key of each table. For the tables created using the Files as Tables rule, Hevo uses only the __line column as the primary key.
Hevo infers the data type of each column from its values. For example, Hevo loads values such as 2026-10-01 as dates, whole numbers as integers, and other numbers as decimals. Values that do not match any other type, including numbers with leading zeros, such as 007, are loaded as strings. If a file contains a column that is not present in the Destination table, Hevo adds the column to the table.
Supported Compression Formats
Hevo identifies compressed files and archives from their file names, or from their content if the name does not indicate the format, and reads the files in them. Hevo supports the following compression formats:
| Compression Format | File Extensions |
|---|---|
| gzip | .gz, .gzip |
| bzip2 | .bz2, .bzip2 |
| Zstandard | .zst, .zstd |
| zlib (deflate) | .deflate, .zz, .zlib |
| Unix compress | .Z |
| Snappy (framed) | .sz, .snappy |
| LZ4 (framed) | .lz4 |
| xz | .xz |
Hevo also reads the files in .zip and .tar archives, including compressed tar archives, such as .tar.gz, .tgz, .taz, .tbz, .tbz2, .txz, and .tzst.
Note: Hevo supports only the framed forms of Snappy and LZ4.
Source Considerations
-
If a row in a file contains more values than the file’s header, Hevo adds columns to the Destination table for the additional values. If a row contains fewer values than the header, Hevo loads NULL in the remaining columns of the Destination table.
-
If the first line of a file shares no column name with its Destination table, Hevo loads that line as a data row. This allows Hevo to ingest all the rows from exports split into multiple files, such as Spark or MySQL exports, where only the first file contains the header.
-
If a file is updated while Hevo is reading it, Hevo stops reading the file and ingests its latest content in the next run.
Limitations
-
Hevo currently supports only storage accounts in the Azure global cloud. Storage accounts in Azure Government and Azure operated by 21Vianet are not supported.
-
Hevo supports only Unicode Transformation Format, 8-bit (UTF-8) encoded files. If your files use another encoding, any characters that are not valid in UTF-8 are loaded as the replacement character (�).
-
Hevo ingests data only from CSV and TSV files stored as blobs in containers. Data from Azure Files shares, queues, tables, and files in any other format is not ingested.
-
Hevo does not capture deletes. If you delete a file from your container, the rows loaded from it remain in the Destination.