Hevo can load data from any of your Pipelines into a SQL Server database.
Prerequisites
Set up an SQL Server Instance (Optional)
This section explains the steps to install the SQL Server 2019 Evaluation Edition on a Microsoft Windows Server 2019. To continue using SQL Server post-trial expiry, you must upgrade to the SQL Server Enterprise or Standard Edition. Read SQL Server 2019: Hardware and software requirements for the hardware and software you need to install and set up SQL Server 2019.
Note: You must have administrative rights on the Windows server to set up the SQL Server instance.
1. Download SQL Server on Windows
-
Go to Microsoft Evaluation Center.
-
In the navigation bar, click SQL Server, and select SQL Server 2019 from the drop-down.

-
In the SQL Server 2019 page, click the Get Started for free tab, and then click Download the EXE.

-
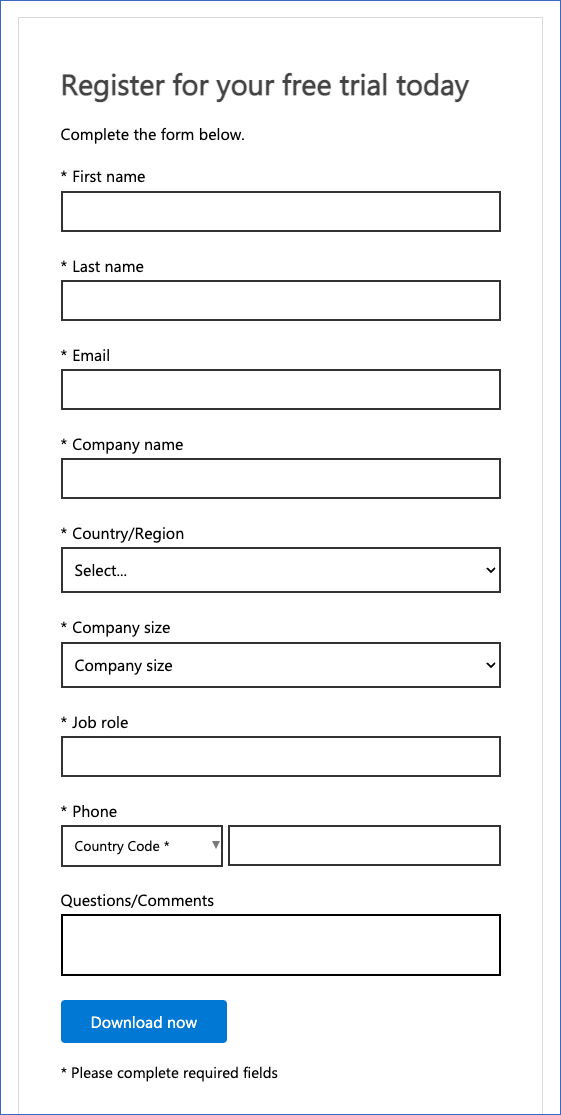
In the Evaluate SQL Server 2019 page, specify the following and click Download now:
-
Provide your details such as First name, Last name, and Job role.
-
Provide your company details such as the name, its size, and country/region.
-
Provide your email address that you want to register for the free trial.
-
In the Please select your SQL Server 2019 download page, under EXE download, select 64-bit edition and save the server setup file.

-
Proceed to install the SQL Server.
2. Install the SQL Server on Windows
-
Go to the location where you saved the SQL Server setup file. For example, C:\MSSQL.
-
Launch the SQL Server setup file, SQL2019-SSEI-Eval.exe, and in the Select an installation type window, select Basic.
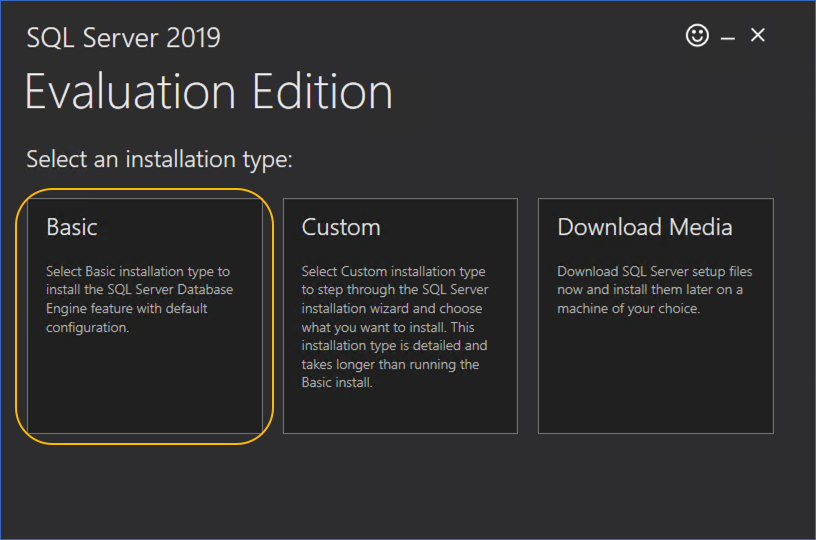
The Basic installation installs the SQL Server with the default configuration and starts the instance. Select the Custom installation type if you want to manually pick the components to install. You can select Download Media to download the installation file, to install the SQL Server later. Read the SQL Server installation guide for further guidance.
-
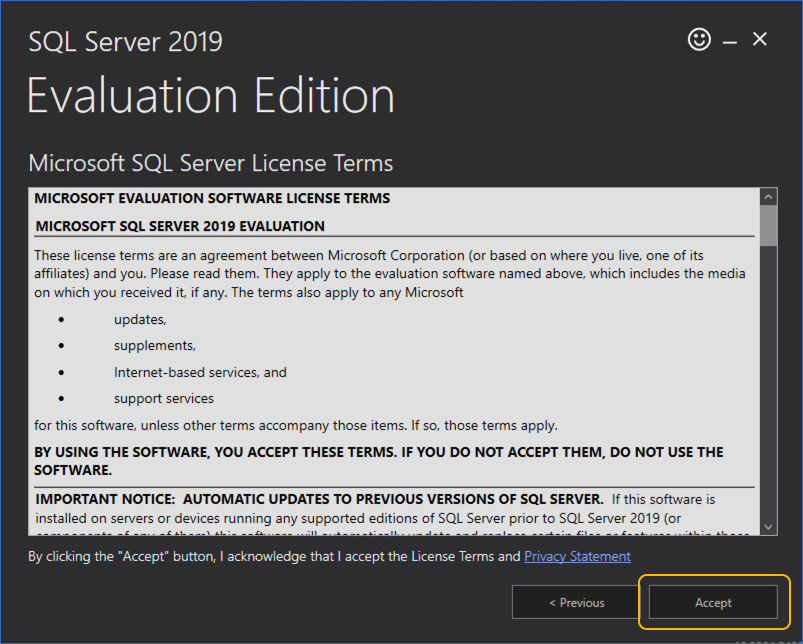
In the Microsoft SQL Server License Terms window, review and accept the license terms.
-
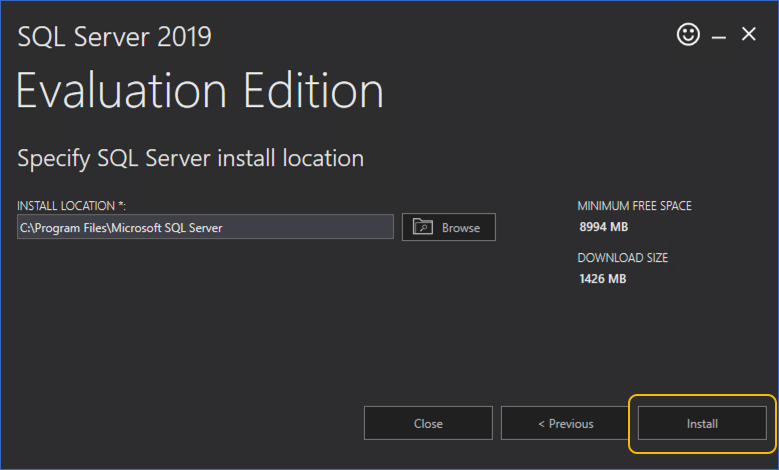
In the Specify SQL Server install location window, specify the INSTALL LOCATION, and click Install to start the installation process.
-
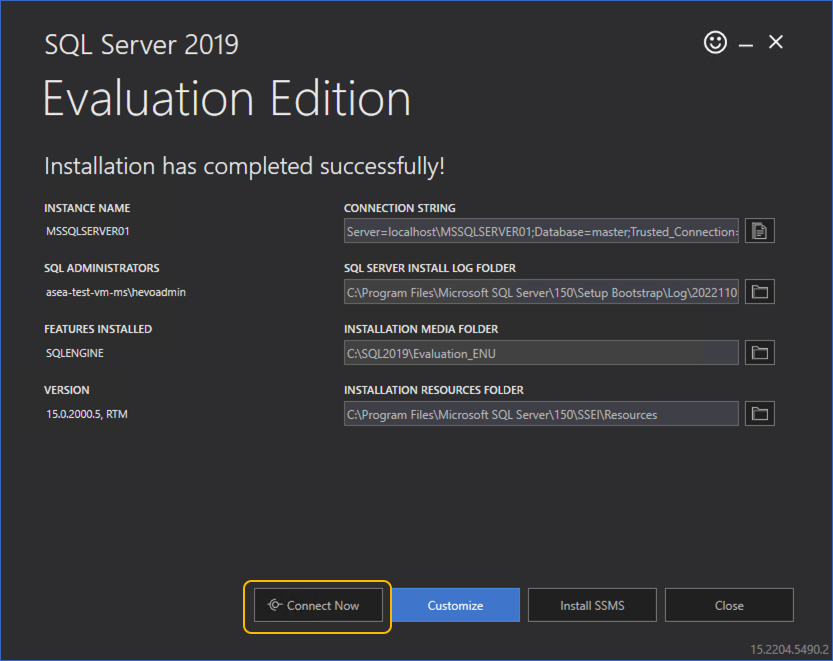
Click Connect Now if you want to connect to the installed SQL Server. This opens a command line window for testing the connection.
-
Click Install SSMS to install the SQL Server Management Studio (SSMS). You can use SSMS to connect to and manage your SQL Server instances and perform operations in it, such as changing the authentication method and creating login users and databases.
You have successfully installed the SQL Server and started the instance.
Allow Access to the SQL Server Instance (Optional)
To set up access and allow connections to your SQL Server instance from external machines such as Hevo, you must:
-
Enable the TCP/IP protocol for the SQL Server
-
Create firewall rules
-
Create a login for the SQL Server
1. Enable the TCP/IP protocol for the SQL Server
-
Open the SQL Server Configuration Manager.
-
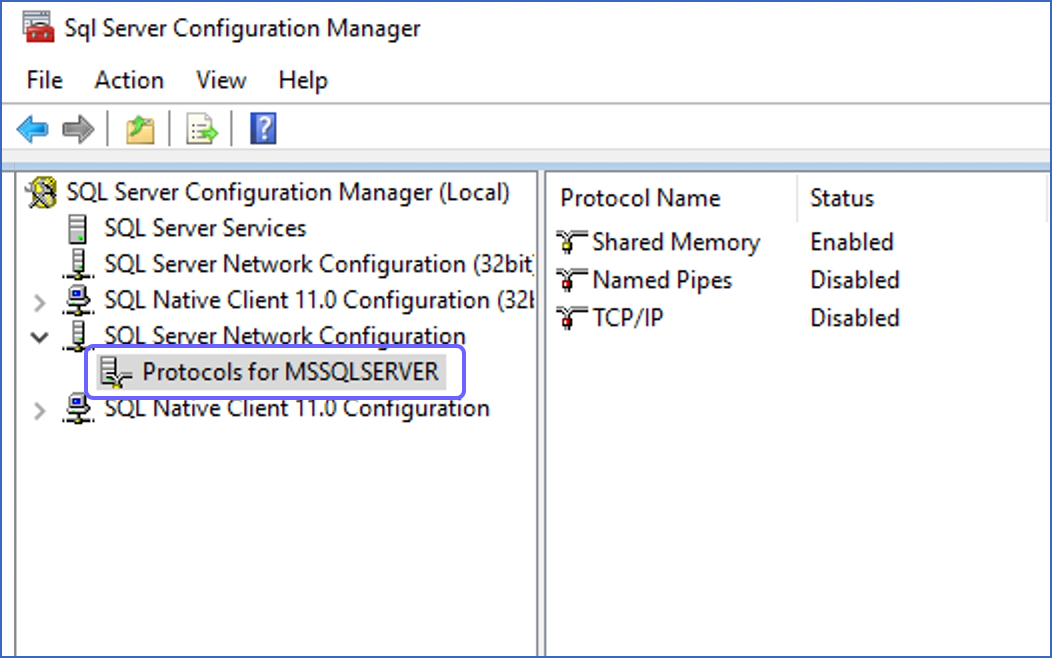
In the left navigation pane, click SQL Server Network Configuration, and select Protocols for <SQL Server Instance Name> from the drop-down. Default name: MSSQLSERVER.
-
In the right pane, if the TCP/IP Protocol is Disabled, then perform this step. Else, skip to Step 4.
-
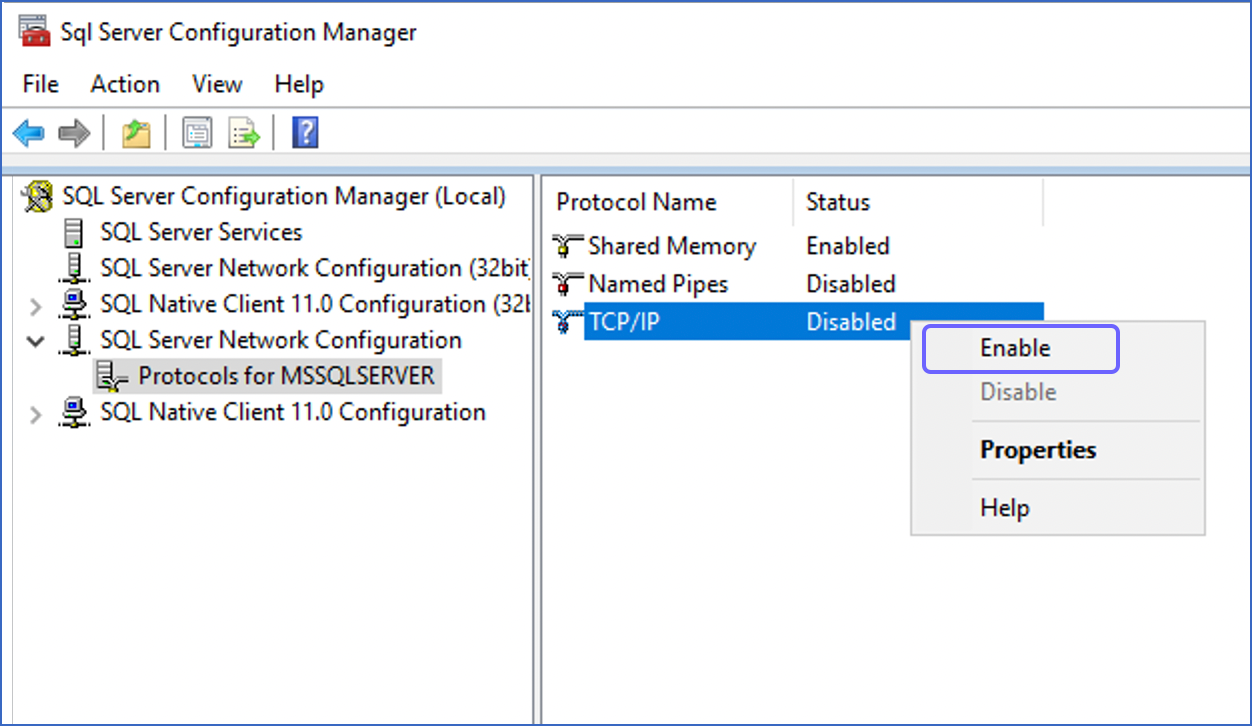
Right-click on TCP/IP, and select Enable.
-
Click OK to acknowledge the warning.
-
Verify the TCP/IP Port:
-
In the right pane, double-click the TCP/IP protocol name.
-
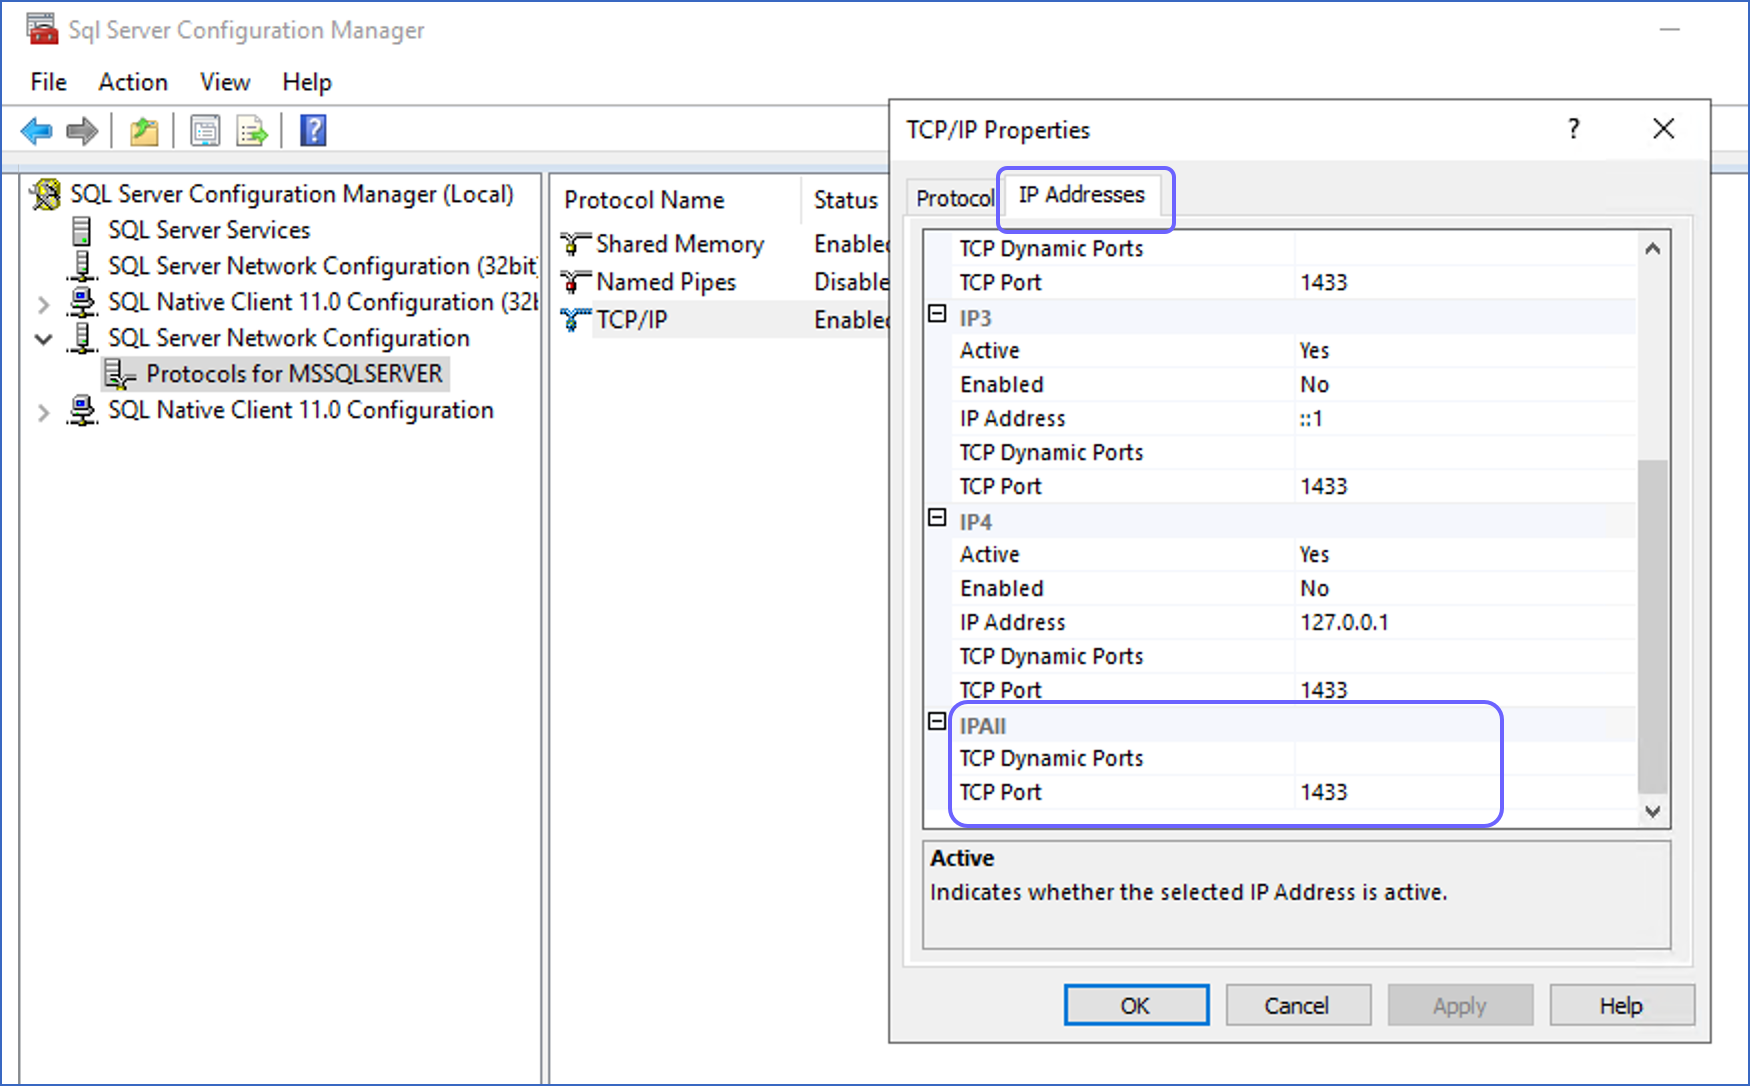
In the TCP/IP Properties dialog, click the IP Addresses tab.
-
Scroll to the IPAII section, and ensure the TCP Port value is 1433, which is the default port for SQL Server. Read Configure a Server to Listen on a Specific TCP Port if you want to change this value.
-
Click OK, to exit the TCP/IP Properties dialog.
-
Restart the SQL Server instance if you enabled the TCP/IP Protocol in Step 3, else skip this step. To restart:
-
In the left navigation pane, click SQL Server Services.
-
In the right pane, right-click on SQL Server (<your_instance_name>), and select Restart.
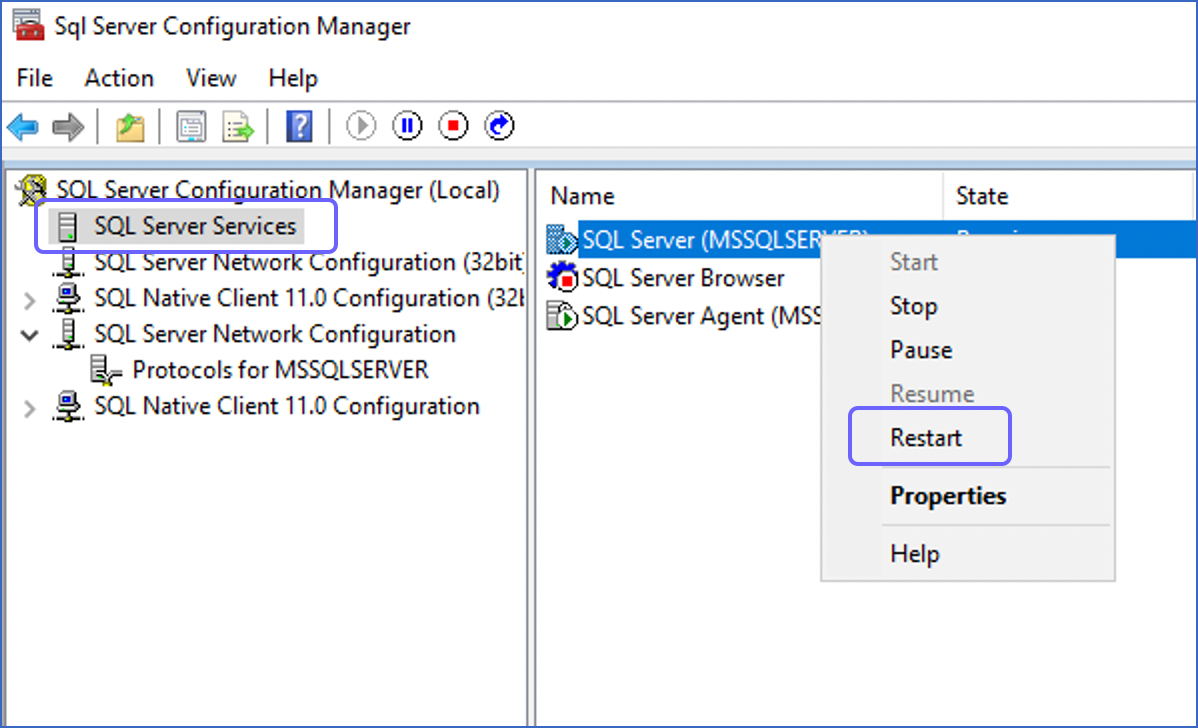
You have successfully enabled TCP/IP for your SQL Server instance.
2. Create firewall rules
The Windows Firewall filters the incoming and outgoing traffic to and from your Windows server. You must create Inbound Rules for allowing Hevo to access your SQL Server database. In addition, you must open the MS SQL port if your SQL Server is installed on Windows Virtual Machine. Contact your Windows system administrator for this.
To configure the firewall, you can use the Microsoft Management Console (MMC), netsh, or PowerShell. Read Programs to configure the firewall for the steps to do this.
Here, we are using Windows PowerShell.
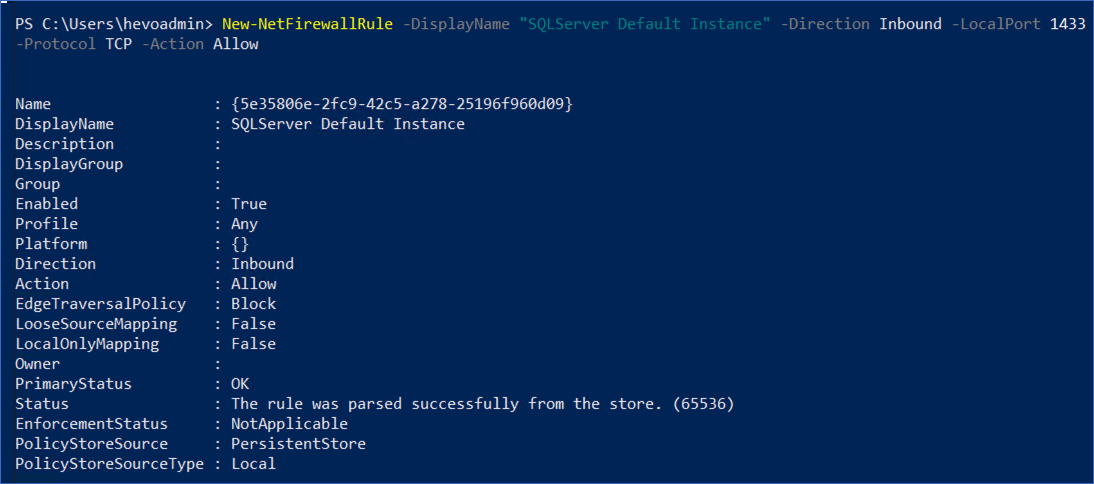
Run the following command in Windows PowerShell to create an inbound rule named SQLServer Default Instance:
New-NetFirewallRule -DisplayName "SQLServer Default Instance" -Direction Inbound -LocalPort 1433 -Protocol TCP -Action Allow
The output from this command is:
3. Create a login for the SQL Server
To enable non-Windows users, such as Hevo, to connect to your SQL Server, you need to:
-
Enable SQL authentication
-
Create an SQL login with sysadmin privileges
1. Enable SQL authentication
-
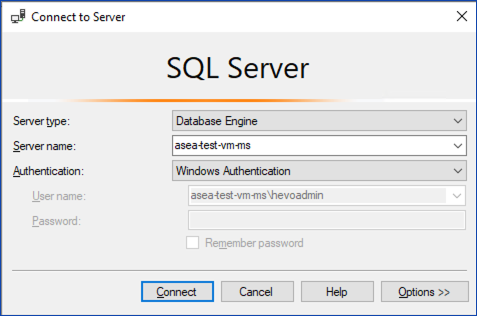
Open the SQL Server Management Studio (SSMS).
-
Connect to your SQL Server using Windows Authentication. This is the default authentication method.
-
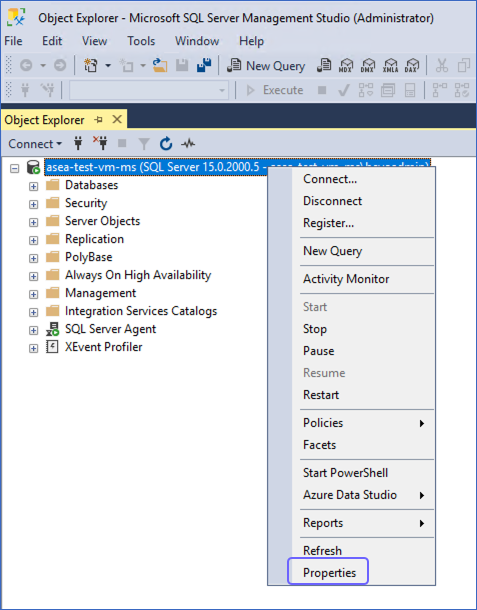
In the Object Explorer, right-click on your SQL server name, and select Properties.
-
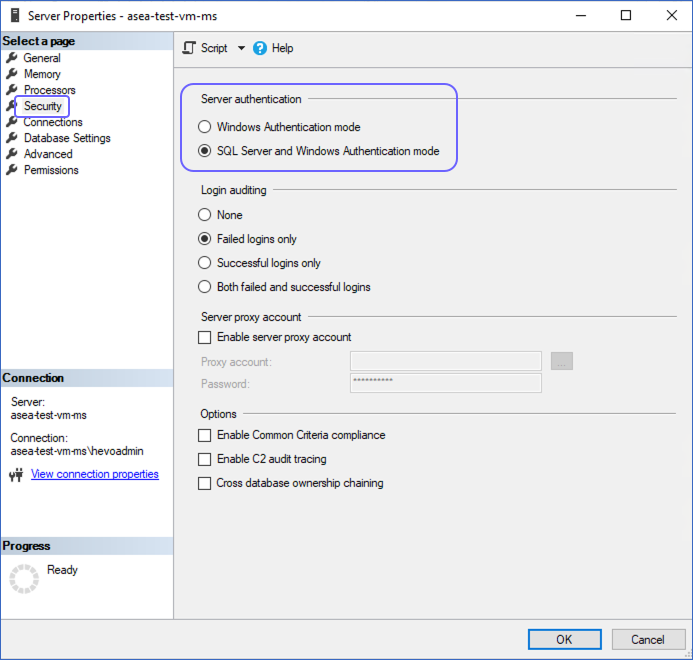
In the Server Properties dialog, click on Security in the left pane.
-
In the Security page, under Server authentication, select SQL Server and Windows Authentication mode, and click OK.
-
In the Microsoft SQL Server Management Studio dialog, click OK to acknowledge the warning to restart the SQL Server.

-
In the Object Explorer, right-click on your SQL server name, and select Restart.
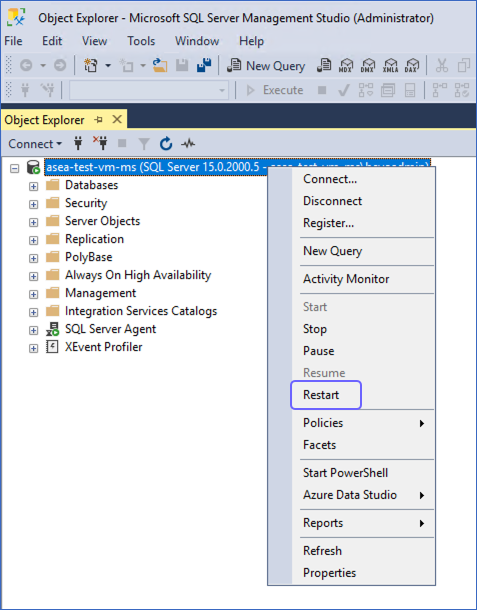
The SQL Server and the SQL Server Agent are restarted.
2. Create an SQL login with sysadmin privileges
-
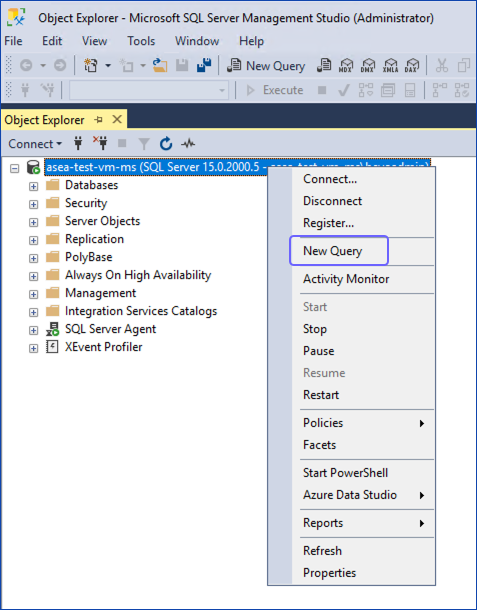
In the Object Explorer, right-click on your SQL server name, and select New Query.
-
Enter the following commands in the Query Editor pane:
CREATE LOGIN [<master_user>] WITH PASSWORD=N'<strong password>', DEFAULT_DATABASE=[master], DEFAULT_LANGUAGE=[us_english], CHECK_EXPIRATION=OFF, CHECK_POLICY=ON
GO
ALTER LOGIN [<master_user>] ENABLE
GO
ALTER SERVER ROLE [sysadmin] ADD MEMBER [<master_user>]
GO
Replace all placeholder values in the commands above with your own. For example, <master_user> with hevouser.
-
In the Quick Access Panel, click Execute to run the commands.

Create a Database in the SQL Server Instance (Optional)
Note: Replace the placeholder values in all the commands with your own. For example, <database_name> with MSSQLDestination.
1. Create a database in your SQL Server
-
Open the SQL Server Management Studio (SSMS).
-
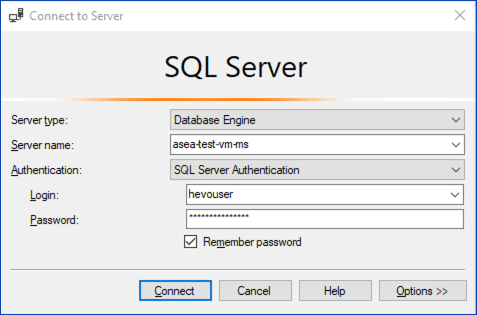
Connect to your SQL Server with the SQL login created in Step 2 above.
-
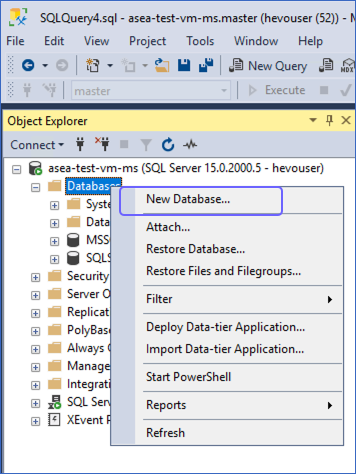
In the Object Explorer, under your SQL server name, right-click on Databases, and select New Database.
-
In the New Database dialog, specify a Database name, and click OK, to create the database.
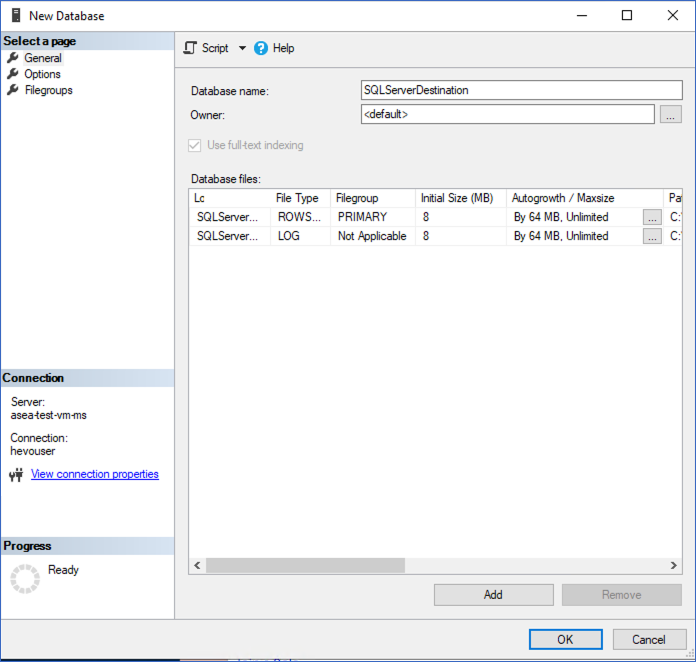
You can provide this database name while configuring your SQL Server Destination.
2. Create a schema in your database (Optional)
-
Log in to your SQL Server instance as a master user using an SQL client tool, such as sqlcmd. For example, sqlcmd -U hevouser.
-
Enter the following commands to access your database and create a schema in it:
USE [<your_database_name>]
GO
CREATE SCHEMA [<schema_name>]
GO
You can provide this schema name while configuring your SQL Server Destination.
Create a Database User and Grant Privileges
1. Create a database user
Perform the following steps to create a login user and map it to a database user to connect to your SQL Server database:
-
Log in to your SQL Server instance as a master user using an SQL client tool, such as sqlcmd. For example, sqlcmd -U hevouser.
-
Enter the following command to access the database where you want to add the user:
-
(Optional) Enter the following command to create a login user in the selected database:
Note: Skip this step if you want to use an existing login user.
CREATE LOGIN [<login_name>] WITH PASSWORD=N'<strong_password>', DEFAULT_DATABASE=[<database_name>]
GO
-
Create a database user for the login user:
Note: You can specify an existing login user or the one created in the step above.
CREATE USER [<username>] FOR LOGIN [<login_name>]
GO
Note: Replace the placeholder values in all the commands above with your own. For example, <database_name> with MSSQLDestination.
2. Grant privileges to the database user
The following table lists the privileges that Hevo requires to connect to and load data into your SQL Server Destination:
| Privilege Name |
Privilege Description |
Applies to |
| ALTER |
Allows Hevo to create, alter, and drop objects from the schema. |
SCHEMA |
| INSERT |
Allows Hevo to insert rows, synonyms, tables and columns, and views and columns into the schema or database. |
- SCHEMA
- DATABASE |
| SELECT |
Allows Hevo to select rows, synonyms, tables and columns, and views and columns from the schema or database. |
- SCHEMA
- DATABASE |
| UPDATE |
Allows Hevo to update rows, synonyms, tables and columns, and views and columns in the schema or database. |
- SCHEMA
- DATABASE |
| CREATE TABLE |
Allows Hevo to create tables in the database. |
DATABASE |
Perform the following steps to grant the required privileges to the database user for creating the database objects needed to load and store your data:
-
Log in to your SQL Server instance as a login user using an SQL client tool, such as sqlcmd. For example, sqlcmd -U hevouser.
-
Enter the following command to access the database in which you created the database user:
-
Enter the following commands to grant privileges to the database user:
GRANT ALTER, SELECT, INSERT, UPDATE ON SCHEMA::<schema_name> TO <username>
GO
GRANT CREATE TABLE, INSERT, SELECT, UPDATE ON DATABASE::<database_name> to <username>
GO
Note: Replace the placeholder values in all the commands above with your own.
Perform the following steps to configure SQL Server as a Destination in Hevo:
-
Click DESTINATIONS in the Navigation Bar.
-
Click + Create Standard Destination in the Destinations List View.
-
On the Add Destination page, select SQL Server.
-
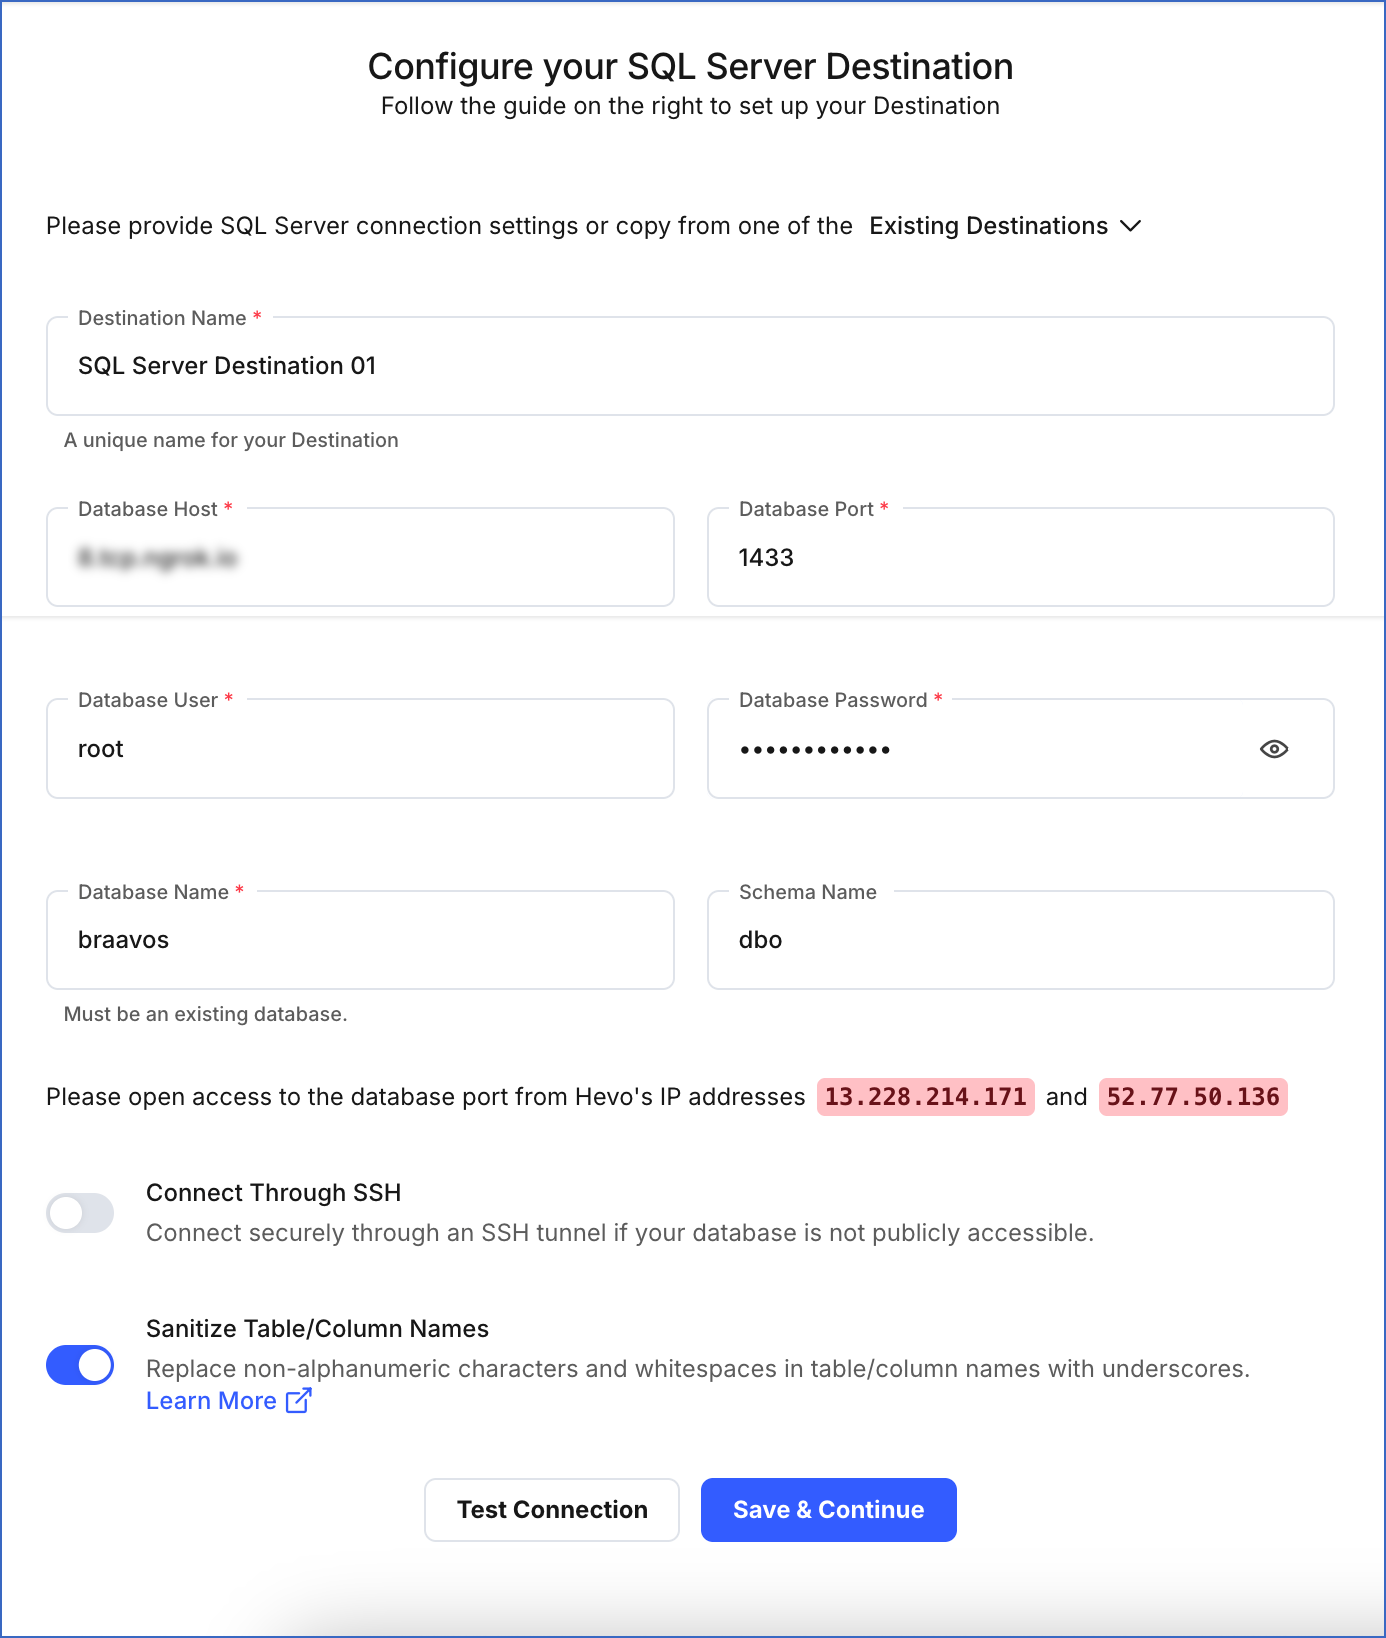
On the Configure your SQL Server Destination page, specify the following:
-
Destination Name: A unique name for your Destination, not exceeding 255 characters.
-
Database Host: The IP address or DNS of your SQL Server instance. This can be an IP address, such as 10.123.10.001, or an endpoint, such as mssql.westeros.inc.
For URL-based hostnames, exclude the http:// or https:// part. For example, if the hostname URL is https://mssql.database.windows.net, enter mssql.database.windows.net.
If you want to configure a local database as your Destination, read Connecting to a Local Database for the steps to do this.
-
Database Port: The port on which your SQL Server listens for connections. Default value: 1433
-
Database User: A login user with a non-administrative role in the SQL Server database. This can be the login user that you created in Step 4 above.
-
Database Password: The password for the login user.
-
Database Name: The name of the Destination database to which the data is loaded. This can be the database that you created in Step 3 above. The login user must have permission to access this database.
-
Schema Name (Optional): The name of the Destination database schema. This can be the database schema that you created in Step 3 above. Default value: dbo
-
Additional Settings:
-
Connect through SSH: Enable this option to connect to Hevo using an SSH tunnel. This provides an additional level of security to your database by not exposing your SQL Server setup to the public. Read Connecting Through SSH.
If this option is disabled, you must whitelist Hevo’s IP addresses.
-
Sanitize Table/Column Names: Enable this option to remove all non-alphanumeric characters and spaces in a table or column name, and replace them with an underscore (_). Read Name Sanitization.
-
Click Test Connection. This button is enabled once all the mandatory fields are specified.
-
Click Save & Continue. This button is enabled once all the mandatory fields are specified.
Read the detailed Hevo documentation for the following related topics:
Destination Considerations
-
You must disable any foreign keys defined in the target tables. Foreign keys do not allow data to be loaded until the reference table has a corresponding key defined.
-
You can replicate data for only 1018 columns in a given SQL Server table. Read Limits on the Number of Columns.
-
SQL Server stores row data on pages of size 8,192 bytes (8 KB). Out of this, 8,060 bytes are available for row data, and the remaining bytes are used for page metadata. As a result, if the Event size in the Source object exceeds this limit, Hevo may not be able to load the Event. This can lead to data mismatches between the Source and Destination. To avoid such a scenario, ensure that each Event contains less than 8,060 bytes of data.
Read SQL Server documentation for information on how SQL Server handles larger rows.
-
By default, SQL Server uses case-insensitive collation, which means table names such as Test and test are treated as identical.
If you have enabled the Sanitize Table/Column Names option while configuring the Destination, Hevo converts all table names to lowercase. This can cause auto-mapping failures if Source contains multiple objects that differ only by case, or if a similarly named table already exists in the Destination. In such cases, Test and test are treated as identical and mapped to the same test Destination table, causing data mismatch.
Even if name sanitization is disabled, SQL Server may still reject the creation of tables with names that differ only by casing, due to its default collation settings. As a best practice, avoid using Source table names that differ only by case when using SQL Server Destination.
Revision History
Refer to the following table for the list of key updates made to this page:


