Snowflake offers a cloud-based data storage and analytics service, generally termed as data warehouse-as-a-service. Companies can use it to store and analyze data using cloud-based hardware and software.
Snowflake automatically provides you with one data warehouse when you create an account. Further, each data warehouse can have one or more databases, although this is not mandatory.
The data from your Pipeline is staged in Hevo’s S3 bucket before finally being loaded to your Snowflake warehouse.
The Snowflake data warehouse may be hosted on any of the following cloud providers:
-
Amazon Web Services (AWS)
-
Google Cloud Platform (GCP)
-
Microsoft Azure (Azure)
To connect your Snowflake instance to Hevo, you can either use a private link that directly connects to your cloud provider through a Virtual Private Cloud (VPC) or connect via a public network using the Snowflake account URL.
A private link enables communication and network traffic to remain exclusively within the cloud provider’s private network while maintaining direct and secure access across VPCs. It allows you to transfer data to Snowflake without going through the public internet or using proxies to connect Snowflake to your network. Note that even with a private link, the public endpoint is still accessible, and Hevo uses that to connect to your database cluster.
Please reach out to Hevo Support to retrieve the private link for your cloud provider.
Prerequisites
-
An active Snowflake account is available.
-
You have either the ACCOUNTADMIN or SECURITYADMIN role in Snowflake to create a new role for Hevo.
-
You have either the ACCOUNTADMIN or SYSADMIN role in Snowflake to create a warehouse.
-
Hevo is assigned the USAGE permission on data warehouses.
-
Hevo is assigned the USAGE and CREATE SCHEMA permissions on databases.
-
Hevo is assigned the USAGE, MONITOR, CREATE TABLE, CREATE EXTERNAL TABLE, and MODIFY permissions on the current and future schemas.
Refer to the section Create and Configure your Snowflake Warehouse to create a Snowflake warehouse with adequate permissions for Hevo to access your data.
Perform the following steps to configure your Snowflake Destination in Edge:
(Optional) Create a Snowflake Account
When you sign up for a Snowflake account, you get 30 days of free access with $400 credits. Beyond this limit, usage of the account is chargeable. The free trial starts from the day you activate the account. If you consume the credits before 30 days, the free trial ends and subsequent usage becomes chargeable. You can still log in to your account, however, you cannot use any features, such as running a virtual warehouse, loading data, or performing queries, until you upgrade your account or add more credits.
Perform the following steps to create a Snowflake account:
-
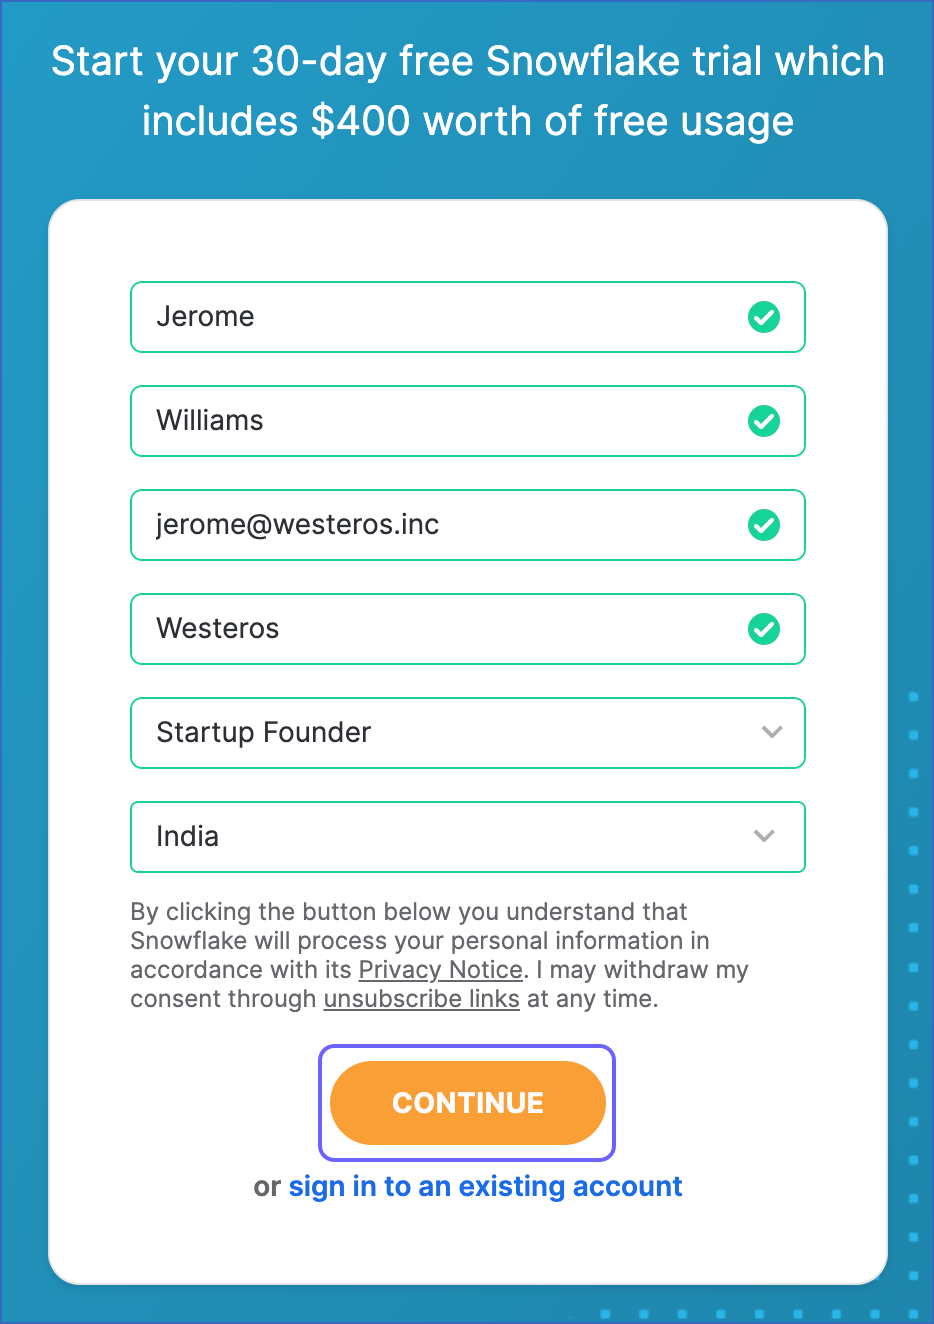
On the Sign up page, specify the following and click CONTINUE:
-
First Name and Last Name: The first and last name of the account user.
-
Company Email: A valid email address that can be used to manage the Snowflake account.
-
Company Name: The name of your organization.
-
Role: The account user’s role in the organization.
-
Country: Your organization’s country or region.
-
-
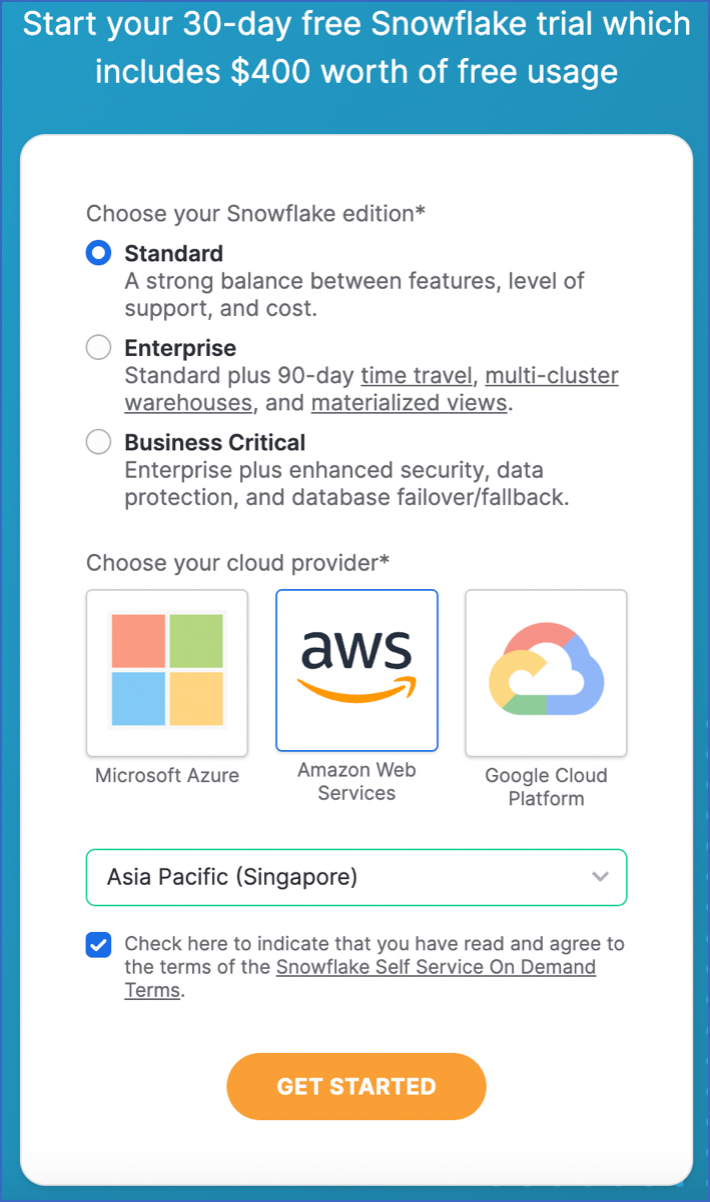
Select the Snowflake edition you want to use.
Note: You can choose the edition that meets your organization’s needs. Read Snowflake Editions to know more about the different editions available.
-
Select one of the following cloud platforms to host your Snowflake account:
- Amazon Web Services (AWS)
- Google Cloud Platform (GCP)
- Microsoft Azure (Azure)
Read Supported Cloud Platforms to know more about the details and pricing of each cloud platform.
-
Select the region for your cloud platform. In each platform, Snowflake provides one or more regions where the account can be provisioned.
-
Click GET STARTED.
An email to activate your account is sent to your registered email address. Click the link in the email to activate and sign in to your Snowflake account.
Create and Configure your Snowflake Warehouse
Hevo provides you with a ready-to-use script to create the resources needed to configure your Snowflake Edge Destination.
Follow these steps to run the script:
-
Log in to your Snowflake account.
-
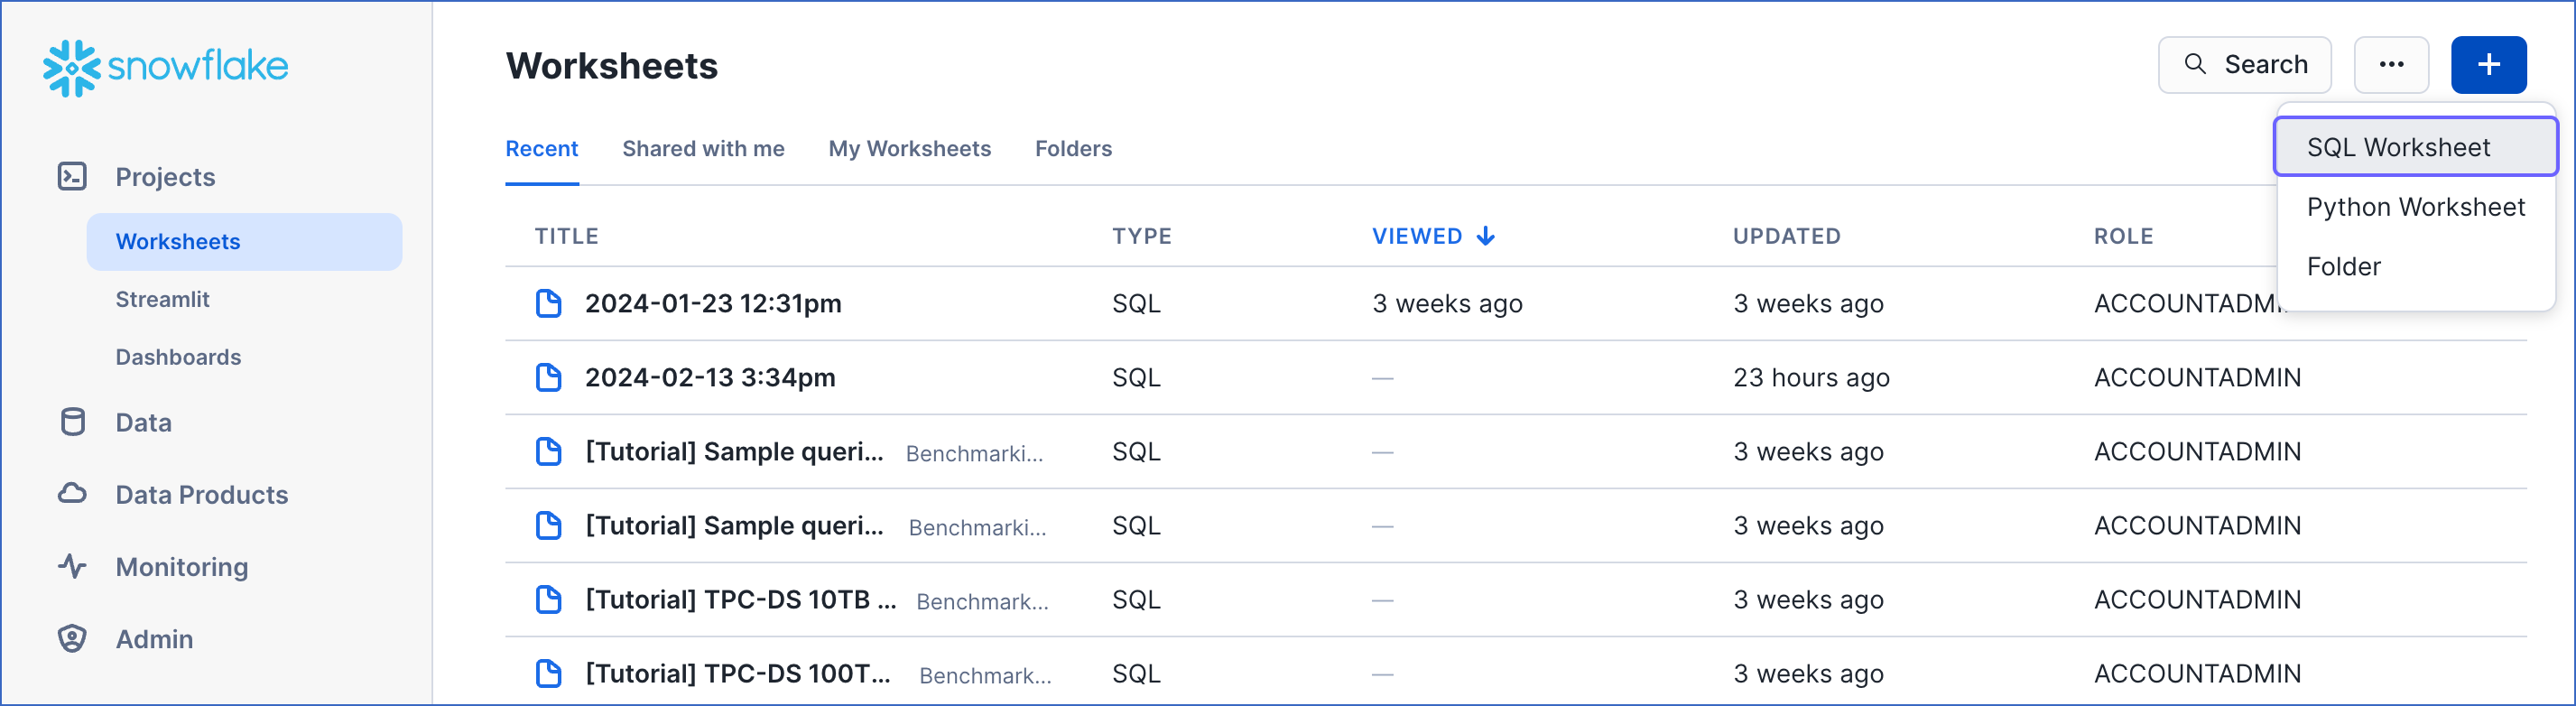
In the left navigation pane, under Projects, click Worksheets.

-
In the top right corner of the Worksheets tab, click the + icon and select SQL Worksheet from the drop-down to create a worksheet.
-
Copy the following script and paste it into the SQL Worksheet. Replace the sample values provided for
warehouse_nameanddatabase_name(in lines 2-3 of the script) with your own. You can specify new warehouse and database names to create them now or use the names of pre-existing resources.-- Create variables for warehouse/database (needs to be uppercase for objects) set warehouse_name = 'HOGWARTS'; -- Replace "HOGWARTS" with the name of your warehouse set database_name = 'RON'; -- Replace "RON" with the name of your database begin; -- Change role to sysadmin for the warehouse/database steps use role sysadmin; -- Create a warehouse for Hevo only if it does not exist create warehouse if not exists identifier($warehouse_name) warehouse_size = xsmall warehouse_type = standard auto_suspend = 60 auto_resume = true initially_suspended = true; -- Create a database for Hevo only if it does not exist create database if not exists identifier($database_name); commit;Note: The values for
warehouse_nameanddatabase_namemust be in uppercase. -
Press CMD + A (Mac) or CTRL + A (Windows) inside the worksheet area to select the script.
-
Press CMD + return (Mac) or CTRL + Enter (Windows) to run the script.
-
Once the script runs successfully, you can specify the warehouse and database names (from lines 2-3 of the script) to connect your warehouse to Hevo while creating a Snowflake Destination in Edge.
Create a Snowflake User and Grant Permissions
Hevo does not need a user with the ACCOUNTADMIN role to connect to your Snowflake warehouse. You can create a non-administrative user and assign a custom role to it or use one of the admin roles. Hevo provides you with a ready-to-use script to create the user and grant it only the essential permissions required by Hevo to load data into your Snowflake warehouse.
Perform the following steps to run the script:
-
Follow steps 1-3 from the Create and Configure your Snowflake Warehouse section.
-
Copy the following script and paste it into the SQL Worksheet. Replace the sample values provided for
role_name,user_name, anduser_password(in lines 7-9 of the script) with your own. Also, substitute those forexisting_warehouse_nameandexisting_database_name(in lines 2-3 of the script) with the names of pre-existing resources or those created by the script above.Note: The following script creates the role and user; it does not create the warehouse, database, or schema.
-- Create variables for the resources created by the script in the Create and Configure your Snowflake Warehouse section set existing_warehouse_name = 'HOGWARTS'; -- Replace "HOGWARTS" with the name of the warehouse created earlier for Hevo set existing_database_name = 'RON'; -- Replace "RON" with the name of the database created earlier for Hevo -- Create variables for user/password/role/warehouse/database/schema set role_name = 'HEVO'; -- Replace "HEVO" with your role name set user_name = 'HARRY_POTTER'; -- Replace "HARRY_POTTER" with your username set user_password = 'Gryffindor'; -- Replace "Gryffindor" with the user password begin; -- Change the role to securityadmin for user/role steps use role securityadmin; -- Create a role for Hevo create role if not exists identifier($role_name); grant role identifier($role_name) to role SYSADMIN; -- Create a user for Hevo create user if not exists identifier($user_name) password = $user_password default_role = $role_name default_warehouse = $existing_warehouse_name; -- Grant access to the user grant role identifier($role_name) to user identifier($user_name); -- Grant the Hevo role access to the warehouse use role sysadmin; grant USAGE on warehouse identifier($existing_warehouse_name) to role identifier($role_name); -- Grant the Hevo role access to the database and existing schemas use role accountadmin; grant CREATE SCHEMA, MONITOR, USAGE on database identifier($existing_database_name) to role identifier($role_name); -- Grant the Hevo role access to future schemas and tables use role accountadmin; grant SELECT on future tables in database identifier($existing_database_name) to role identifier($role_name); grant MONITOR, USAGE, MODIFY on future schemas in database identifier($existing_database_name) to role identifier($role_name); commit;Note: The values for all the variables, such as
role_nameanduser_name, must be in uppercase. -
Press CMD + A (Mac) or CTRL + A (Windows) inside the worksheet area to select the script.
-
Press CMD + return (Mac) or CTRL + Enter (Windows) to run the script.
-
Once the script runs successfully, you can specify the values of
user_nameanduser_password(from lines 8-9 of the script) when connecting to your Snowflake warehouse using access credentials.Note: Hevo recommends connecting to the Snowflake warehouse using key pair authentication.
If you are a user in a Snowflake account created after the BCR Bundle 2024_08, Snowflake recommends connecting to ETL applications, such as Hevo, through a service user. For this, run the following command:
ALTER USER <your_snowflake_user> SET TYPE = SERVICE;
Replace the placeholder value in the command above with your own. For example, <your_snowflake_user> with HARRY_POTTER.
Note: New service users will not be able to connect to Hevo via password authentication; they must connect with a key pair. Read Obtain a Private and Public Key Pair for the steps to create a key pair.
Obtain a Private and Public Key Pair (Recommended Method)
You can authenticate Hevo’s connection to your Snowflake data warehouse using a public-private key pair. For this, you need to:
-
Generate the public key for your private key.
1. Generate a private key
You can connect to Hevo using an encrypted or unencrypted private key.
Note: Hevo supports only private keys encrypted using the Public-Key Cryptography Standards (PKCS) #8-based triple DES algorithm.
Open a terminal window, and on the command line, do one of the following:
-
To generate an unencrypted private key, run the command:
openssl genrsa 2048 | openssl pkcs8 -topk8 -inform PEM -out <unencrypted_key_name> -nocrypt -
To generate an encrypted private key, run the command:
openssl genrsa 2048 | openssl pkcs8 -topk8 -v2 des3 -inform PEM -out <encrypted_key_name>You will be prompted to set an encryption password. This is the passphrase that you need to provide while connecting to your Snowflake Edge Destination using key pair authentication.
Note: Replace the placeholder values in the commands above with your own. For example, <encrypted_key_name> with encrypted_rsa_key.p8.
The private key is generated in the PEM format.
-----BEGIN ENCRYPTED PRIVATE KEY-----
MIIFJDBWBg...
----END ENCRYPTED PRIVATE KEY-----
Open the private key file and remove the extra blank space or empty line at the bottom of the file. Save the private key file in a secure location and provide it while connecting to your Snowflake Edge Destination using key pair authentication.
2. Generate a public key
To use a key pair for authentication, you must generate a public key for the private key created in the step above. For this:
Open a terminal window, and on the command line, run the following command:
openssl rsa -in <private_key_file> -pubout -out <public_key_file>
Note:
-
Replace the placeholder values in the command above with your own. For example, <private_key_file> with encrypted_rsa_key.p8.
-
If you are generating a public key for an encrypted private key, you will need to provide the encryption password used to create the private key.
The public key is generated in the PEM format.
-----BEGIN PUBLIC KEY-----
MIIBIjANBgk...
-----END PUBLIC KEY-----
Save the public key file in a secure location. You must associate this public key with the Snowflake user that you created for Hevo.
3. Assign the public key to a Snowflake user
To authenticate Hevo’s connection to your Snowflake warehouse using a key pair, you must associate the public key generated in the step above with the user that you created for Hevo. To do this:
-
Log in to your Snowflake account as a user with the SECURITYADMIN role or a higher role.
-
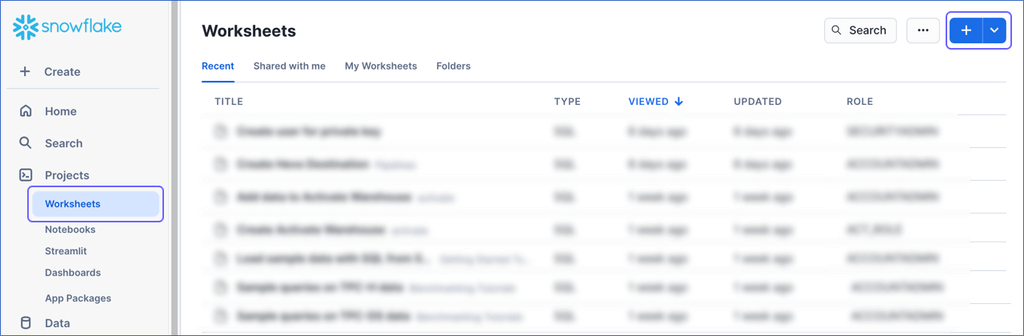
In the left navigation bar, click Projects, and then click Worksheets.
-
In the top right corner of the Worksheets tab, click the + icon to create a SQL worksheet.
-
Run the following command in the SQL worksheet:
ALTER USER <your_snowflake_user> SET RSA_PUBLIC_KEY='<public_key>'; // Example ALTER USER HARRY_POTTER set RSA_PUBLIC_KEY='MIIBIjANBgk...';Note:
-
Replace the placeholder values in the command above with your own. For example, <your_snowflake_user> with HARRY_POTTER.
-
Set the public key value to the content between
-----BEGIN PUBLIC KEY-----and-----END PUBLIC KEY-----.
-
To check whether the public key is configured correctly, you can follow the steps provided in the verify the user’s public key fingerprint section.
Obtain your Snowflake Account URL
The organization name and account name are visible in your Snowflake web interface URL.
For most accounts, the URL looks like https://<orgname>-<account_name>.snowflakecomputing.com.
For example, https://hevo-westeros.snowflakecomputing.com. Here, hevo is the organization name and westeros is your account name.
Perform the following steps to obtain your Snowflake account URL:
-
Log in to your Snowflake instance.
-
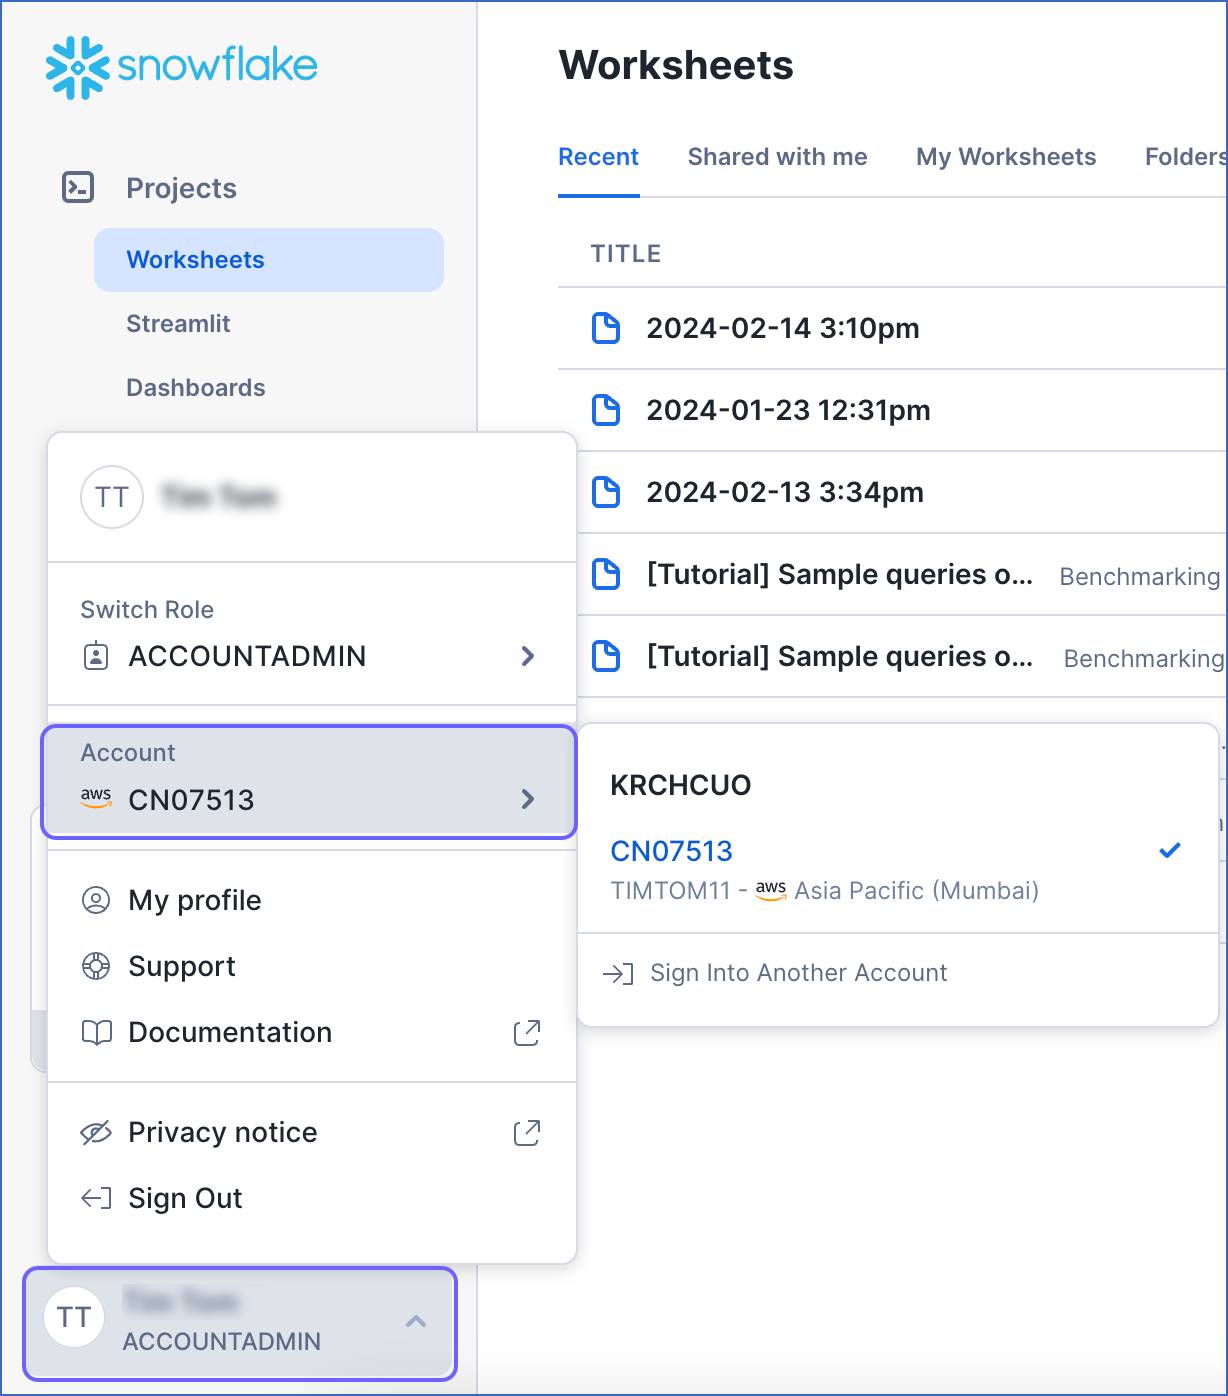
Navigate to the bottom of the left navigation pane, click the account selector, and then hover over the Account section.
-
In the pop-up, locate the account whose URL you want to obtain and hover over it.
-
In the account details pop-up dialog, click the Copy icon to copy the account identifier, and save it securely.
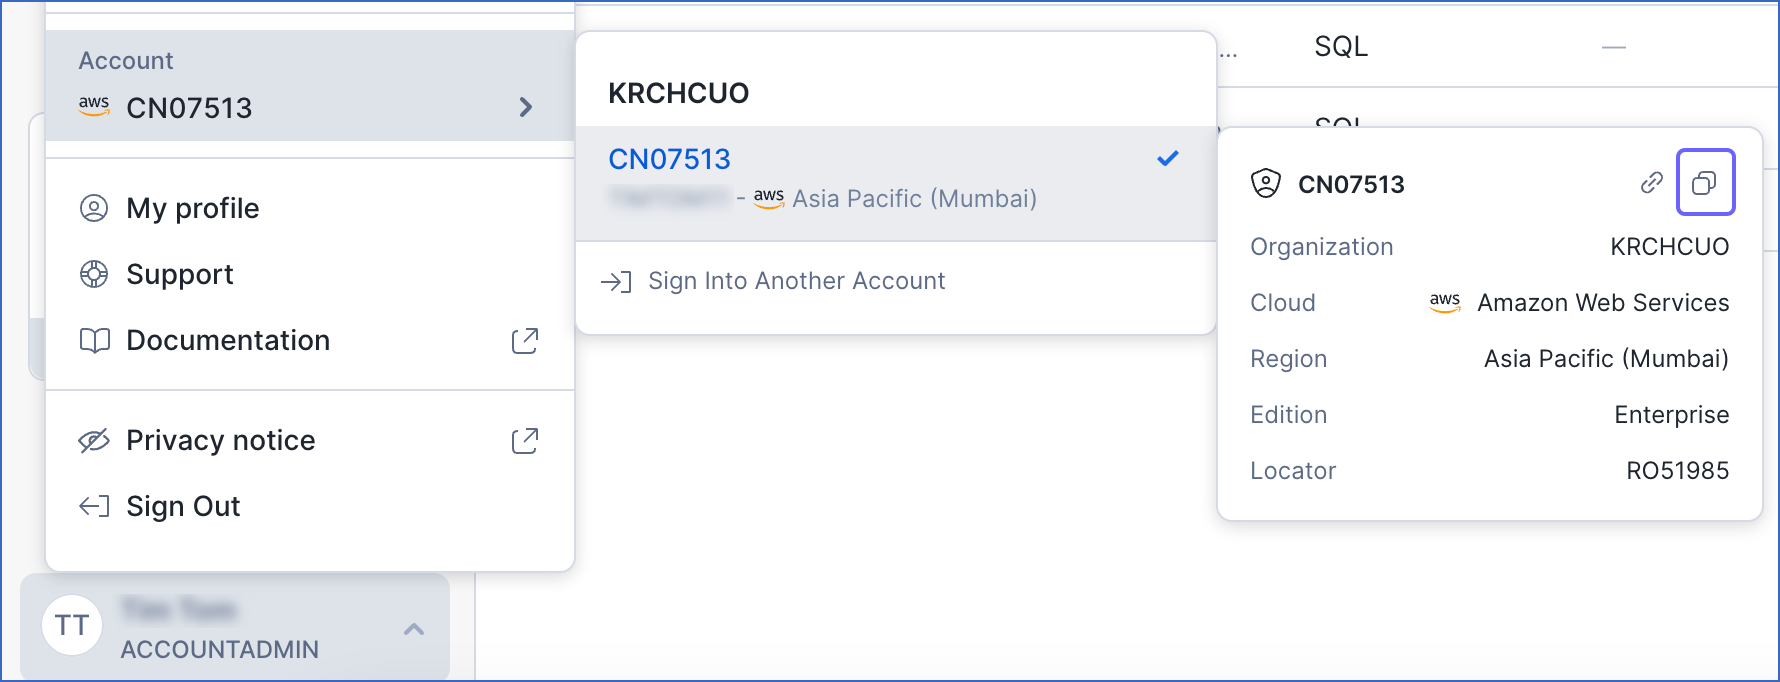
The account identifier is provided in the format <orgname>.<account_name>. To convert it to the account URL, substitute the values of orgname and account_name in the format https://<orgname>-<account_name>.snowflakecomputing.com.
For example, if the account identifier is KRCHCUO.CN07513, the account URL is https://krchcuo-cn07513.snowflakecomputing.com.
Use this URL while configuring your Destination.
Configure S3 Bucket for Staging Data
Note: This section is applicable only if you enable the Use your S3 Bucket option while configuring the Destination.
By default, Hevo stages your data in a Hevo-managed S3 bucket before loading it into your Snowflake Destination. The S3 bucket serves as a staging area where data is temporarily stored before it is loaded into Snowflake, allowing Hevo to transfer a large volume of data to Snowflake in bulk. However, you may need to use your S3 bucket in the following cases:
-
Your Snowflake account has organization-level or account-level security controls, such as
REQUIRE_STORAGE_INTEGRATION_FOR_STAGE_CREATIONandREQUIRE_STORAGE_INTEGRATION_FOR_STAGE_OPERATIONenabled. -
You want to manage data staging within your own AWS environment.
In such cases, you can configure Hevo to use a bucket you own. To set this up, perform the following steps:
If you do not have an S3 bucket, refer to Create an Amazon S3 Bucket to create one.
Tip: It is recommended to create the bucket in the same AWS region as your Snowflake account to avoid slower load times.
1. Create an IAM Policy for your S3 Bucket
To allow Hevo to access your S3 bucket and load data into it, you must create an IAM policy with the following permissions and attach it to the IAM role or user:
| Permission Name | Allows Hevo to |
|---|---|
| s3:ListBucket | Check if the S3 bucket: - Exists - Can be accessed - Lists all the objects |
| s3:GetObject | Read staged files from the bucket. |
| s3:PutObject | Write staged files to the bucket. |
| s3: DeleteObject | Delete objects from the S3 bucket. Hevo requires this permission to delete the file it creates in your S3 bucket while testing the connection. Note: This permission is scoped to Hevo’s own staged files, not your existing bucket contents. However, Hevo recommends using a dedicated staging bucket or prefix rather than a bucket that also stores other data. |
Perform the following steps to create the IAM policy:
-
Log in to the AWS IAM Console.
-
In the left navigation pane, under Access Management, click Policies.
-
On the Policies page, click Create policy.

-
On the Specify permissions page, click JSON.

-
In the Policy editor section, paste the following JSON statements:
{ "Version": "2012-10-17", "Statement": [ { "Sid": "VisualEditor0", "Effect": "Allow", "Action": [ "s3:ListBucket", "s3:GetObject", "s3:PutObject", "s3:DeleteObject" ], "Resource": [ "arn:aws:s3:::<your_bucket_name>", "arn:aws:s3:::<your_bucket_name>/*" ] } ] }Note: Replace the placeholder values in the commands above with your own. For example, <your_bucket_name> with s3-destination1.
-
At the bottom of the page, click Next.
-
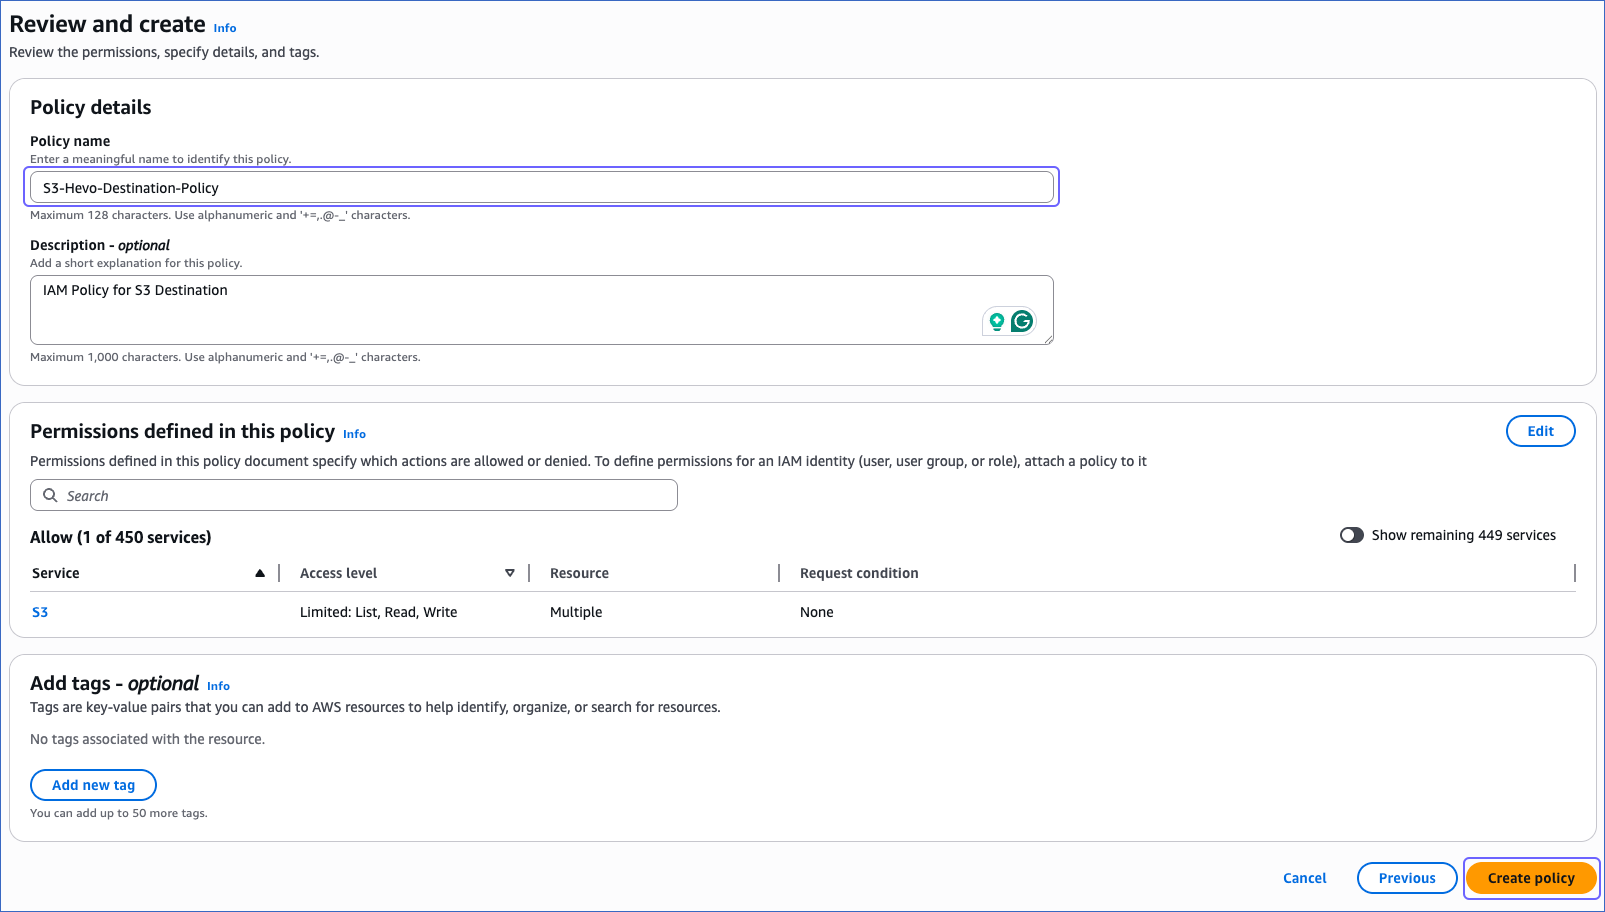
On the Review and create page, specify the Policy name, and at the bottom of the page, click Create policy.
You must assign this policy to the IAM role or the IAM user that you create for Hevo to access your S3 bucket. Without this, the connection will fail.
2. Create and Retrieve the Amazon S3 Connection Settings
Hevo connects to your S3 bucket using an IAM role. To set this up, you need to create an IAM role for Hevo, attach the policy you created in Step 1, and then retrieve the following credentials:
-
Amazon Resource Name (ARN): A unique address that identifies your IAM role in AWS.
-
External ID: A unique token that ensures only Hevo can access your AWS account.
1. Create an IAM role and assign the IAM policy
-
Log in to the AWS IAM Console.
-
In the left navigation pane, under Access Management, click Roles.
-
On the Roles page, click Create role.

-
In the Select trusted entity section, choose AWS account.

-
In the An AWS account section, choose Another AWS account, and in the Account ID field, specify Hevo’s Account ID, 393309748692.

-
In the Options section, select the Require external ID check box, specify an External ID of your choice, and click Next.

-
On the Add Permissions page, search and select the policy that you created in the Create an IAM Policy for your S3 Bucket section, and at the bottom of the page, click Next.

-
On the Name, review, and create page, specify a Role name and a Description.

-
At the bottom of the page, click Create role.
You are redirected to the Roles page.
2. Retrieve the ARN and External ID
-
On the Roles page, click the role that you created in the Create an IAM role and assign the IAM policy section.

-
On the <Role name> page, Summary section, click the copy icon below the ARN field and save it securely like any other password.

-
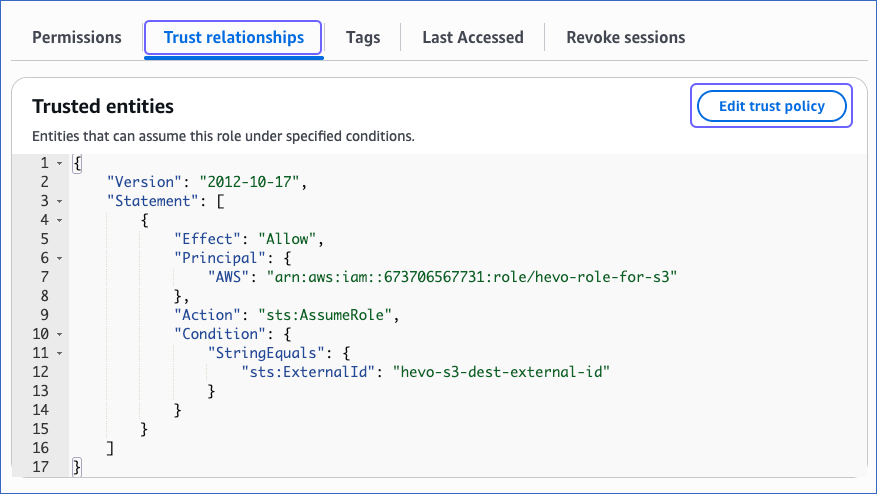
In the Trust relationships tab, copy the external ID corresponding to the sts:ExternalID field. For example, hevo-s3-dest-external-id in the image below.

Use the ARN and the external ID while creating a Snowflake storage integration and configuring a Snowflake Destination in Hevo.
3. Create a Snowflake Storage Integration
A storage integration allows Snowflake to read data from your S3 bucket. To create a Snowflake storage integration, you must have the following credentials of your S3 bucket:
-
Folder path where the files are staged
Perform the following steps to create a Snowflake storage integration:
-
Log in to your Snowflake account.
-
In the left navigation bar, hover over Projects, and then click Workspaces.

-
In the workspace pane on the left, click + Add new, and then click SQL File.

-
Rename the SQL file and press Enter (Windows) or return (Mac) to create an SQL worksheet.
-
Paste the following script in the worksheet. The script creates a new storage integration that allows Snowflake to access your S3 bucket.
CREATE STORAGE INTEGRATION IF NOT EXISTS '<storage_integration_name>' TYPE = EXTERNAL_STAGE STORAGE_PROVIDER = 'S3' STORAGE_AWS_ROLE_ARN = '<your_iam_role_arn>' STORAGE_AWS_EXTERNAL_ID = '<your_external_id>' ENABLED = TRUE STORAGE_ALLOWED_LOCATIONS = ('s3://<your_bucket_name>/<your_folder_path>/'); GRANT USAGE ON INTEGRATION '<storage_integration_name>' TO ROLE '<snowflake_role_name>'; DESC STORAGE INTEGRATION '<storage_integration_name>';Note: Replace the placeholder values in the script above with your own. For example, <storage_integration_name> with HEVO-INTEGRATION.
-
Press CMD + A (Mac) or CTRL + A (Windows) inside the worksheet area to select the script.
-
Press CMD + return (Mac) or CTRL + Enter (Windows) to run the script.
Once the script runs successfully, your storage integration will be created. Make a note of the STORAGE_AWS_IAM_USER_ARN and STORAGE_AWS_EXTERNAL_ID. Use them to add your Snowflake account as a trusted entity in your S3 bucket.
4. Add Snowflake as a Trusted Entity in your S3 bucket
To allow Snowflake to access the data in your S3 bucket, you must update the IAM role created in Step 2 and add Snowflake as a trusted entity. To do so, perform the following steps:
-
On the Roles page of your IAM console, click the role that you created in Step 2 .
-
In the Trust relationships tab, click Edit trust policy.
-
In the Edit trust policy section, paste the following JSON statements and do the following:
{ "Version": "2012-10-17", "Statement": [ { "Effect": "Allow", "Principal": { "AWS": [ "<your_iam_role_arn>", "<snowflake-aws-iam-user-arn>" ] }, "Action": "sts:AssumeRole", "Condition": { "StringEquals": { "sts:ExternalId": "<storage_aws_external-id>" } } } ] }-
Replace <your_iam_role_arn> with the ARN of your IAM role retrieved in the Retrieve the ARN and External ID section.
-
Replace <snowflake-aws-iam-user-arn> and <storage_aws_external-id> with the
STORAGE_AWS_IAM_USER_ARNandSTORAGE_AWS_EXTERNAL_IDvalues retrieved in the Create a Snowflake Storage Integration section.
-
-
Click Update policy.
The IAM role trust policy has been successfully updated, allowing your Snowflake account to access data in your S3 bucket.
Configure Snowflake as a Destination in Edge
Perform the following steps to configure Snowflake as a Destination in Edge:
-
Click DESTINATIONS in the Navigation Bar.
-
Click the Edge tab in the Destinations List View and click + Create Edge Destination.
-
On the Create Destination page, click Snowflake.
-
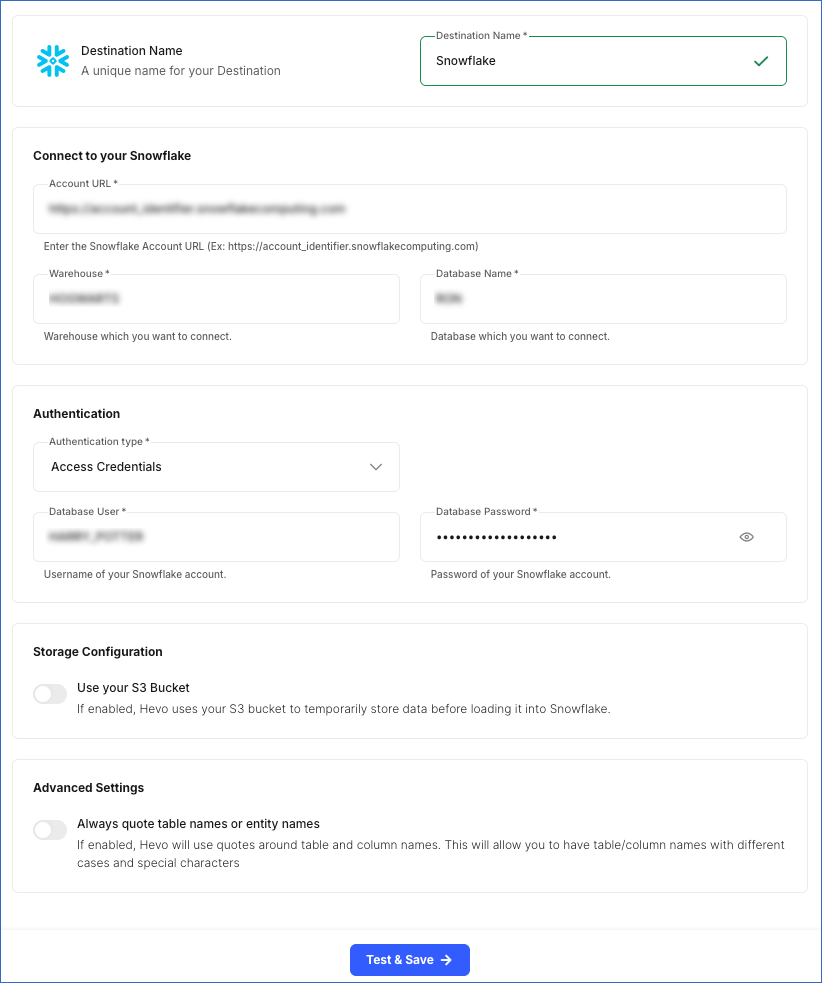
In the screen that appears, specify the following:
-
Destination Name: A unique name for your Destination, not exceeding 255 characters.
-
In the Connect to your Snowflake section:
-
Account URL: The Snowflake account URL that you retrieved in Step 5 above.
-
Warehouse: The Snowflake warehouse associated with your database where the data is managed. This warehouse can be the one you created above or an existing one.
-
Database Name: The name of the database where the data is to be loaded. This database can be the one you created above or an existing one.
Note: All the field values are case-sensitive.
-
-
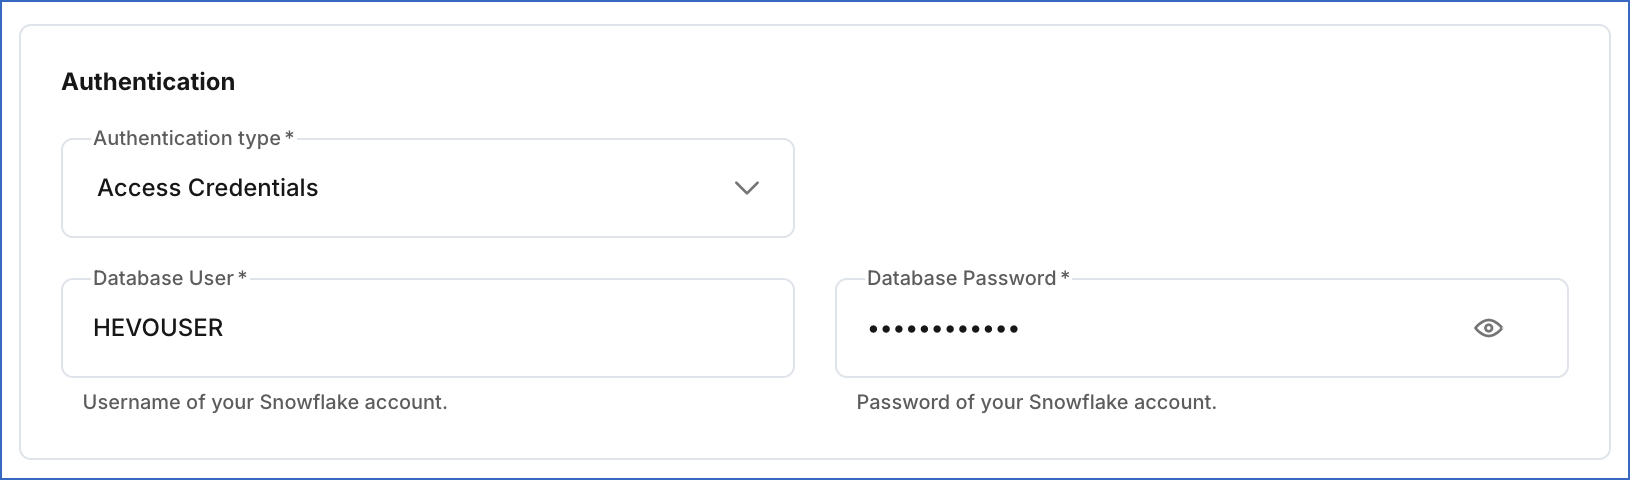
In the Authentication section, from the drop-down, select the Authentication type for authenticating Hevo’s connection to your Snowflake warehouse:
-
Key Pair: Connect to your Snowflake warehouse using a public and private key pair.
-
Database User: A user with a non-administrative role created in the Snowflake database. This user must be the one to whom the public key is assigned.
-
Private Key: A cryptographic password used along with a public key to generate digital signatures. Click the attach (
 ) icon to upload the private key file that you generated in Step 4.
 -
Passphrase: The password given while generating the encrypted private key. Leave this field blank if you have attached a non-encrypted private key.
-
-
Access Credentials: Connect to your Snowflake warehouse using a password.
Note: Hevo does not support Multi-factor Authentication (MFA) for Snowflake Destinations. If MFA is enforced for the Snowflake user configured in your Destination settings, do one of the following:
-
Ask your Snowflake administrator to exempt the user from MFA enforcement.
-
Configure your Destination using one of the following:
-
A dedicated service account that is exempt from MFA enforcement.
-
Key pair authentication method, as it does not require MFA.
-
-
Database User: A user with a non-administrative role created in the Snowflake database. This user can be the one you created in Step 3 or an existing one.
-
Database Password: The password of the database user specified above.
-
Note: All the field values are case-sensitive.
-
-
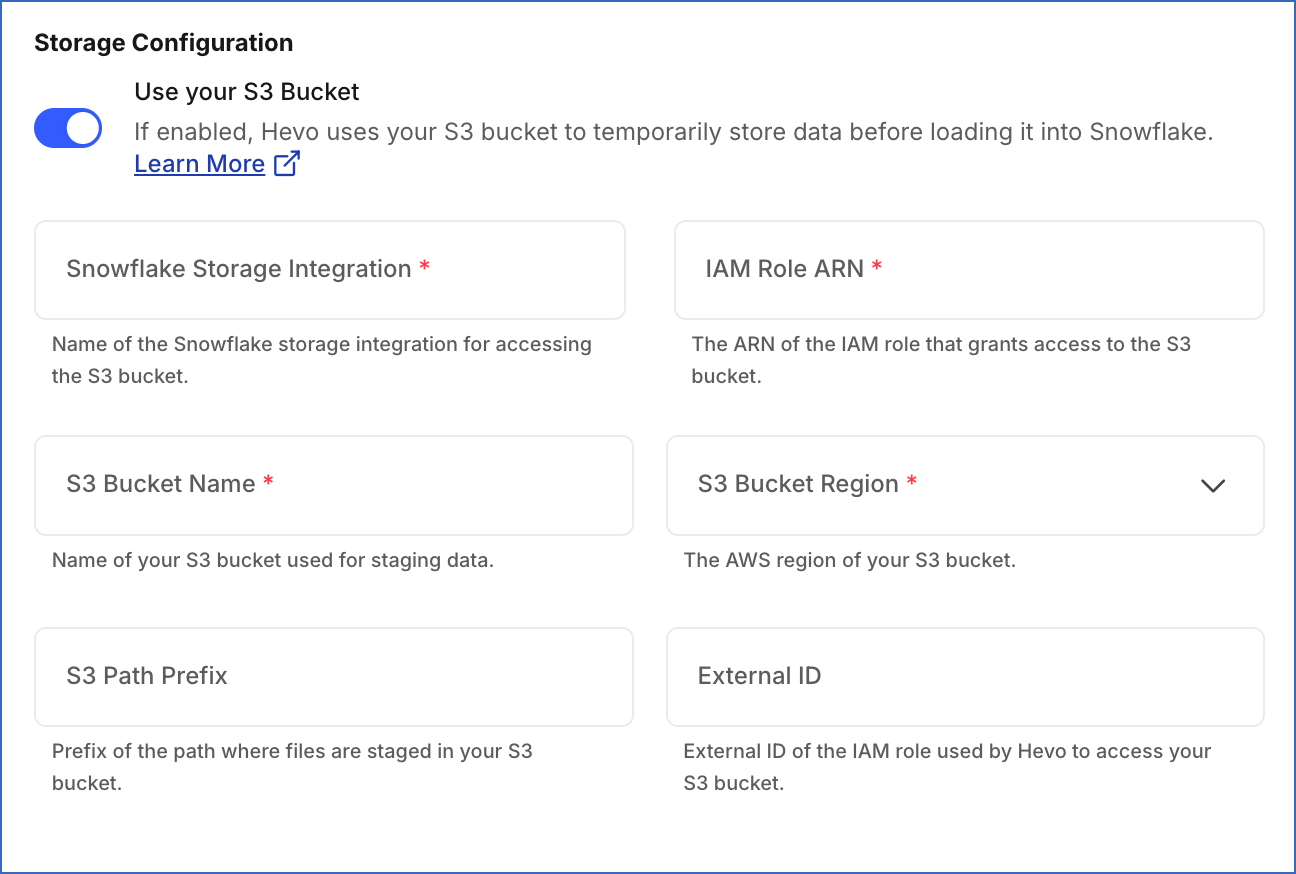
Storage Configuration:
-
Use your S3 Bucket: Enable this option if your Snowflake account requires a storage integration, or you want to stage data in your S3 bucket instead of Hevo’s before loading it into the Destination.
Note: Ensure that Hevo has the required permissions to access your S3 bucket and load data into it.
-
Snowflake Storage Integration: The name of the storage integration created in your Snowflake account to access your S3 bucket.
-
IAM Role ARN: The unique identifier assigned by AWS to the IAM role to grant Hevo access to your S3 bucket.
-
S3 Bucket Name: The name of your S3 bucket where you want Hevo to stage data before loading it into your Destination. For example, my-s3-bucket.
-
S3 Bucket Region: The AWS region where your S3 bucket is located. For example, Asia Pacific (Singapore).
-
S3 Path Prefix (Optional): A prefix added to the directory path in your S3 bucket where you want Hevo to stage data. Refer to Configuring the Pipeline Settings for more information on the directory path.
-
External ID (Optional): The external ID of the IAM role Hevo uses to access your S3 bucket.
-
-
-
Advanced Settings:
-
Always quote table names or entity names:
If enabled, Hevo puts double quotes around the Source table and column names while creating them in your Snowflake Destination. This setting preserves the case of your table and or column names. Further, if the names contain any special characters, these are retained as well. You need to use quotes while accessing your tables and columns in Snowflake.
For example,
SELECT "Column 1", "name" from RON.DARK_ARTS."test1_Table namE 05";If disabled, Hevo sanitizes your Source table and column names, replacing each non-alphanumeric (special) character with an underscore and removing trailing underscores. Hence, you are not required to use quotes while accessing them. Read Destination Considerations for more information about unquoted identifiers in Snowflake.
For example,
SELECT COLUMN_1, NAME from RON.DARK_ARTS.TEST1_TABLE_NAME_05;
-
-
-
Click Test & Save to test the connection to your Snowflake warehouse.
Once the test is successful, Hevo creates your Snowflake Edge Destination. You can use this Destination while creating your Edge Pipeline.
Additional Information
Read the detailed Hevo documentation for the following related topics:
Error Snowflake Database Not Found
Error Summary
- Hevo was unable to locate the database specified in the Destination configuration inside your Snowflake warehouse.
Potential Causes
-
The database entered does not exist in the connected Snowflake warehouse.
-
The database name has a case mismatch, a typing or formatting error.
-
The database was deleted, renamed, or moved to another Snowflake warehouse or account.
-
The database user does not have the required privileges on the Snowflake database.
-
Your Destination configuration is correct, but temporary connectivity issues, such as short-term network interruptions or cloud service disruptions, may prevent access from Hevo to the Snowflake database.
Suggested Action(s)
-
Verify that the database specified in the Destination configuration exists in the Snowflake warehouse and account.
-
Ensure that the database name has no typing or formatting errors and matches casing.
-
Review the access privileges for the specified user. Grant any missing privileges, such as USAGE, on the configured database. Refer to the Create a Snowflake User and Grant Permissions section for the steps.
-
For temporary connectivity problems:
-
Check Snowflake’s service status or the cloud provider’s console for any maintenance or outage notifications.
-
Contact the network administrator or cloud provider support to confirm account status and network access.
Verify your network connectivity and then try configuring the Destination again.
-
Modifying Snowflake Destination Configuration in Edge
You can modify some settings of your Snowflake Edge Destination after its creation. However, any configuration changes will affect all the Pipelines using that Destination.
To modify the configuration of your Snowflake Destination in Edge:
-
In the detailed view of your Destination, do one of the following:
-
Click the More (
 ) icon to access the Destination Actions menu, and then click Edit Destination.
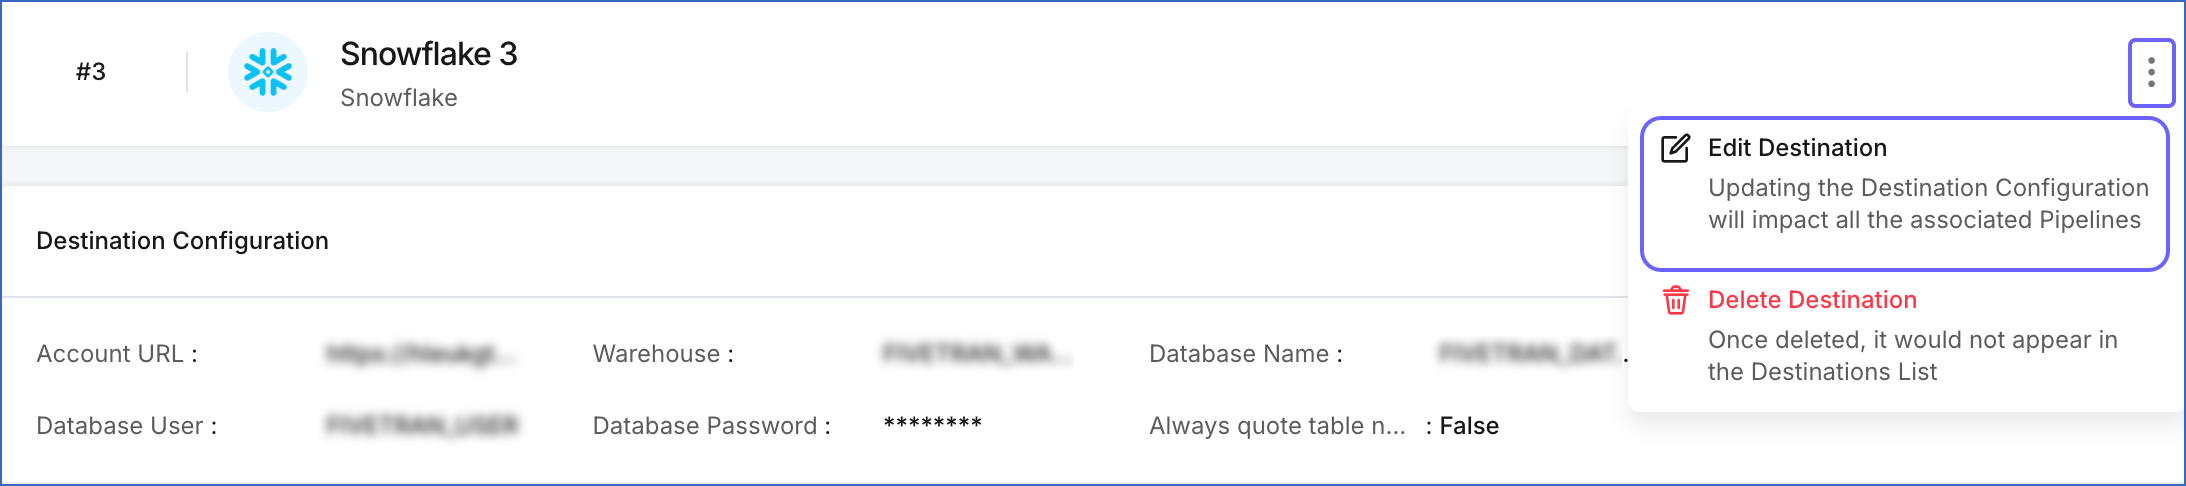
-
In the Destination Configuration section, click Edit.
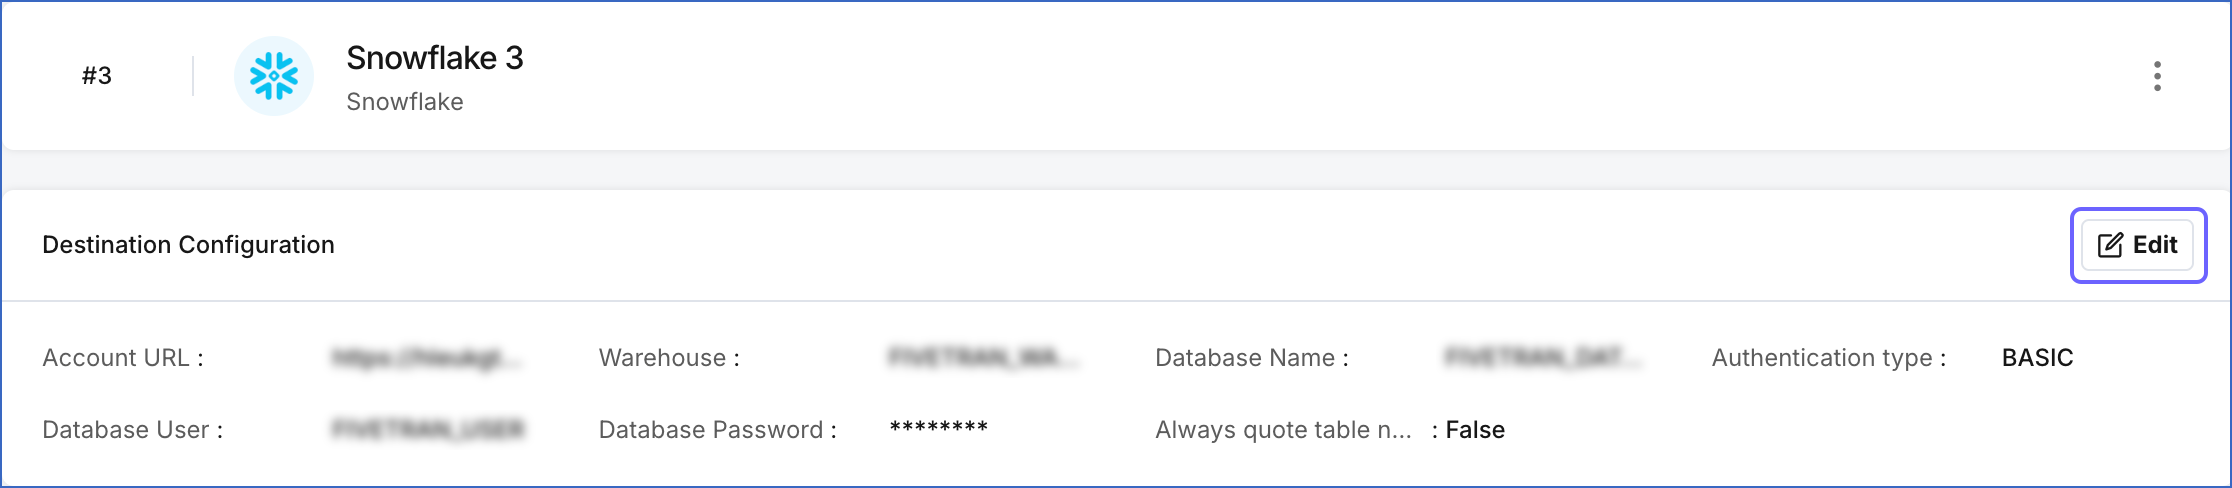
-
-
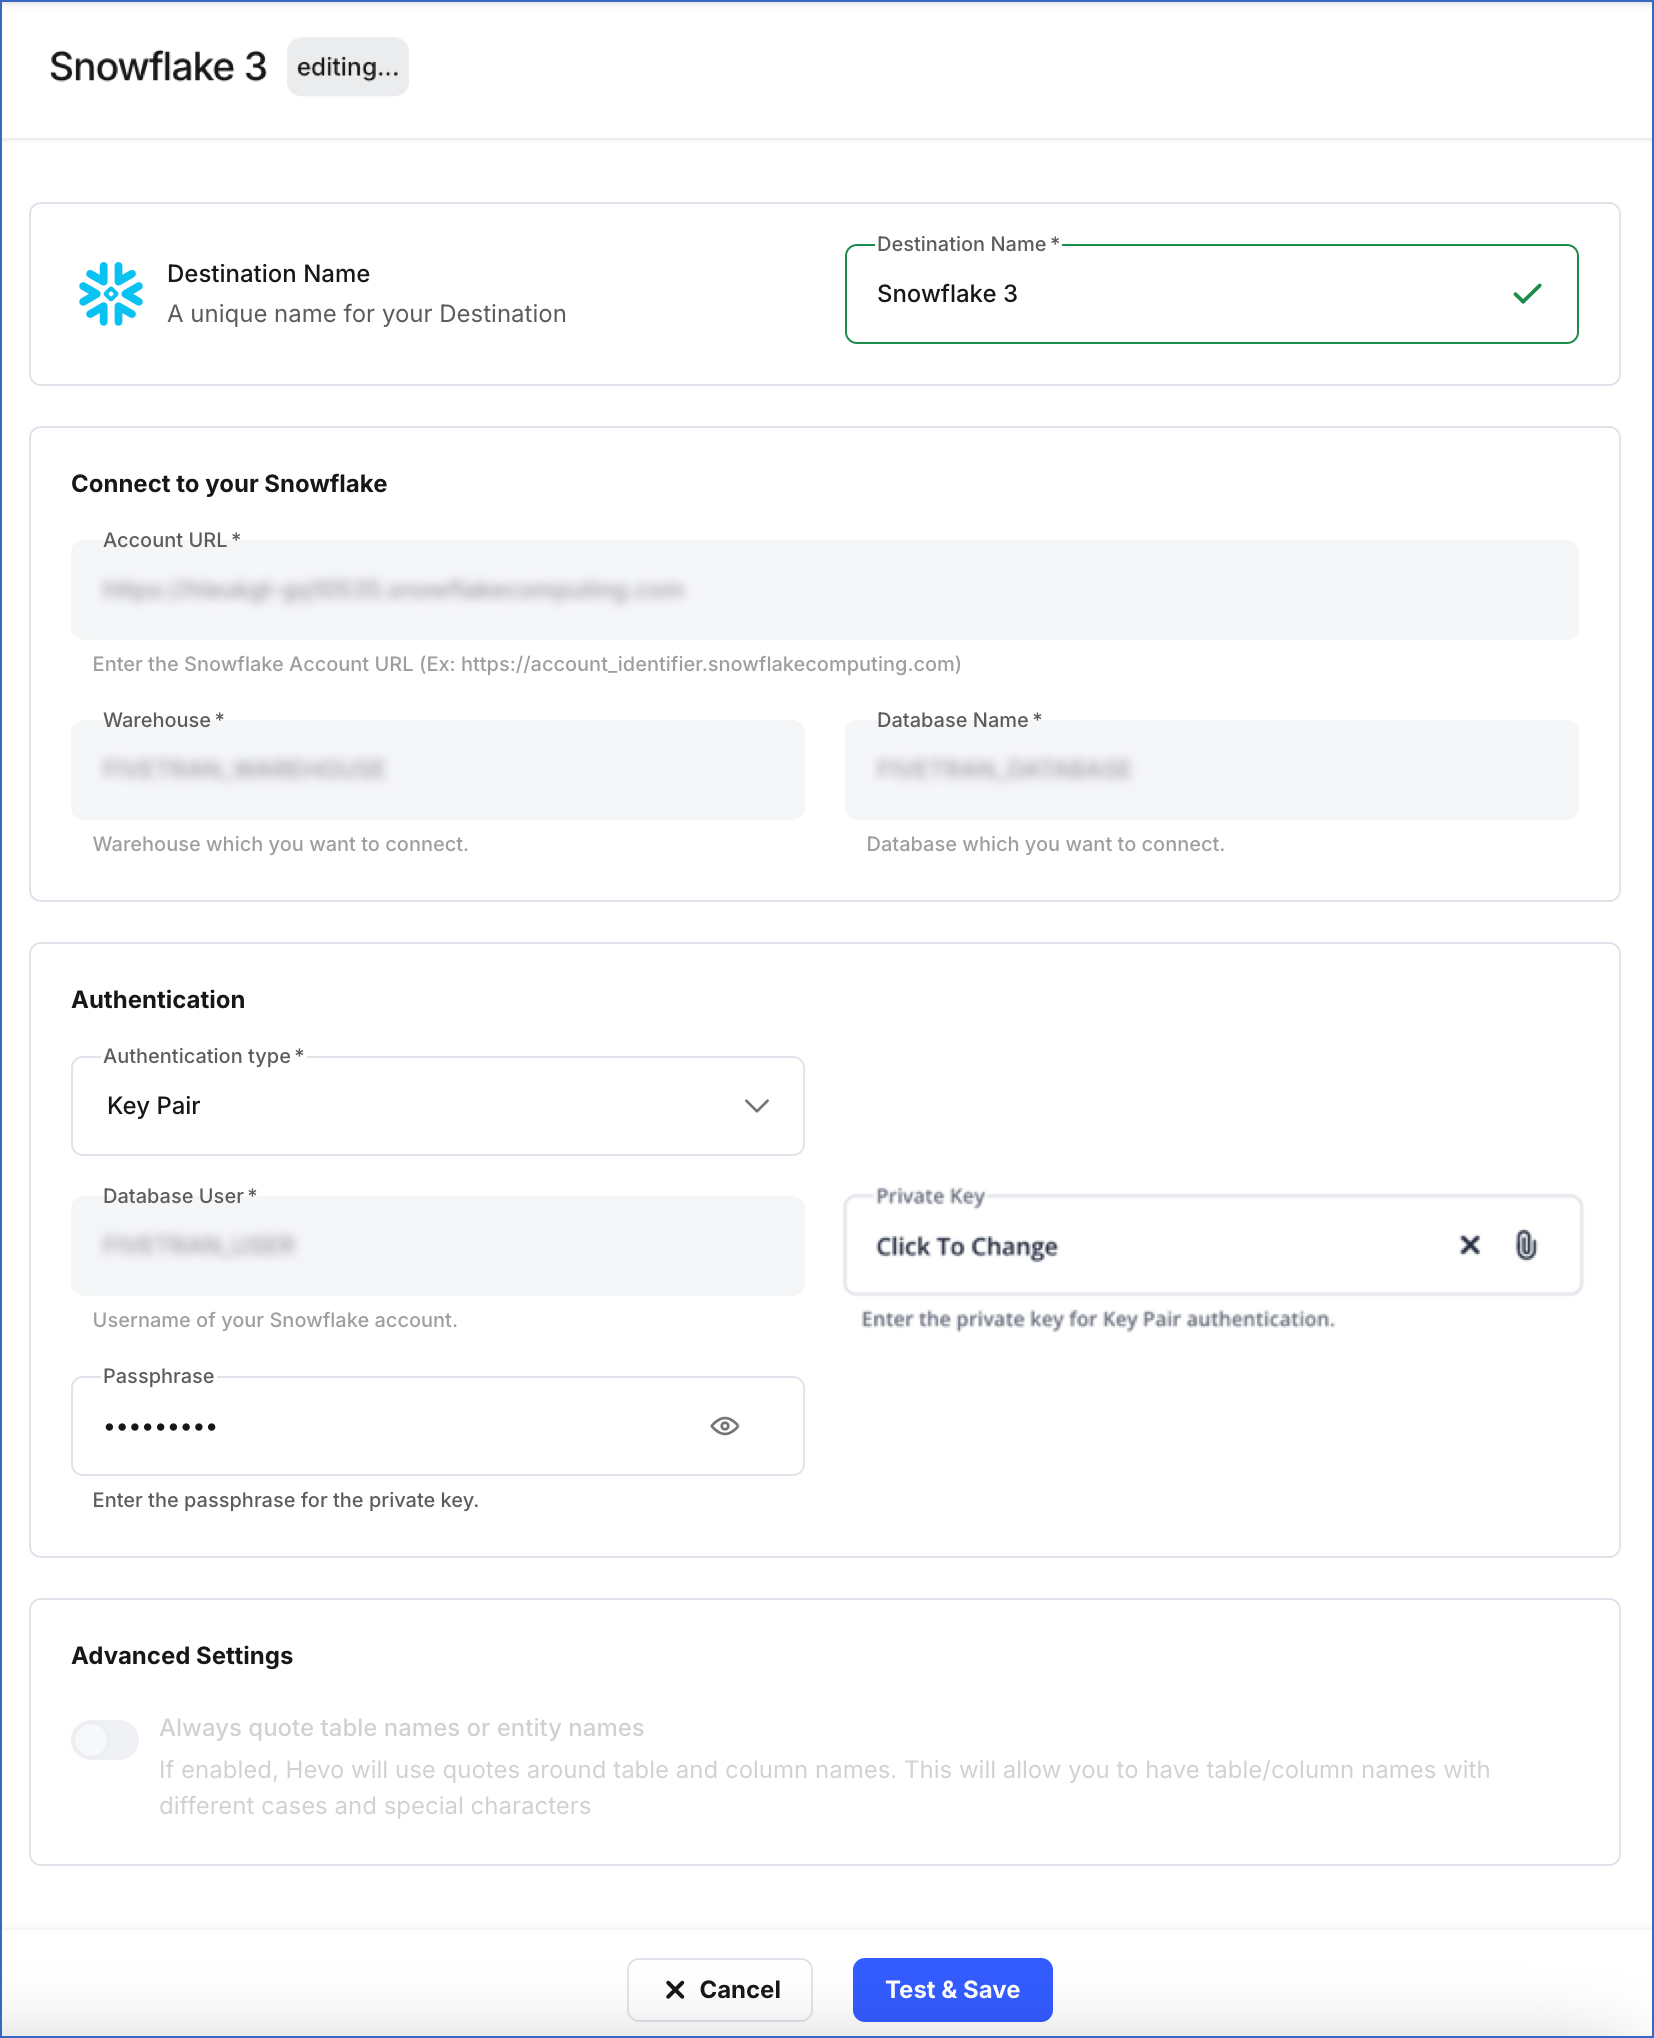
On the <Your Destination Name> editing page:
-
You can specify a new name for your Destination, not exceeding 255 characters.
-
In the Authentication section, you can modify your Authentication type and update the necessary fields based on the selected type:
-
Key Pair:
-
Private Key: Click the attach (
) icon to upload your encrypted or non-encrypted private key file. As the database user configured in your Destination cannot be changed, ensure that the public key corresponding to the uploaded private key is assigned to it. -
Passphrase: Click Change to clear the field. If you uploaded an encrypted private key, provide the password used to generate it; otherwise, leave the field blank.
-
-
Access Credentials:
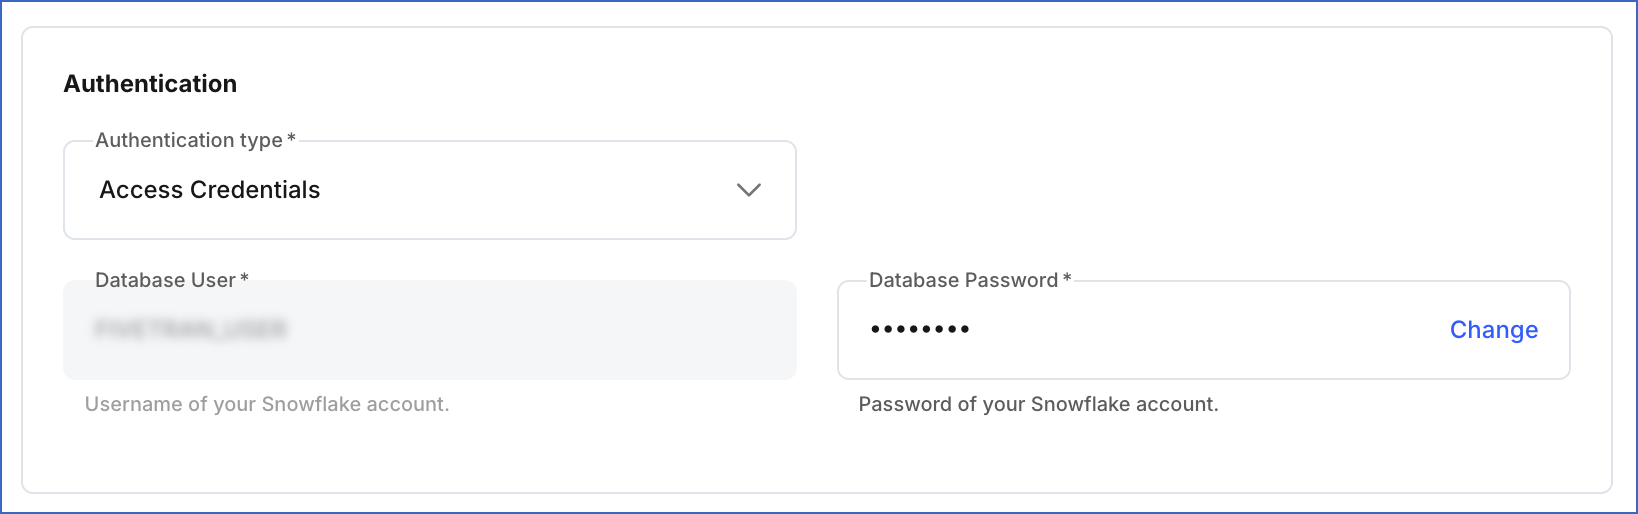
- Database Password: Click Change to update the password for the user configured in your Destination.
-
-
-
Click Test & Save to check the connection to your Snowflake Destination and then save the modified configuration.
Data Type Evolution in Snowflake Destinations
Hevo has a standardized data system that defines unified internal data types, referred to as Hevo data types. During the data ingestion phase, the Source data types are mapped to the Hevo data types, which are then transformed into the Destination-specific data types during the data loading phase. A mapping is then generated to evolve the schema of the Destination tables.
The following image illustrates the data type hierarchy applied to Snowflake Destination tables:

Data Type Mapping
The following table shows the mapping between Hevo data types and Snowflake data types:
| Hevo Data Type | Snowflake Data Type |
|---|---|
| BOOLEAN | BOOLEAN |
| BYTEARRAY | BINARY |
| - BYTE - SHORT - INTEGER - LONG |
NUMBER(38,0) |
| DATE | DATE |
| DATETIME | TIMESTAMP_NTZ |
| DATETIME_TZ | TIMESTAMP_TZ |
| DECIMAL | - NUMBER - VARCHAR |
| - FLOAT - DOUBLE |
FLOAT |
| VARCHAR | VARCHAR |
| - JSON - XML |
VARIANT |
| TIME | TIME |
| TIMETZ | VARCHAR |
Handling the Decimal data type
For Snowflake Destinations, Hevo maps DECIMAL data values with a fixed precision (P) and scale (S) to the NUMBER (NUMERIC) or VARCHAR data types. This mapping is decided based on the number of significant digits (P) in the numeric value and the number of digits in the numeric value to the right of the decimal point (S). Refer to the table below to understand the mapping:
| Precision and Scale of the Decimal Data Value | Snowflake Data Type |
|---|---|
| Precision: >0 and <= 38 Scale: > 0 and <= 37 |
NUMBER |
For precision and scale values other than those mentioned in the table above, Hevo maps the DECIMAL data type to a VARCHAR data type.
Read Numeric Types to know more about the data types, their range, and the literal representation Snowflake uses to represent various numeric values.
Handling Time and Timestamp data types
Snowflake supports fractional seconds up to 9 digits of precision (nanoseconds) for both TIME and TIMESTAMP data types. Hevo truncates any digits beyond this limit. For example, a Source value 12:00:00.1234567890 will be stored as 12:00:00.123456789.
Handling of Unsupported Data Types
Hevo does not allow the direct mapping of a Source data type to any of the following Snowflake data types:
-
ARRAY
-
STRUCT
-
Any other data type not listed in the table above.
Hence, if the Source object is mapped to an existing Snowflake table with columns of unsupported data types, it may become inconsistent. To prevent any inconsistencies during schema evolution, Hevo maps all unsupported data types to the VARCHAR data type in Snowflake.
Destination Considerations
-
Snowflake converts any unquoted Source table and column names to uppercase while mapping to the Destination table. For example, the Source table, Table namE 05, is converted to TABLE_NAME_05. The same conventions apply to column names.
However, if you have enabled the Always quote table names or entity names option while configuring your Snowflake Destination, your Source table and column names are preserved. For example, the Source table, ‘Table namE 05’ is created as “Table namE 05” in Snowflake.
Limitations
-
Hevo replicates a maximum of 4096 columns to each Snowflake table, of which six are Hevo-reserved metadata columns used during data replication. Therefore, your Pipeline can replicate up to 4090 (4096-6) columns for each table.
-
If a Source object has a column value exceeding 16 MB, Hevo marks the Events as failed during ingestion, as Snowflake allows a maximum column value size of 16 MB.