Activate is currently available for Early Access. Please contact your Hevo account executive or the Support team to enable it for your team. Alternatively, request for early access to try out one or more such features.
Amazon Redshift offers a cloud-based data warehouse service that stores your data across one or more compute nodes and lets you query it using SQL. In Activate, an Amazon Redshift database acts as the Source that your datasets read from before the data is sent to your business applications.
Activate reads your data from Amazon Redshift without modifying the tables your datasets read from. It keeps a record of each sync in a dedicated hevo schema in the same database, so the user you configure needs read access to your data and write access to that one schema. Activate also temporarily stores your data in a Hevo-managed Amazon S3 bucket, so your cluster must be able to access Amazon S3.
If your Pipelines already load data into Amazon Redshift, you can use that same database as your Source. Activate then sends the data that your Pipelines have already loaded and your Transformations have already prepared.
Prerequisites
-
The Amazon Redshift cluster is running and can access Amazon S3.
-
The cluster is publicly accessible, or an SSH server that can access it is available.
-
Hevo’s IP addresses for your region are allowlisted in the security group attached to your cluster.
-
You have superuser access to the Amazon Redshift database, or access to a user that can create users and schemas.
-
A dedicated schema named hevo is available in the database that your datasets read from. Activate records the progress of each sync there.
-
Hevo is assigned the USAGE privilege on each schema that your datasets read from, and the SELECT privilege on the current and future tables in those schemas.
-
Hevo is assigned full access to the hevo schema, which allows it to create, read, write, rename, and drop its own bookkeeping tables.
-
The database hostname and port number of your cluster are available.
Perform the following steps to configure your Amazon Redshift Source in Activate:
(Optional) Create an Amazon Redshift Cluster
Note: If you are using an existing Amazon Redshift cluster, skip to the Allowlist Hevo IP Addresses for your region section.
An Amazon Redshift cluster provides the compute and the storage that Activate uses to run your dataset queries. You can use an existing cluster or create one specifically for Activate.
Perform the following steps to create a cluster:
-
Log in to the Amazon Redshift console.
-
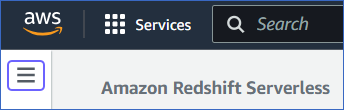
Click the hamburger menu at the top left corner of the console.
-
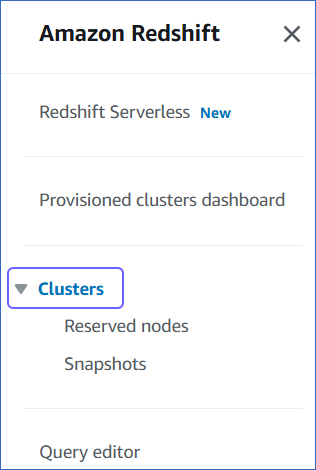
In the left navigation pane, click Clusters.
-
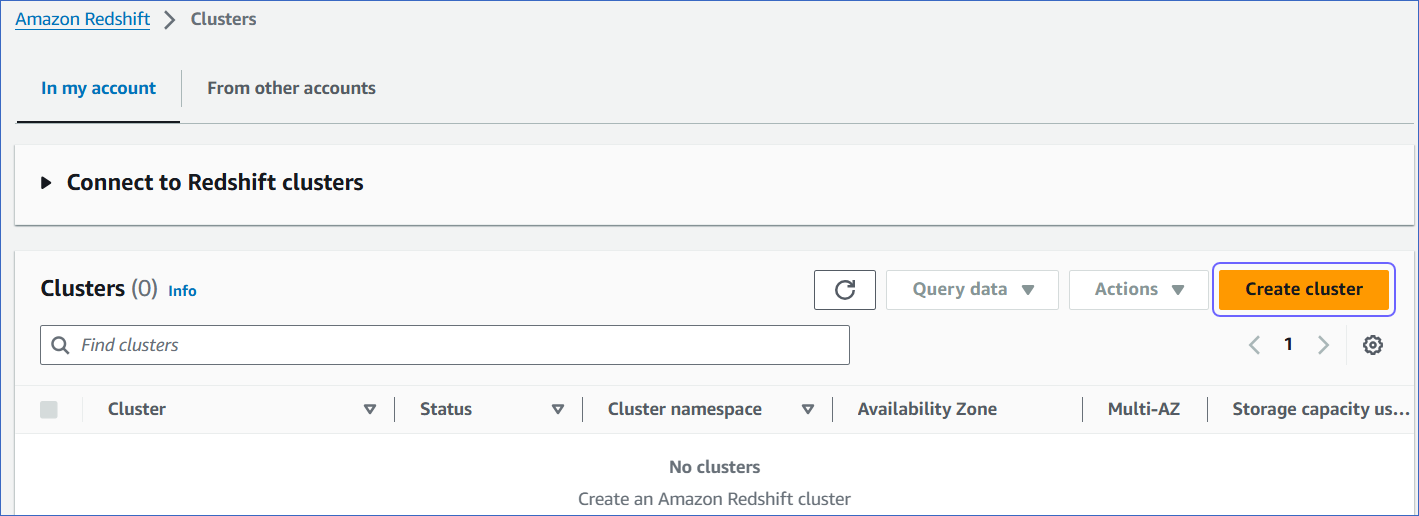
In the In my account tab, Clusters section, click Create cluster.
-
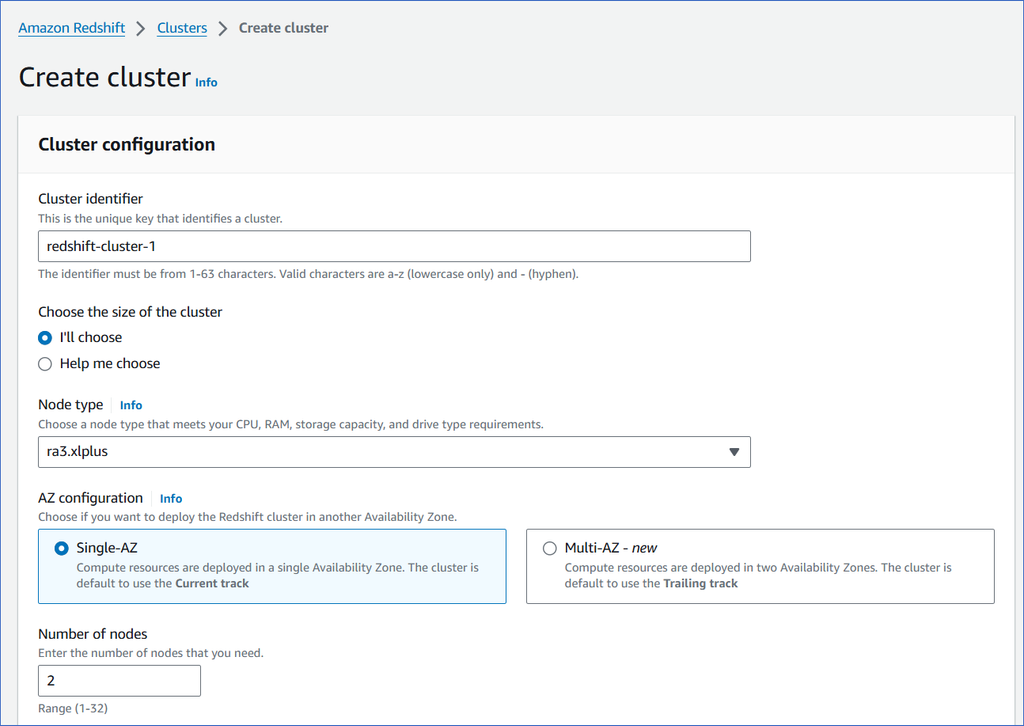
On the Create cluster page, Cluster configuration section, specify the following:
-
Cluster identifier: A unique name for your cluster.
-
Node type: The primary data processing purpose for which the node is to be used.
-
Select RG for the best price and performance, as these nodes also include an integrated data lake query engine.
-
Select RA3 to scale and pay for the compute and the managed storage independently.
-
Select DC2 if you want compute-intensive nodes with local solid-state drive (SSD) storage.
Each node type has a different cost depending on the storage and compute resources. The Configuration summary section shows the estimated cost for the node type and the number of nodes you select. The node types available to you depend on your AWS Region. Refer to the Amazon Redshift pricing page for more information.
-
-
AZ configuration: The deployment setting for your cluster across different availability zones (AZ).
-
Select Single-AZ if you want to deploy your cluster in a single availability zone.
-
Select Multi-AZ if you want to deploy your cluster in two availability zones.
-
-
Number of nodes: The number of nodes, based on the amount of data or computational processing you require. Select 1 to start with. You can increase this value later by resizing your cluster.
Note: The minimum and the maximum number of nodes depend on the node type you select.
-
-
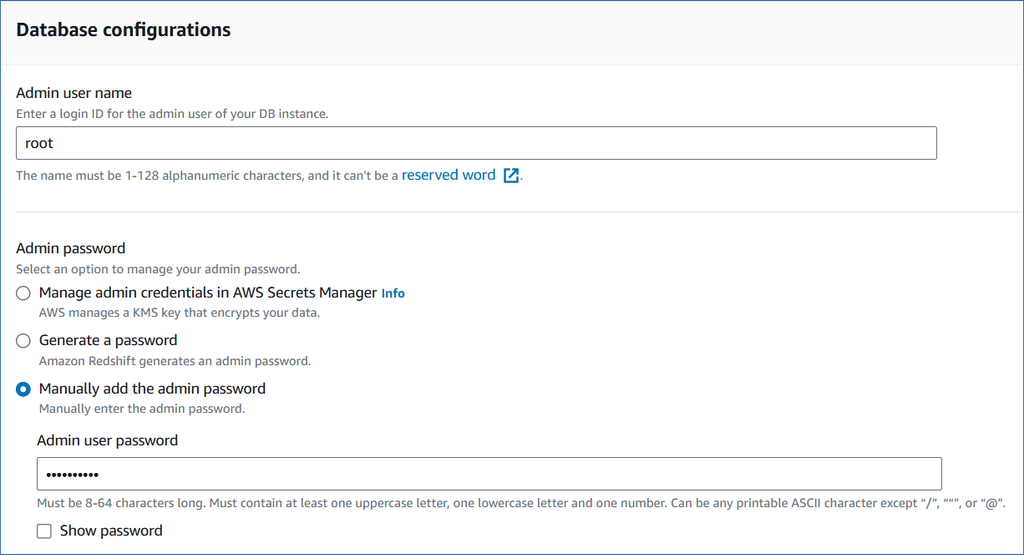
In the Database configurations section, select Manually add the admin password, and specify the following:
-
Admin user name: A unique name for the admin user of your cluster.
-
Admin user password: The password for the admin user. It must be 8-64 characters long and contain at least one uppercase letter, one lowercase letter, and one number.
-
-
In the Additional configurations section, you can use the default settings provided by AWS, or disable the Use defaults option and specify any additional settings you need.
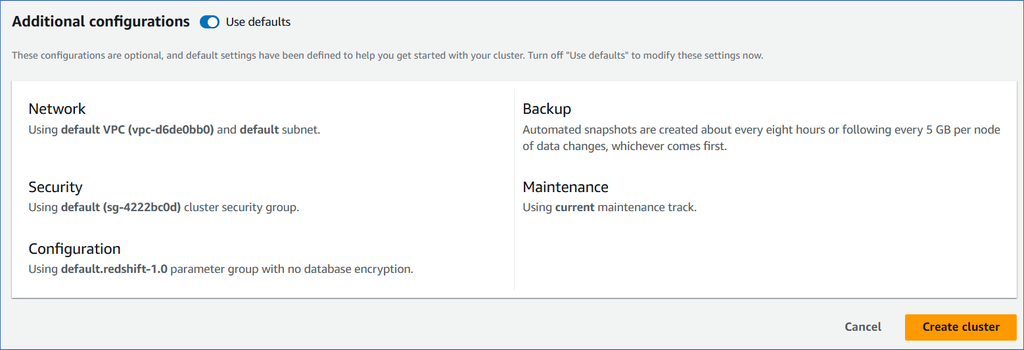
Note: If you want Hevo to connect directly to your cluster, disable the Use defaults option, and in the Network and security section, enable Publicly accessible. Leave this option disabled if you plan to connect through an SSH tunnel. You can also change this setting after the cluster is created. Read Make your Redshift cluster publicly accessible for the steps.
-
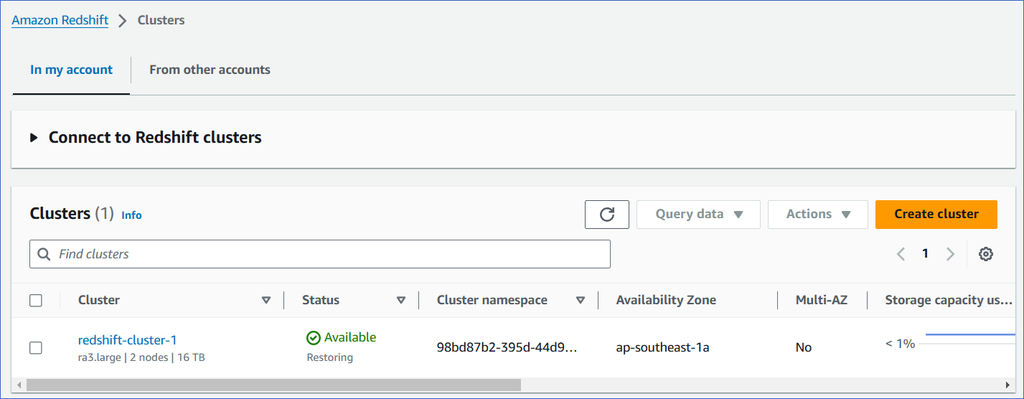
Click Create cluster. You can view the new cluster in the Clusters section. Once the cluster configurations are complete, the status changes to Available.
-
(Optional) Click the cluster to view its details.
Allowlist Hevo IP Addresses for your region
To connect Hevo directly to your Amazon Redshift cluster, you need the following:
-
A cluster that is publicly accessible, so that it can be reached from outside its virtual private cloud (VPC).
-
The Hevo IP addresses for your region, allowed by the security group attached to your cluster.
These settings allow Hevo to reach your cluster over the internet and to connect to it. If either one is missing, the connection test fails even when the credentials are correct.
Note: If you connect through an SSH tunnel, your cluster does not need to be publicly accessible. Allowlist the Hevo IP addresses on your SSH server instead. Read Connecting Through SSH for the steps.
1. Make your Redshift cluster publicly accessible
Perform the following steps to make your cluster publicly accessible:
-
Follow steps 1-3 from the Create an Amazon Redshift Cluster section to open the Clusters page.
-
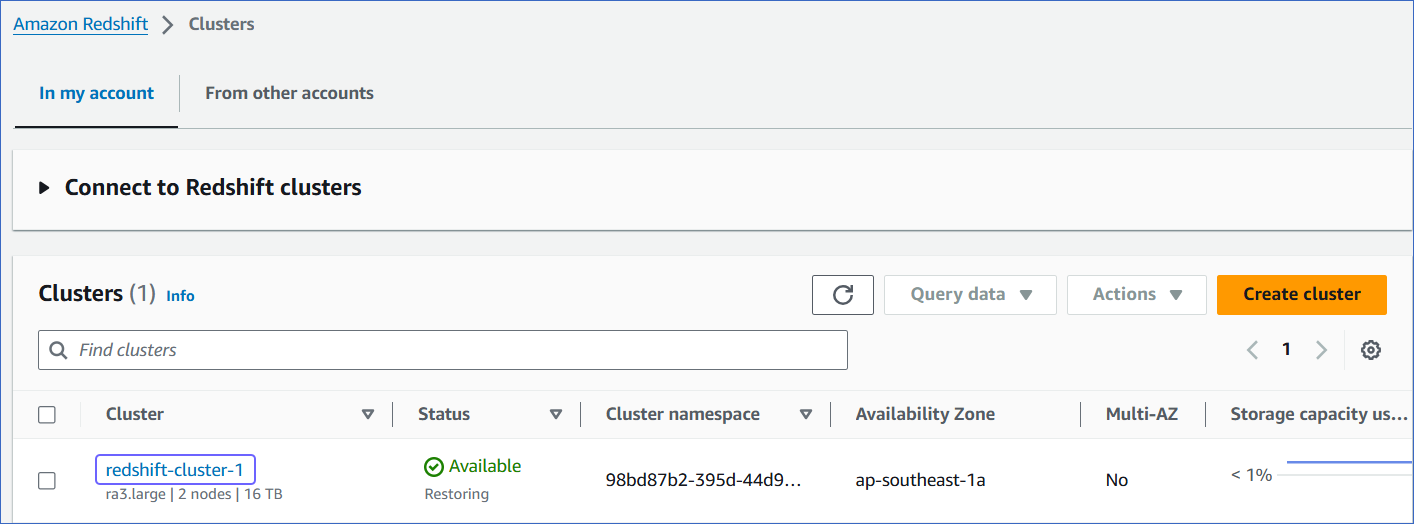
In the In my account tab, Clusters section, click the cluster you want to connect to Hevo.
-
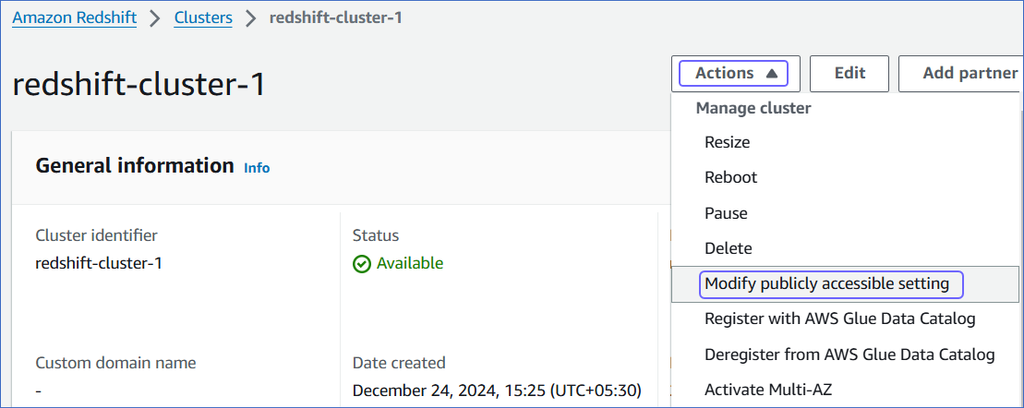
On the <Cluster Name> page, click the Actions drop-down, and then click Modify publicly accessible setting.
-
On the Edit publicly accessible pop-up window, select the Turn on Publicly accessible check box, and then click Save changes.
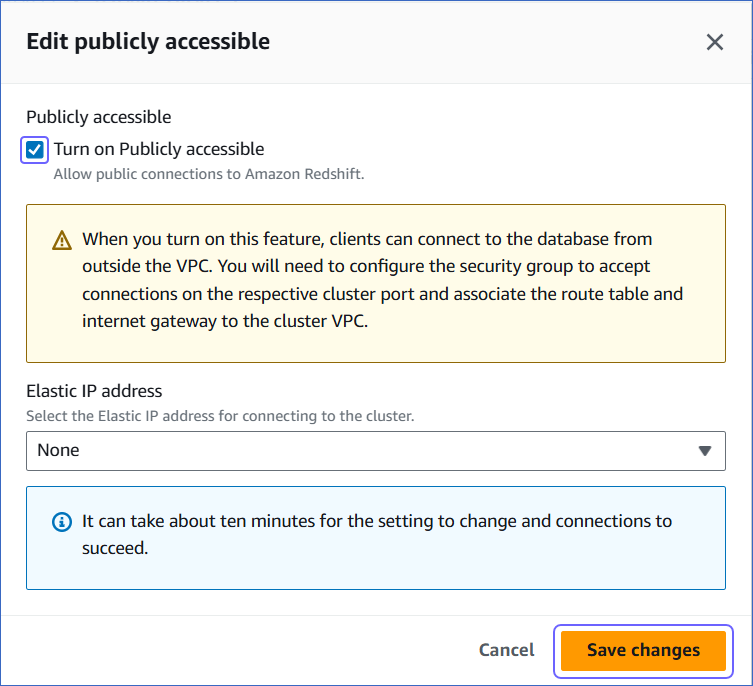
Note: It can take about ten minutes for the setting to change and for connections to succeed.
Your cluster now has an endpoint that can be reached from outside its VPC. However, the security group attached to the cluster decides which addresses can connect to that endpoint, so proceed to allowlist the Hevo IP addresses for your region.
2. Allowlist the Hevo IP addresses
A security group controls the traffic that is allowed to reach your cluster, so you must add an inbound rule to it for each Hevo IP address.
Perform the following steps to allowlist the Hevo IP addresses for your region:
-
Follow steps 1-3 from the Create an Amazon Redshift Cluster section to open the Clusters page.
-
In the In my account tab, Clusters section, click the cluster you want to connect to Hevo.
-
On the <Cluster Name> page, click the Properties tab.
-
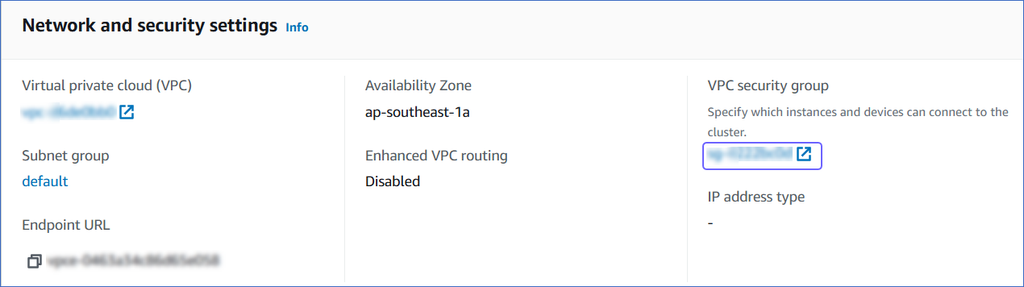
Scroll to the Network and security settings section, and click the link text under VPC security group.
-
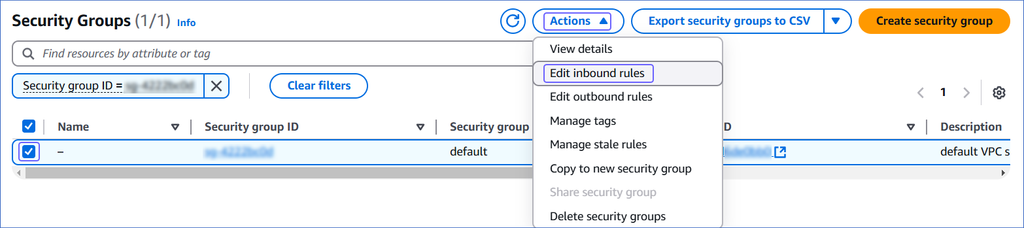
On the Security Groups page, select the check box for your security group, and from the Actions drop-down, click Edit inbound rules.
-
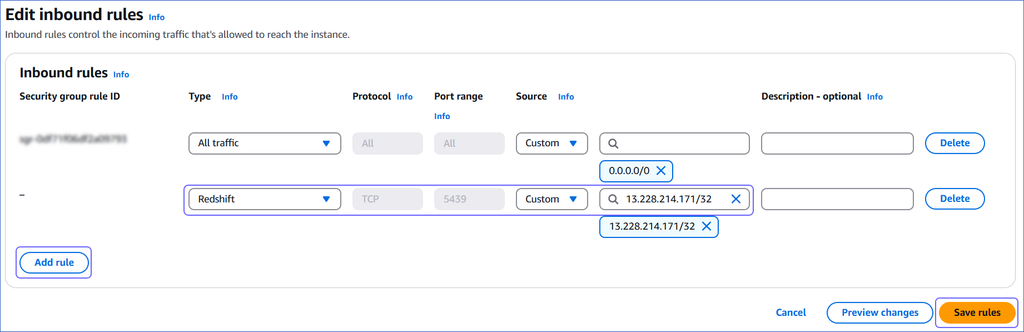
On the Edit inbound rules page, do the following:
-
Click Add rule.
-
In the Type column, select Redshift from the drop-down. The Port range is set to 5439 automatically.
-
In the Source column, select Custom from the drop-down, and specify one of the Hevo IP addresses for your region, in the CIDR format. For example, 13.228.214.171/32.
-
Repeat steps 1-3 to allowlist all the IP addresses.
-
-
Click Save rules.
The Hevo IP addresses are allowlisted, and Activate can connect to your Amazon Redshift cluster.
Create the Bookkeeping Schema
Activate records the progress of each sync in a dedicated schema named hevo, in the same database that your datasets read from. This schema helps Activate identify and send only the rows that changed since the last successful run, and stores the records that failed to sync. Your own data is never stored here. Read bookkeeping for more information.
Activate does not create the schema for you. If it is missing, the connection test fails.
Perform the following steps to create the bookkeeping schema:
-
Connect to your Amazon Redshift database as a superuser or a user with the CREATE privilege, using any SQL client tool, such as DBeaver or Postico.
-
Run the following command to create the bookkeeping schema:
CREATE SCHEMA hevo;Ensure that the schema name is lowercase. By default, Amazon Redshift stores identifiers in lowercase, so both
CREATE SCHEMA hevoandCREATE SCHEMA HEVOresult in a schema named hevo. The enable_case_sensitive_identifier parameter changes this behavior. When set to TRUE, Amazon Redshift preserves the case of identifiers enclosed in double quotes. For example,CREATE SCHEMA "HEVO"results in a schema named HEVO.Activate treats uppercase and lowercase letters in the schema name as the same during the connection test, but uses the lowercase name when sending data. As a result, a schema named HEVO passes the connection test but causes syncs to fail.
Note: Do not place your own data in the hevo schema. Activate reserves it for bookkeeping and manages the tables inside it, so anything you store there can be changed.
Once the schema is created, you must grant the Hevo user access to it.
Create a Database User and Grant Privileges
Hevo does not need a superuser to connect to your Amazon Redshift database. You can create a user with only the privileges that Activate requires, which are read access to the data your datasets return, and write access to the schema you created in the Create the Bookkeeping Schema section.
The following table lists the privileges that the database user for Hevo requires:
| Privilege Name | Allows Hevo to |
|---|---|
| USAGE | Access the objects in the specified schema. |
| SELECT | Select rows from the tables that your datasets read from, including the tables created later when you grant it through the ALTER DEFAULT PRIVILEGES command. |
| ALL | Create, read, write, rename, and drop its own bookkeeping tables in the hevo schema. |
| EXECUTE | Call the user-defined functions that your dataset queries use. |
Perform the following steps to create the user and grant it the required privileges:
-
Connect to your Amazon Redshift database as a superuser or a user with the CREATE privilege, using any SQL client tool, such as DBeaver or Postico.
-
Run the following command to create the user:
CREATE USER hevo_activate PASSWORD '<password>';Note: Replace the placeholder value in the command above with your own. The password must be 8-64 characters long and contain at least one uppercase letter, one lowercase letter, and one number.
-
Run the following commands to grant the user read access to a schema that your datasets read from:
GRANT USAGE ON SCHEMA <schema_name> TO hevo_activate; GRANT SELECT ON ALL TABLES IN SCHEMA <schema_name> TO hevo_activate; ALTER DEFAULT PRIVILEGES IN SCHEMA <schema_name> GRANT SELECT ON TABLES TO hevo_activate;Note:
-
Replace the placeholder value in the commands above with your own. For example, <schema_name> with analytics.
-
If your datasets read from more than one schema, run these commands again for each additional schema. The
ALTER DEFAULT PRIVILEGEScommand applies only to the schema you specify in it, and grants access to the tables created in that schema later. -
If a view in your schema reads from a table in another schema, grant access to that schema as well. Otherwise, the dataset query fails even though the view itself is readable.
-
-
Run the following commands to grant the user write access to the bookkeeping schema:
GRANT ALL ON SCHEMA hevo TO hevo_activate; GRANT ALL PRIVILEGES ON ALL TABLES IN SCHEMA hevo TO hevo_activate; ALTER DEFAULT PRIVILEGES IN SCHEMA hevo GRANT ALL PRIVILEGES ON TABLES TO hevo_activate; -
(Optional) If your dataset queries call user-defined functions, run the following commands:
GRANT EXECUTE ON ALL FUNCTIONS IN SCHEMA <schema_name> TO hevo_activate;
ALTER DEFAULT PRIVILEGES IN SCHEMA <schema_name> GRANT EXECUTE ON FUNCTIONS TO hevo_activate;
The ALTER DEFAULT PRIVILEGES command applies only to the tables that you create. If another user creates the tables that your datasets read from, the Hevo user loses its access each time those tables are dropped and created again. To prevent this, connect to your Amazon Redshift database as a superuser, and run the following command to grant the access to the tables that the other user creates later:
ALTER DEFAULT PRIVILEGES FOR USER <owner_username> IN SCHEMA <schema_name> GRANT SELECT ON TABLES TO hevo_activate;
Note: Replace the placeholder values in the command above with your own. For example, <owner_username> with the user that runs your dbt models.
(Optional) Retrieve the Database Hostname and Port Number
You specify the database hostname and the port number of your cluster while configuring the Amazon Redshift Source. If you do not have these values, you can retrieve them from the Amazon Redshift console.
Perform the following steps to obtain the hostname and the port number of your cluster:
-
Follow steps 1-3 from the Create an Amazon Redshift Cluster section to open the Clusters page.
-
In the In my account tab, Clusters section, click the cluster you want to connect to Hevo.
-
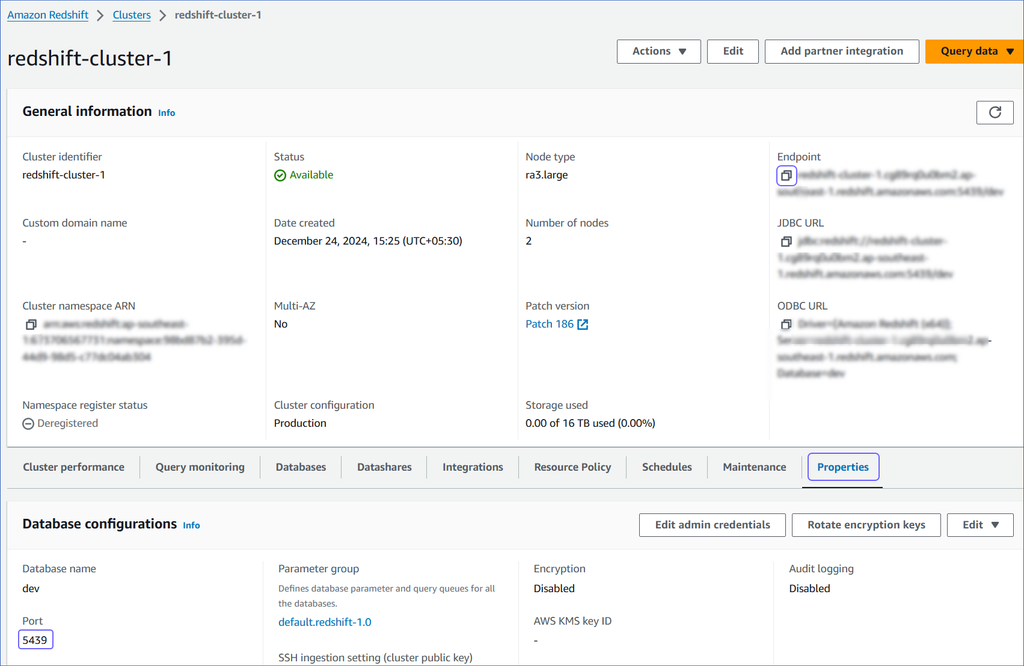
On the <Cluster Name> page, do the following:
-
In the General information section, click the copy icon corresponding to the Endpoint to copy it.
Remove the :<portnumber>/<databasename> part from the endpoint to obtain the hostname, and use it while configuring your Source in Activate.
For example, if examplecluster.abc123xyz789.us-east-1.redshift.amazonaws.com:5439/dev is the endpoint, use examplecluster.abc123xyz789.us-east-1.redshift.amazonaws.com as the hostname.
-
Navigate to the Properties tab and copy the Port.
-
Configure Amazon Redshift as a Source in Activate
Perform the following steps to configure Amazon Redshift as a Source in Activate:
-
In the Navigation Bar, click Activate.
-
On the Activate page, click the Sources tab, and then click + Create Source.

-
On the Select Source Type page, click Amazon Redshift.
-
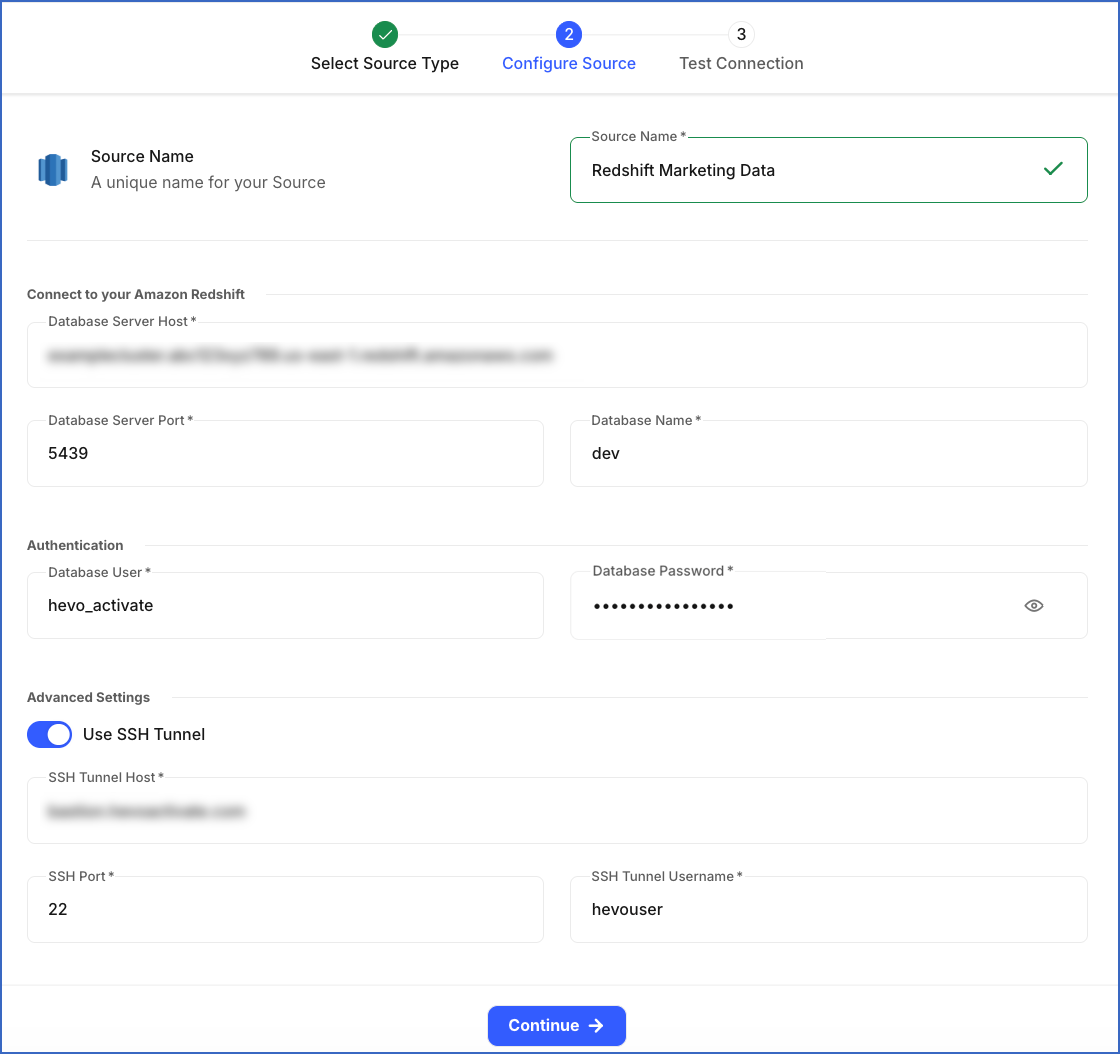
On the Configure Source page, specify the following:
-
Source Name: A unique name for your Source, not exceeding 255 characters. For example, Redshift Marketing Data.
-
In the Connect to your Amazon Redshift section:
-
Database Server Host: The Amazon Redshift host’s IP address or Domain Name System (DNS) name. This is the hostname that you retrieved in the Retrieve the Database Hostname and Port Number section.
-
Database Server Port: The port on which your Amazon Redshift cluster listens for connections. This is the port that you retrieved in the Retrieve the Database Hostname and Port Number section. Default value: 5439.
-
Database Name: The database that holds the data you want to send. Your dataset queries read from this database.
-
-
In the Authentication section:
-
Database User: The user you created in the Create a Database User and Grant Privileges section, or an existing user with the same privileges.
-
Database Password: The password for the database user.
-
-
In the Advanced Settings section:
-
Use SSH Tunnel: Enable this option to connect to your cluster through an SSH tunnel, instead of exposing it to the public. Use it when your cluster is not publicly accessible. Read Connecting Through SSH for the steps to set up your SSH server. This option is disabled by default.
-
SSH Tunnel Host: The hostname or IP address of your SSH server. This server must be reachable from the internet and able to connect to your cluster.
-
SSH Port: The port on which your SSH server listens for connections. Default value: 22.
-
SSH Tunnel Username: The user account on your SSH server. This user is different from the database user.
-
-
-
-
Click Continue.
-
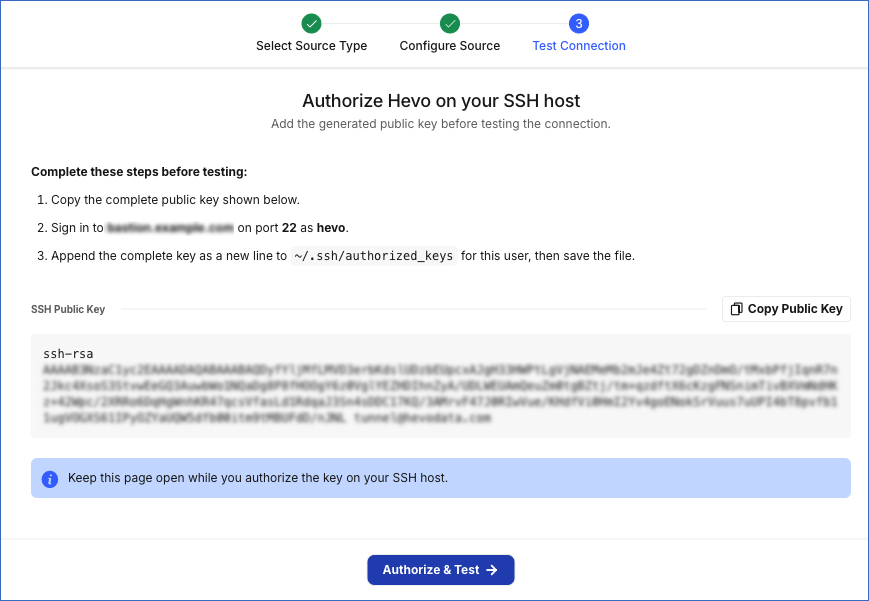
If you enabled the Use SSH Tunnel option, Hevo displays the Authorize Hevo on your SSH host page. Perform the following steps to authorize Hevo before the connection is tested:
-
Click Copy Public Key to copy the key that Hevo displays. Hevo generates and holds the matching private key, so you do not need to create a key pair.
-
Log in to your SSH server as the user you specified in the SSH Tunnel Username field, and add the copied key as a new line to the ~/.ssh/authorized_keys file for that user.
-
Click Authorize & Test.
Note: Keep the Hevo page open while you authorize the key. If you change any SSH setting later, you must authorize the key again before you can test the connection.
-
-
On the Test Connection page, Hevo runs the following checks:
-
Network connectivity: Confirms that Hevo can access your cluster. This check fails if the Hevo IP addresses are not allowlisted, or if your cluster is not publicly accessible and you are not connecting through an SSH tunnel.
-
Warehouse credentials: Confirms that the configured database user and the database password are valid.
-
Bookkeeping access: Confirms that the database user can view the tables that Activate creates in the hevo schema.
-
Bookkeeping schema permissions: Confirms that the hevo schema exists, and that the database user can create, rename, and drop tables in it.
-
Amazon S3 access: Confirms that your cluster can send a single row of data to the Hevo-managed Amazon S3 bucket and read it back into the hevo schema. This check fails if Enhanced VPC Routing is enabled on your cluster without an S3 gateway endpoint, or if a bucket policy, a service control policy, or a KMS key policy blocks the data transfer. Activate does not report this as a permissions error, so verify the route to Amazon S3 before you review the privileges granted to the database user.
Note: The connection test does not run your dataset queries, so it cannot confirm the SELECT privilege on every table that your datasets read from. Activate validates that access when you create a dataset or preview its query. If a dataset query fails with a permission error after the Source connects successfully, run the GRANT commands again for that schema.
-
-
Click Finish.
The Source is created and appears in the Sources List View with the Active status, and you can create datasets from it.
Troubleshooting the Connection Test
Missing hevo schema
The schema must exist in the database that your datasets read from, and its name must be lowercase. Creating it in another database, or as HEVO, causes this failure. Read Create the Bookkeeping Schema for the steps.
Insufficient privileges on the hevo schema
The configured database user needs full access to the hevo schema, because Activate creates, renames, and drops its own bookkeeping tables in it. Read Create a Database User and Grant Privileges for the commands.
Hevo IP addresses not allowlisted
The IP addresses for your region must be allowlisted in the security group attached to your cluster, and the cluster must be publicly accessible unless you connect through an SSH tunnel. Read Allowlist Hevo IP Addresses for your region for the steps.
SSH tunnel not authorized
The Hevo public key must be added to the authorized_keys file of the SSH Tunnel Username. The SSH server must also be reachable from the internet and able to connect to your cluster. Read Connecting Through SSH for the steps.
No route to Amazon S3
Activate temporarily stores data in a Hevo-managed Amazon S3 bucket during the connection test and during every sync, so your cluster must be able to access Amazon S3. Read Enhanced VPC Routing in Amazon Redshift for the network configuration that Amazon Redshift requires. Activate does not report this as a permissions error, so verify the route before you review the privileges granted to the configured database user.
Modifying Amazon Redshift Source Configuration
You can modify the configuration of your Amazon Redshift Source after its creation. However, any configuration changes affect all the datasets built on that Source and all the Activations that use those datasets. If a Source shows the Failed status, its credentials are no longer valid, and every Activation that depends on it fails until the credentials are corrected.
Perform the following steps to modify the configuration of your Amazon Redshift Source in Activate:
-
In the Navigation Bar, click Activate.
-
On the Activate page, click the Sources tab.
-
Click the Source you want to modify to open it in the Detailed View.
-
In the Source Header, click Edit.

-
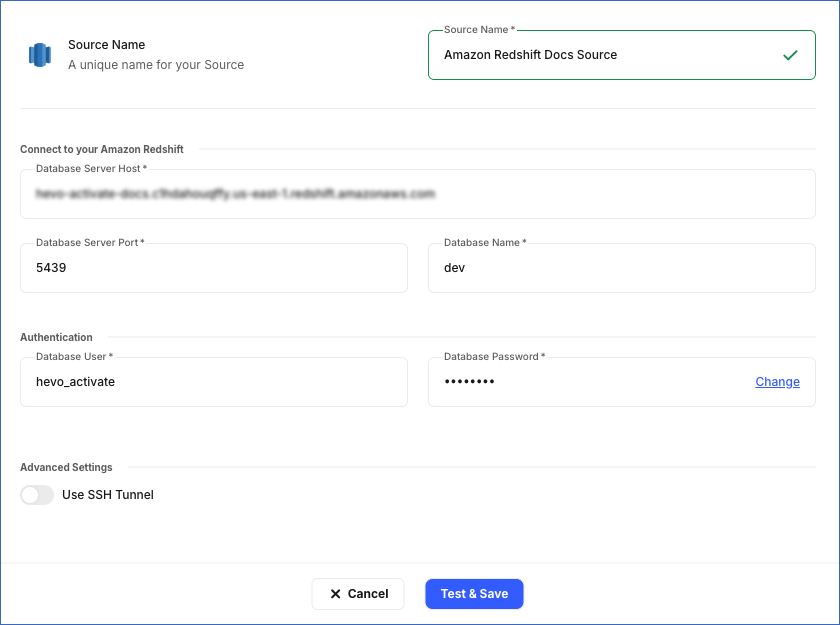
On the <Your Source Name> page, you can do the following:
-
Specify a new name for your Source, not exceeding 255 characters.
-
In the Connect to your Amazon Redshift section, you can update the Database Server Host, the Database Server Port, and the Database Name.
-
In the Authentication section, you can specify a different Database User, and click Change to update the Database Password.
-
In the Advanced Settings section, you can enable or disable the Use SSH Tunnel option, and update the SSH server details. If you enable the option or change any of its values, you must authorize the Hevo public key on your SSH server again before the connection is tested.
-
-
Click Test & Save.
-
In the confirmation dialog, click Yes, Go ahead.
A notification is displayed to confirm that the Source has been updated successfully.
Source Considerations
- Amazon Redshift converts the schema, table, and column names to lowercase. Therefore, if you want to write your dataset queries irrespective of the case, ensure that the warehouse parameter enable_case_sensitive_identifier remains set to its default value, FALSE. If this parameter is set to TRUE, you need to enclose the names that contain uppercase letters in double quotes in your dataset queries.
Limitations
-
Activate supports a single SSH server between Hevo and your cluster, and uses only the key that Hevo generates. You cannot upload your own private key, use an SSH password, or connect through more than one SSH server.
-
Activate does not support connecting to Amazon Redshift through AWS PrivateLink or a virtual private network (VPN).