This Destination is currently available for Early Access. Please contact your Hevo account executive or the Support team to enable it for your team. Alternatively, request for early access to try out one or more such features.
Amazon Redshift Serverless is a cloud-based data warehouse that simplifies data analysis and querying by eliminating the need for server management. You only pay for what you use, making it a cost-effective solution for unpredictable workloads. With a familiar SQL interface, you can leverage your existing skills to get insights from your data quickly.
If you are new to AWS and Redshift Serverless, follow the steps listed below to create an AWS account and create an Amazon Redshift Serverless workspace to which the Hevo Pipeline will load the data. Alternatively, you can create users and assign them the required permissions to set up and manage databases within Amazon Redshift Serverless. Read AWS Identity and Access Management for more details.
Prerequisites
-
You are assigned the Team Collaborator or any administrator role except the Billing Administrator role in Hevo to create the Destination.
Set up an Amazon Redshift Instance (Optional)
Note: The following steps must be performed by an Admin user or a user with permissions to create an instance on AWS. Permissions and roles are managed through the IAM page in AWS. Read Identity and access management in Amazon Redshift.
1. Log in to your AWS instance
Do one of the following:
-
Create an AWS account
Note: You can also use the AWS Free Tier that offers you a two month free trial of Amazon Redshift.
-
Go to aws.amazon.com and click Create account.

-
On the Sign up for AWS page, specify the following:

-
Root user email address: A valid email address to manage the AWS account. The root user serves as the account admin.
-
AWS account name: A unique name for your AWS account. You can change this if needed.
-
-
Click Verify email address and check your inbox for a verification code.
-
Provide the verification code and proceed to set up your account with the necessary details.
-
-
Sign-in to an existing AWS instance
-
Go to https://aws.amazon.com/console and click Sign in to the console.

-
Click Sign in using root user email.

-
Select the Root user option to log in as the account admin (root user) or the IAM user to log in with IAM role-based permissions. The account admin may create roles based on AWS IAM policies for database permissions and assign these to users.

-
Provide the Root user email address and click Next.
-
Provide the Root user password.
-
Click Sign In.
-
2. Connect to Amazon Redshift Serverless
-
In the AWS Console Home, use the search bar to find Amazon Redshift Serverless.

-
Click Serverless to open the Serverless dashboard.
Create a Workgroup and Namespace
You can create and associate a workgroup with a namespace to effectively manage resources and isolate workloads in Amazon Redshift Serverless. A workgroup is a collection of compute resources such as Redshift Processing Units (RPUs) and VPC subnet groups, whereas a namespace comprises database objects and users.
Perform the following steps to create a workgroup and a namespace:
-
On the Serverless dashboard, in the top right corner, click Create workgroup.

-
On the Create workgroup page, specify the following:

-
Workgroup name: A unique name for your workgroup.
-
Base capacity: The capacity, measured in Redshift Processing Units (RPUs), based on the amount of data or computational processing you require. Default value: 128.
-
Virtual private cloud (VPC): The virtual networking environment for the Serverless database.
-
VPC security groups: The security group(s) that define the subnets, IP ranges, and rules that control inbound traffic for your VPC endpoint. The security group allows access to the selected port.
Note: Ensure that the security group you select has the protocol Type set to All TCP in its inbound rule configuration. Read Configuring security group communication settings for the steps to edit inbound rules.

-
Subnet: The IP address segments associated with the selected VPC.
-
-
Click Next.
-
On the Choose namespace page, specify the following:

-
Namespace: A unique name for your namespace.
-
Admin user credentials: The credentials to authorize the admin user on the Serverless database.
-
Customize admin user credentials (recommended): If selected, it allows you to add a new admin username and password. Otherwise, your IAM credentials are used as the default admin credentials.
-
Admin user name: The username of your admin user. Default value: admin.
-
Admin password: Select the following option to generate your admin password:
-
Manually add the admin password: If selected, you can provide the admin password manually.
- Admin user password: The password of your admin user.
-
-
-
-
Copy the Database name, Admin user name, and Admin user password credentials and save them securely. Use these credentials while configuring your Amazon Redshift Serverless Destination.
-
Click Next.
-
In the Review and create page, review the workgroup and namespace settings and click Edit next to each section to change its details.

-
Click Create.
Once the workgroup and namespace are created, you can view them in the Serverless dashboard, under the Namespaces/Workgroups section.

Obtain the Redshift Serverless Connection Settings
Hevo connects to your Amazon Redshift Serverless data warehouse in one of the following ways:
-
Using a connection string.
-
Using the individual connection fields.
To connect using the connection string, you only need the string. If you opt for individual fields, you need the database cluster identifier and the port number. To retrieve these:
-
In the Namespaces/workgroups section, select the Workgroup that you created in the section above.

-
On the <your workgroup> page, under the Network and security section, click Edit.

-
In the Edit network and security page, select the Turn on Publicly accessible check box to allow outside sources to connect to your Serverless database.

-
Click Save changes.
-
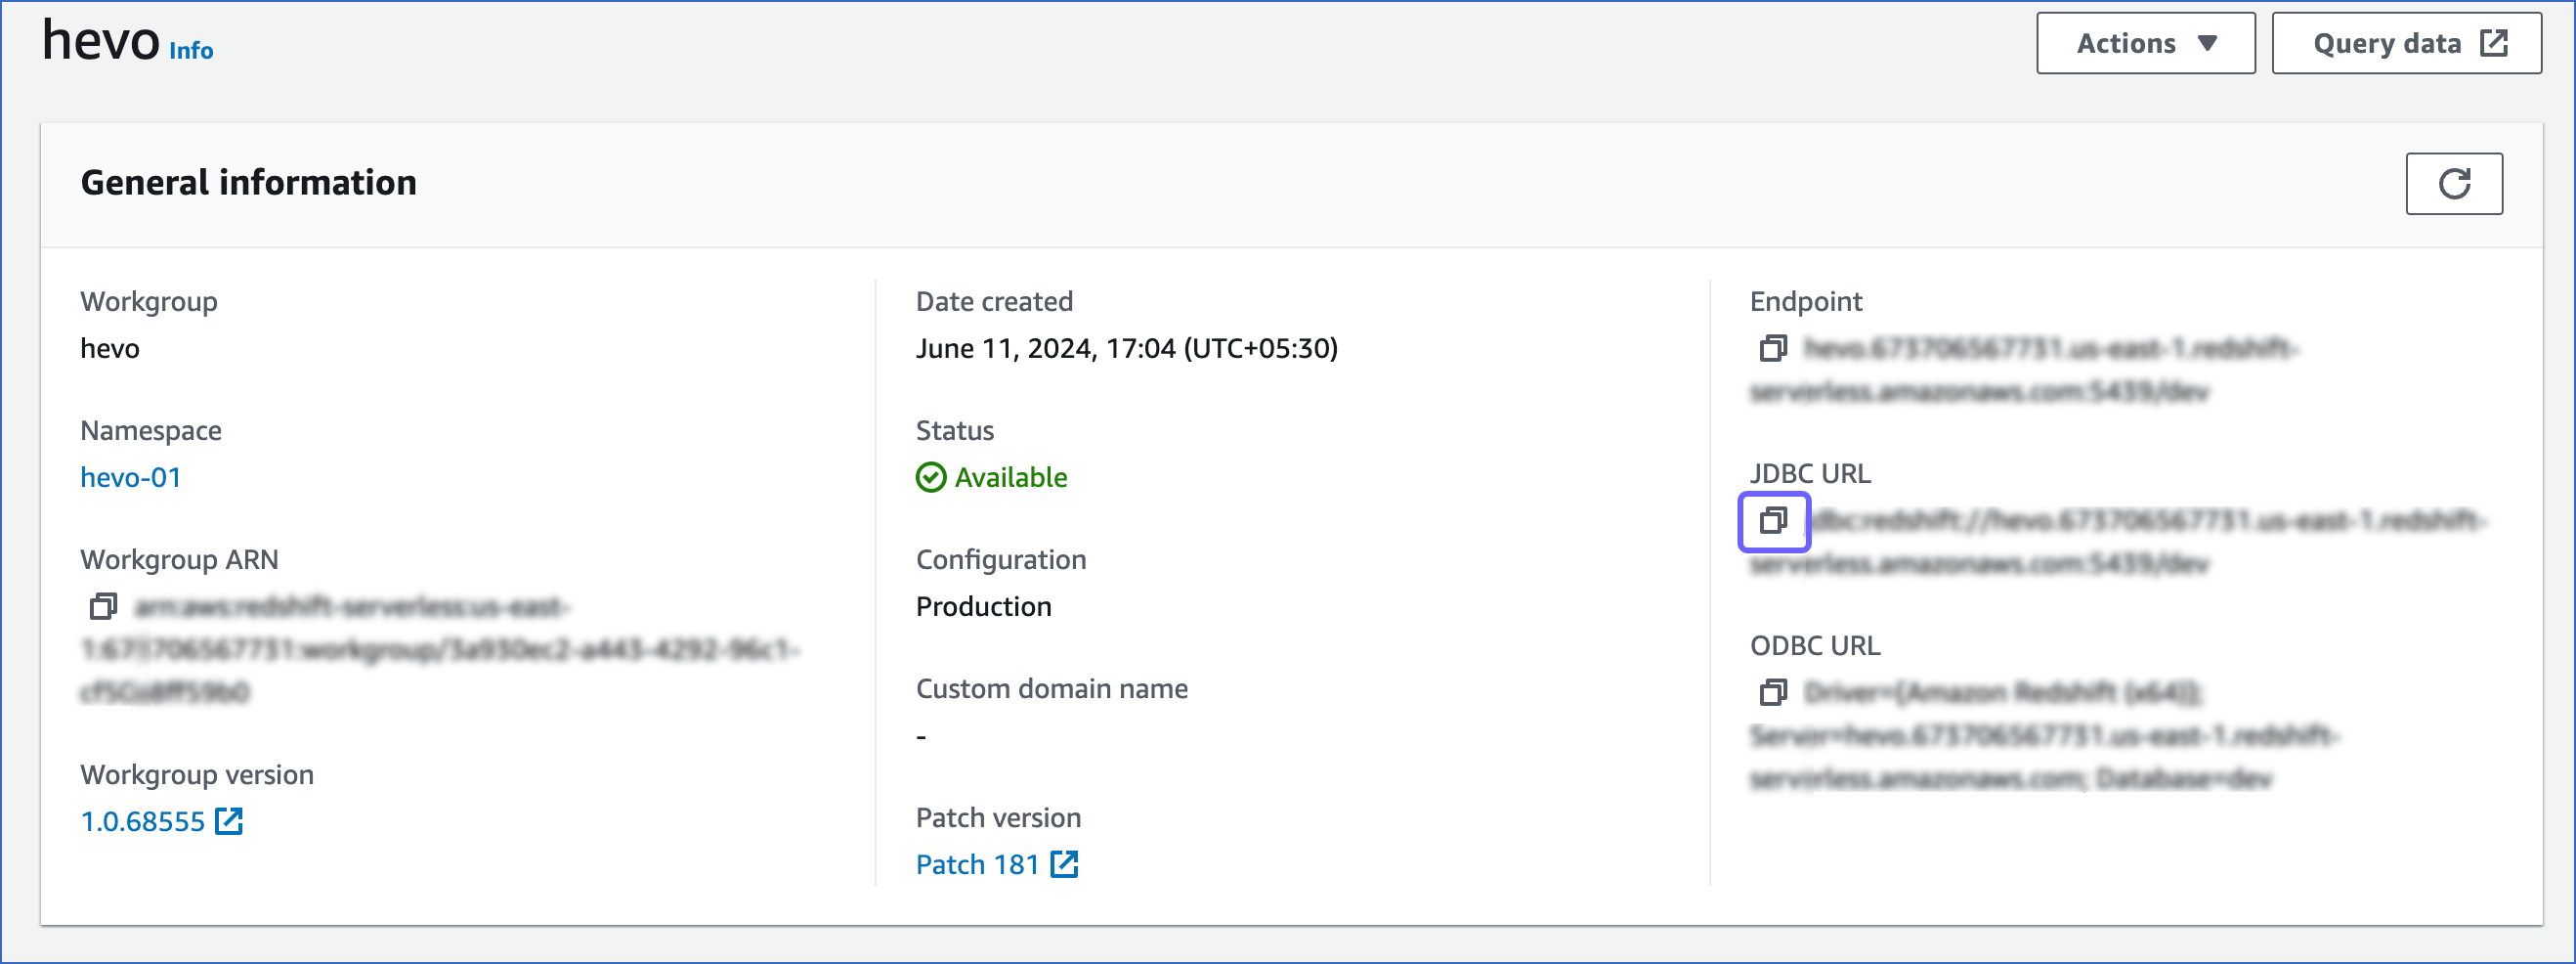
In the <your workgroup> page, do one of the following:
-
To retrieve the publicly accessible endpoint:
-
Click the copy (
 ) icon corresponding to the JDBC URL to copy it. The connection string or database cluster identifier and the port number can be obtained from this URL.
-
Connection string: Use the entire JDBC URL as the connection string while configuring your Destination in Hevo.
For example, jdbc:redshift://examplecluster.abc123xyz789.us-west-2.redshift-serverless.amazonaws.com:5439/dev.
-
Database cluster identifier: Remove the jdbc:redshift:// and :<portnumber>/<databasename> parts from the JDBC URL to obtain the database cluster identifier, and use it while configuring your Destination in Hevo.
For example, if jdbc:redshift://examplecluster.abc123xyz789.us-west-2.redshift-serverless.amazonaws.com:5439/dev is the URL, use examplecluster.abc123xyz789.us-west-2.redshift-serverless.amazonaws.com as the identifier.
-
Port number: The number string in the JDBC URL before the database name.
For example, in the JDBC URL jdbc:redshift://examplecluster.abc123xyz789.us-west-2.redshift-serverless.amazonaws.com:5439/dev, 5439 is the port number.

-
-
Proceed to configure Amazon Redshift Serverless as a Destination in Hevo.
-
-
To retrieve the VPC endpoint:
-
In the Data access tab, under the Redshift-managed VPC endpoint, click Create endpoint.

-
In the Create Redshift-managed VPC endpoint page, specify the following:

-
Endpoint name: A unique name for the VPC endpoint.
-
Virtual private cloud (VPC): The virtual networking environment where the endpoint is created. The selected VPC must have subnets associated with it.
-
Subnet: The IP address segments associated with the selected VPC.
-
-
Click Create endpoint.
-
In the <your workgroup> page, Data access tab, under the Redshift-managed VPC endpoint, select the VPC endpoint that you created above.

-
In the Settings for Redshift-managed VPC endpoint page, click the copy (
 ) icon corresponding to the JDBC URL to copy it. The connection string or database cluster identifier and the port number can be obtained from this URL.
-
Connection string: Add the database name as a suffix to the JDBC URL to obtain the connection string while configuring your Destination in Hevo.
For example, if jdbc:redshift://exampleendpoint.abc123xyz789.us-west-2.redshift-serverless.amazonaws.com:5439/ is the URL, use jdbc:redshift://exampleendpoint.abc123xyz789.us-west-2.redshift-serverless.amazonaws.com:5439/<database name> as the string.
-
Database cluster identifier: Remove the jdbc:redshift:// and :<portnumber>/ parts from the JDBC URL to obtain the database cluster identifier, and use it while configuring your Destination in Hevo.
For example, if jdbc:redshift://exampleendpoint.abc123xyz789.us-west-2.redshift-serverless.amazonaws.com:5439/ is the URL, use exampleendpoint.abc123xyz789.us-west-2.redshift-serverless.amazonaws.com as the identifier.
-
Port number: The number string at the end of the JDBC URL.
For example, in the JDBC URL jdbc:redshift://exampleendpoint.abc123xyz789.us-west-2.redshift-serverless.amazonaws.com:5439/, 5439 is the port number.

-
-
Proceed to configure Amazon Redshift Serverless as a Destination in Hevo.
-
-
Configure Amazon Redshift Serverless as a Destination
Perform the following steps to configure Amazon Redshift as a Destination in Hevo:
-
Click DESTINATIONS in the Navigation Bar.
-
Click + Create Standard Destination in the Destinations List View.
-
On the Add Destination page, select Amazon Redshift.
-
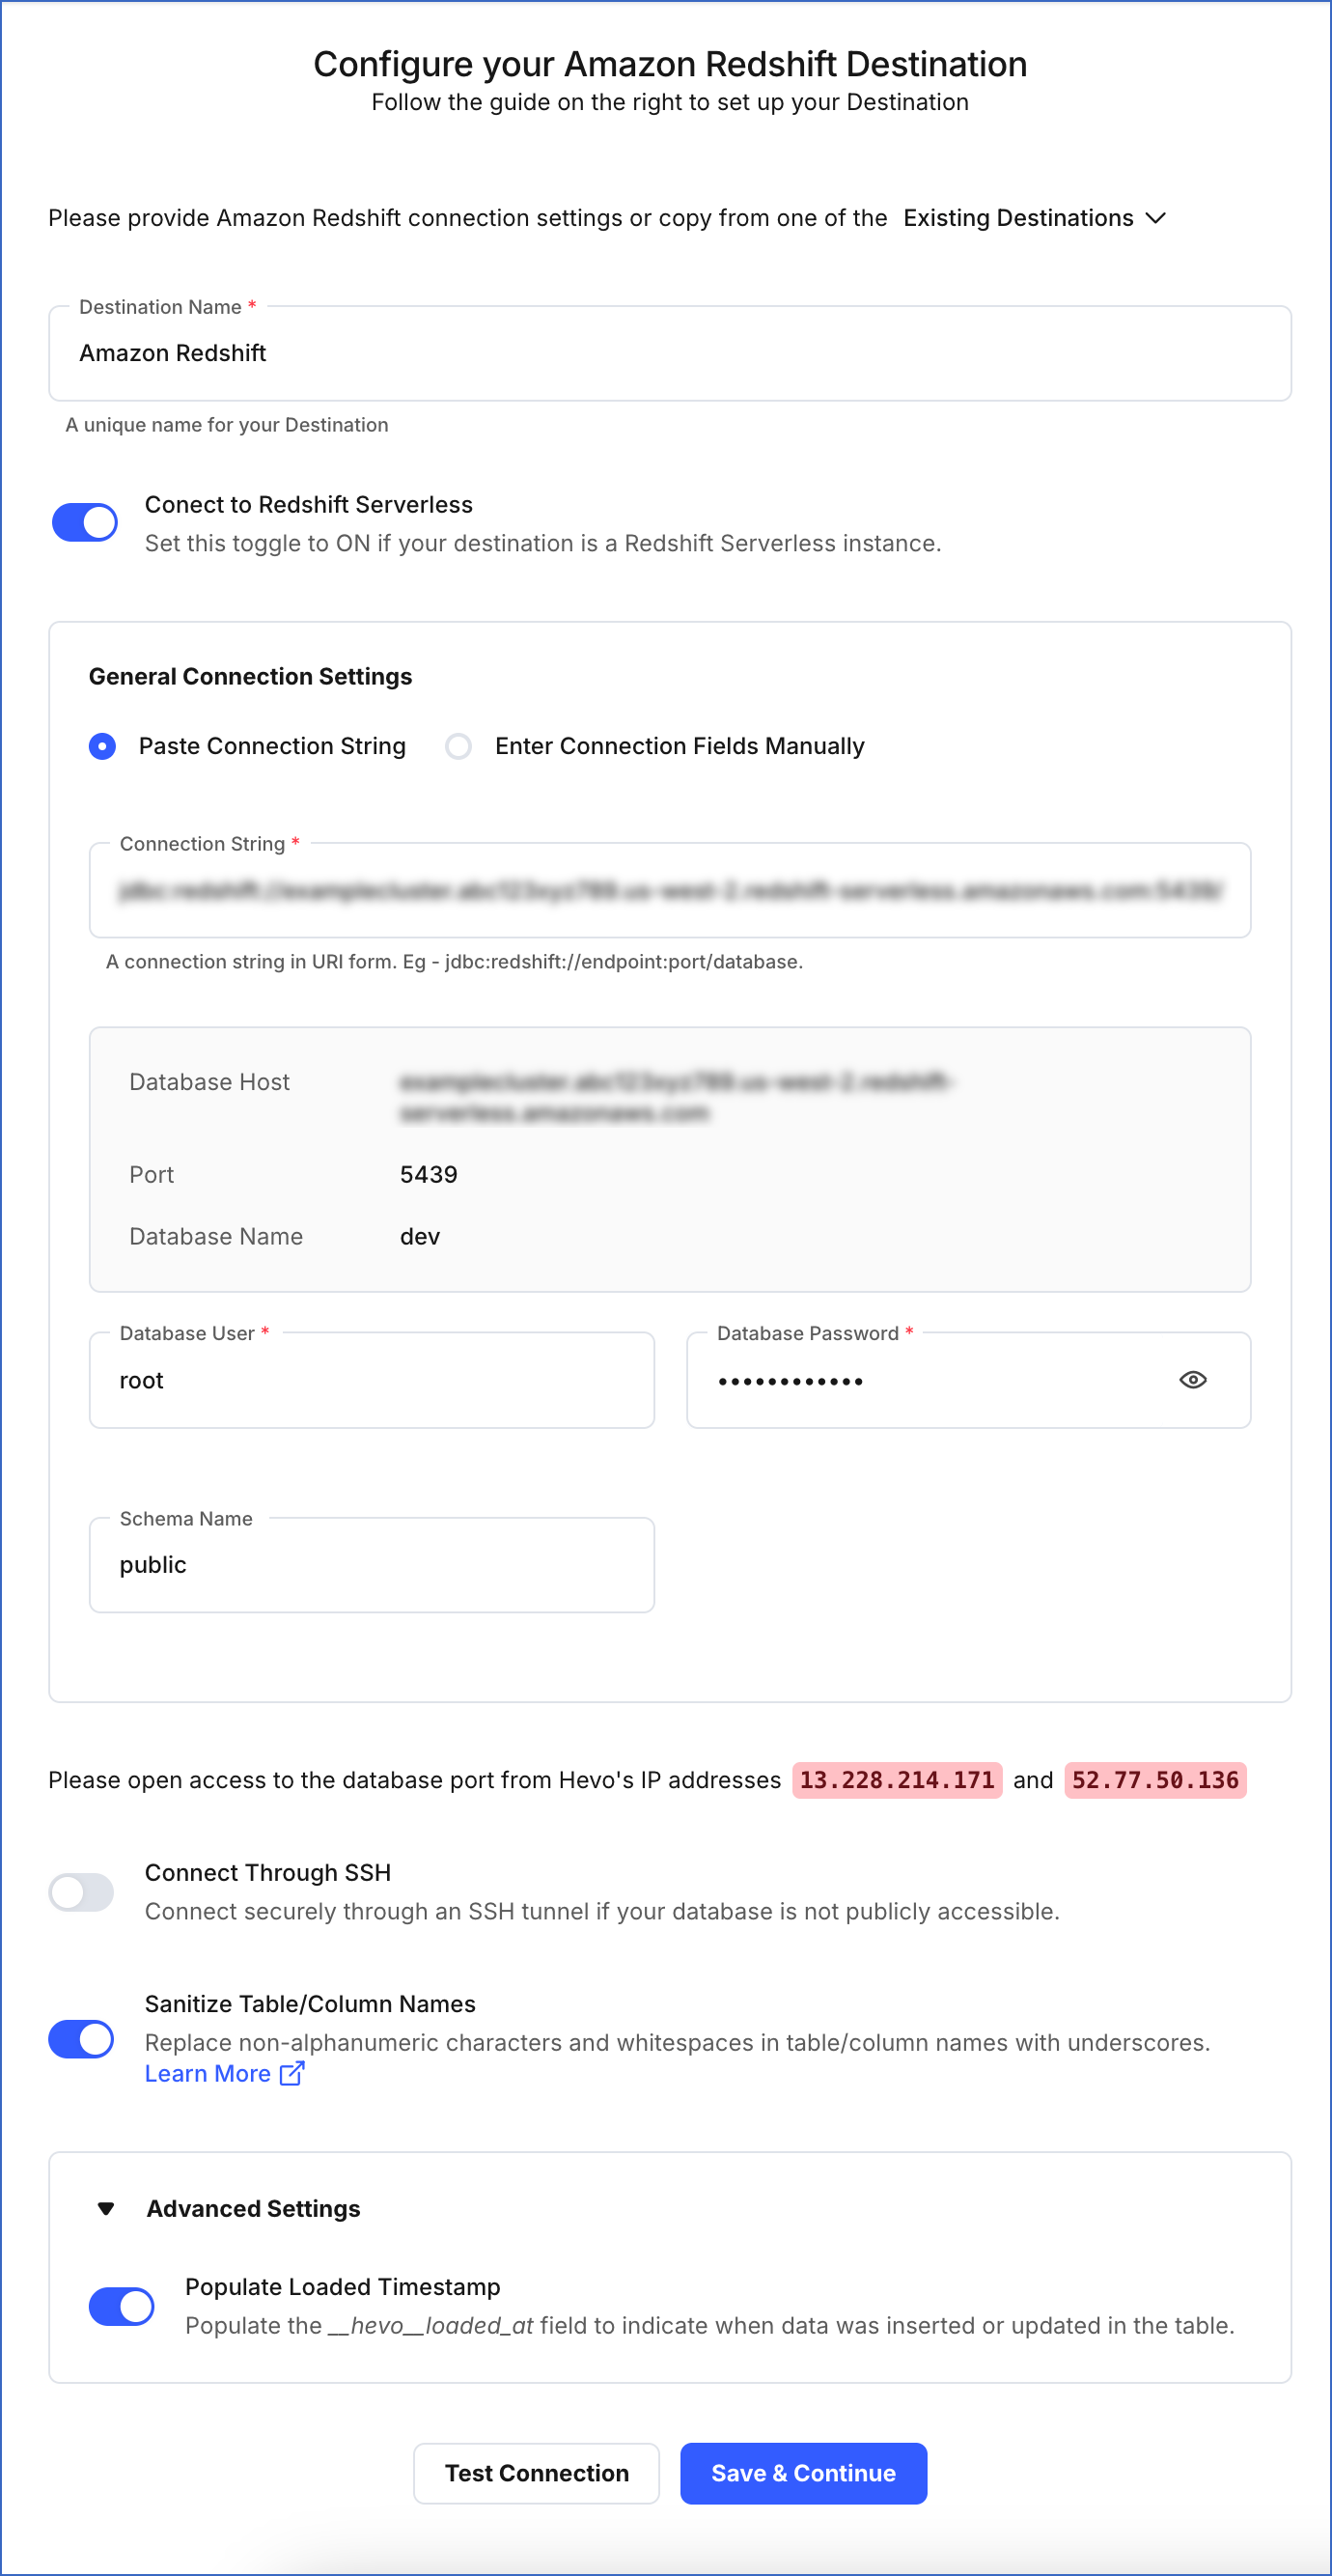
On the Configure your Amazon Redshift Destination page, specify the following:

-
Destination Name: A unique name for your Destination, not exceeding 255 characters.
-
Connect to Redshift Serverless: Enable this toggle option to connect to the Amazon Redshift Serverless instance.
-
General Connection Settings: The method to connect to your Amazon Redshift Serverless data warehouse:
-
Paste Connection String: Specify the connection string obtained in the Obtain the Redshift Serverless Connection Settings section above.
-
Connection String: The unique identifier for connecting to the Amazon Redshift Serverless instance. The connection string automatically fetches details such as the database host, database name, and database port.
Note: The connection string is obtained from the AWS Console and is the same as your hostname URL.
-
Database User: The name of the user with administrator access to your Redshift database.
For example, admin. This can be the user credentials created in Step 2.
-
Database Password: The password of the specified username.
-
Schema Name (Optional): The name of the Destination database schema. Default value: public.
-
-
Enter Connection Fields Manually:
-
Database Cluster Identifier: Amazon Redshift host’s IP address or DNS name. You can use the identifier you obtained in Step 3.
-
Database Port: The port on which your Amazon Redshift Serverless instance listens for connections. Default value: 5439.
-
Database User: The name of the user with administrator access to your Redshift database.
For example, admin. This can be the user credentials created in Step 2.
-
Database Password: The password of the specified username.
-
Database Name: The name of an existing database where the data is to be loaded.
-
Schema Name (Optional): The name of the Destination database schema. Default value: public.
-
-
-
Additional Settings:
- Sanitize Table/Column Names?: Enable this option to remove all non-alphanumeric characters and spaces in a table or column name, and replace them with an underscore (_). Read Name Sanitization.
-
Advanced Settings:
- Populate Loaded Timestamp: Enable this option to append the __hevo_loaded_at_ column to the Destination table to indicate the time when the Event was loaded to the Destination. Read Loading Data to a Data Warehouse.
-
-
Click Test Connection. This button is enabled once all the mandatory fields are specified.
-
Click Save & Continue. This button is enabled once all the mandatory fields are specified.
Revision History
Refer to the following table for the list of key updates made to this page:
| Date | Release | Description of Change |
|---|---|---|
| Nov-12-2025 | NA | Updated the document as per the latest Hevo UI. |
| Nov-05-2025 | NA | Updated section, Log in to your AWS instance as per the latest Amazon Redshift UI. |
| Sep-13-2024 | 2.27 | New document. |