Salesforce is a cloud computing Service as a Software (SaaS) company that allows you to use cloud technology to collaborate effectively with customers, partners, and potential customers.
You can configure Salesforce as a Target in Activate to load data from your Warehouse and synchronize it with standard or custom objects in your Salesforce database. You can then analyze the data to help your various teams, such as marketing, sales, and customer service to better manage external interactions and streamline processes to improve profitability and business relationships.
Note: If you want to synchronize data with custom objects, you need to create them in your Salesforce database before creating an Activation.
Prerequisites
-
An active user with the API Enabled permission in a Salesforce production or sandbox account. Read Grant API Enabled if you need to grant this permission to users in your Salesforce account.
Note: Only some Salesforce editions have the API Enabled permission by default. Read Find your Edition to check your Salesforce edition.
-
Essential scopes are granted to Activate to access your Salesforce user’s account.
Scopes
Activate uses OAuth to connect to your Salesforce account and needs certain scopes to access the different Salesforce API endpoints, to synchronize data with your Salesforce objects. Read OAuth Tokens and Scopes.
Activate requests for the following scopes when you configure Salesforce as a Target:
| Scope | Description |
|---|---|
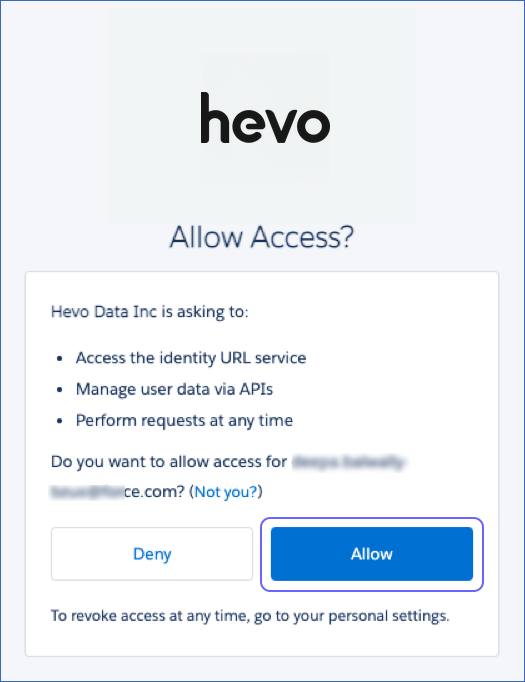
Access the identity URL service (id) |
Provides Hevo access to the identity URL service to get information about the connected Salesforce user and their org. You can get the same result as the id scope using the profile, email, address, or phone scope. |
Manage user data via APIs (api) |
Provides Hevo access to the currently logged-in user’s account using APIs such as REST API and Bulk API 2.0. This scope also includes the chatter_api scope, which allows access to the Connect REST API resources. |
Perform requests at any time (refresh_token) |
Provides Hevo access to the resource server by allowing Hevo to obtain a new access token when an existing token expires or a user revokes it. The refresh_token also provides offline access to your Salesforce user’s data and is synonymous with requesting offline_access. |
Configuring Salesforce as a Target
Perform the following steps to configure Salesforce as the Target in your Activation:
-
Click ACTIVATE in the Navigation Bar.
-
Do one of the following:
-
Select the Targets tab in the Targets List View, and click + CREATE ACTIVATION TARGET.

-
Select the Activations tab in the Activations List View, and click + CREATE ACTIVATION.

-
On the Select Warehouse page, select your Activate Warehouse or click + ADD WAREHOUSE to add a new warehouse. Read Activate Warehouses to configure the selected Warehouse type.
-
On the Select a Target page, click + ADD TARGET.

-
-
-
On the Select a Target Type page, click Salesforce.

-
On the Add the Salesforce Target page, click + ADD SALESFORCE ACCOUNT.

-
Select the Salesforce environment on which your database is hosted.

-
Log in to your Salesforce account.

-
Click Allow to grant Hevo access to your Salesforce data.

-
On the Add the Salesforce Target page, specify a unique Target Name.

-
Click CONTINUE.
You can view the new Target in the Targets List View. If you are creating an Activation, you return to the Select Data to Synchronize page. To finish creating the Activation, you must map the Warehouse fields to the Target fields. Refer to the section, Mapping Fields in Salesforce.

Salesforce Environments
Activate can synchronize data with a Target Salesforce database created in any of the following Salesforce environments:
-
Production: This is the environment that holds live customer data and is used to actively run your business. A production environment is identified by URLs starting with https://login.salesforce.com.
-
Sandbox: This is a copy of your production organization. You can create multiple sandbox environments for different purposes, such as development and testing. Working in the sandbox eliminates any risk of compromising your production data and applications. A sandbox is identified by URLs starting with https://test.salesforce.com.
Mapping Fields in Salesforce
An Activation uses the SQL query you provide to synchronize your Warehouse data with the Salesforce objects. For this, you need to map the query fields in the Field Mapping page. Read Map Warehouse fields to Target fields for the steps to do this.
Data Replication
Activate supports the following synchronization behaviors for Salesforce:
-
Insert New and Update Existing Records (Upsert).
-
Update Existing Records (Update).
-
Add New Records (Insert).
Read Synchronization Behaviors.
Activate synchronizes data from the Warehouse with the supported Salesforce objects using these unique identifiers:
| Unique Identifier | Description |
|---|---|
| ID | A unique value that Salesforce automatically assigns to the ID field of the object record when it is created. |
| The email address of the user. | |
| Lookup ID | A lookup field value that links one Salesforce object to another Salesforce object. It can be used to look up a record in the other object. For example, the AccountId field in a Case object can be used to look up the account associated with a case. |
| External ID | A unique identifier used to associate Salesforce object records with records from another system. |
To synchronize data with Salesforce objects, you can use their respective unique identifiers. Refer to the section, Data Model for the unique identifiers of some of the supported objects.
Data Model
Activate supports synchronizing data with more than 100 standard Salesforce objects. It also supports synchronizing data with the custom objects that you may have created in your Salesforce database.
The following table lists the most frequently used objects along with their unique identifiers:
| Object | Unique Identifiers | Description |
|---|---|---|
| Account | ID | Stores information about an individual customer account, organization, or partner involved with your business. |
| Contact | - ID |
Stores information about people whom you do business with and are associated with an account or opportunities. |
| Lead | - ID |
Stores information about people who are interested in purchasing your product or service. |
| Opportunity | - ID - Name |
Stores information about your deals in progress. An opportunity tracks several details about deals, such as the accounts they are for and the amount of the deal. |
| Custom Objects | - ID - Lookup ID - External ID |
Stores information about the objects that you create in Salesforce to address requirements specific to your company or industry. The custom object name is suffixed with __c. For example, suppose a realtor creates a custom object, Property to track the homes being sold by their company. The custom object name, then, is stored as Property__c in the Salesforce database. |
The unique identifiers and the mandatory fields of all the standard and custom objects are displayed in the drop-down list while mapping the Warehouse fields to the Target fields. You can map them as per your requirement.
Target Considerations
-
The Salesforce APIs retrieve only those object fields that are visible in the System Administrator profile. Therefore, only these fields are available for selection in the Field Mapping page while creating an Activation.
-
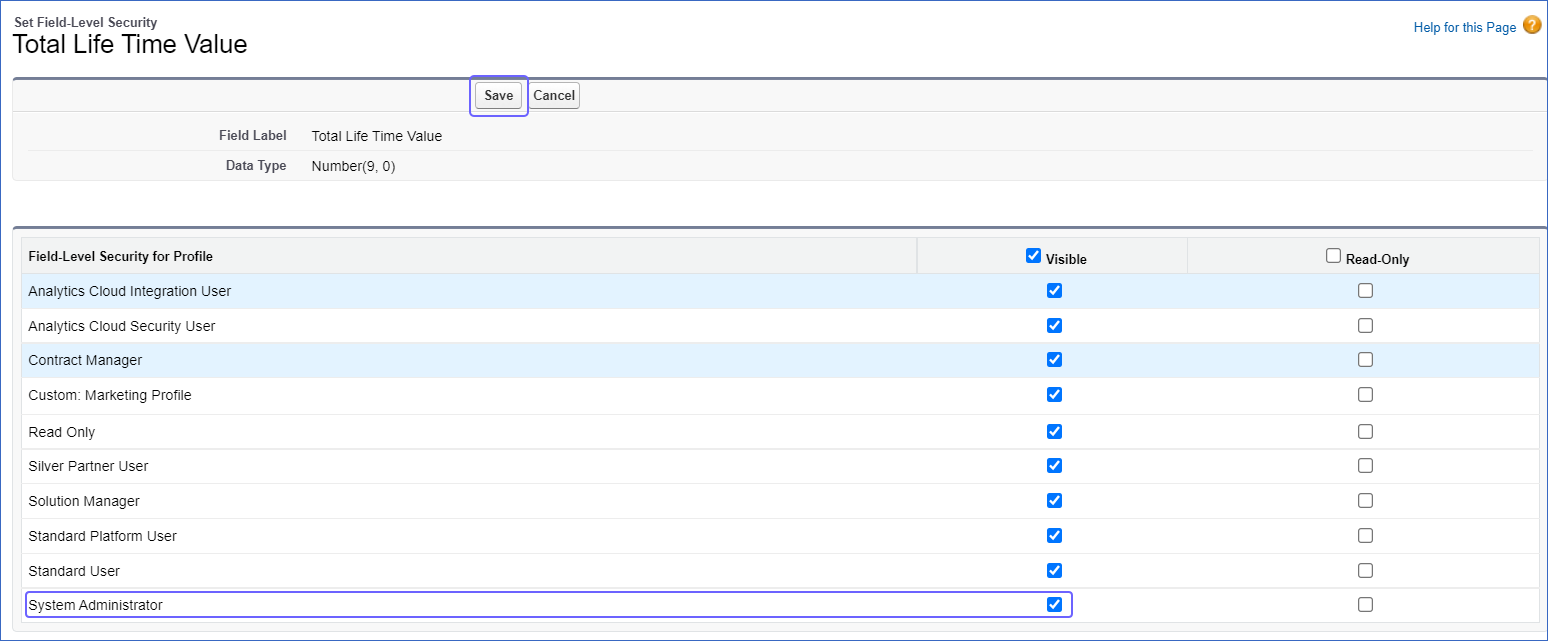
To be able to select and map an object field with a query field while creating an Activation, you must set the field-level security of the object field to Visible for the System Administrator profile in Salesforce. To do so:
-
Log in to Salesforce.
-
In the top right, click the Settings (
 ) icon, and click Setup in the drop-down.
 -
In the Object Manager tab, using the search bar, search for and select the object which contains your desired field. For example, Customer in the image below.

-
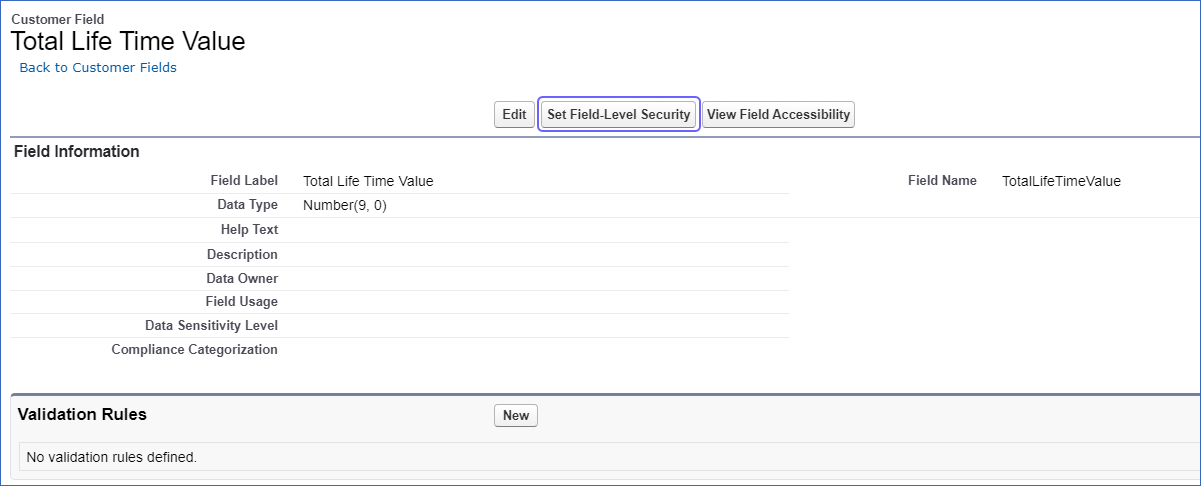
In the left panel, click Fields & Relationships, and select the required field. For example, Total Life Time Value in the image below.

-
Click Set Field-Level Security.

-
Select the Visible check box for the System Administrator profile, and click Save.

-