Amazon RDS for Oracle is a fully managed database service provided by AWS that allows you to leverage the power and flexibility of Oracle databases in the cloud. This reduces the burden of managing these databases yourself and enables you to easily scale its resources up or down as per your requirements. Amazon RDS helps you reduce costs while providing enhanced security, improved performance, and simplified database management.
Refer to Oracle on Amazon RDS for the supported Oracle database versions.
Prerequisites
-
The Oracle database version is 19c.
-
Hevo’s IP address(es) for your region is added to the Amazon RDS Oracle database IP Allowlist.
-
The database hostname and port number of the Source instance are available.
Perform the following steps to configure your Amazon RDS Oracle Source:
Create a Database User and Grant Privileges
Connect to your Oracle server as a database administrator (DBA) using SQL Developer or any other SQL client tool and run the following script. This script creates a new database user in your Oracle database with access to the metadata tables and LogMiner. Keeping your privacy in mind, it grants only the necessary permissions required by Hevo to ingest data from your Oracle database.
-- Create a Database User
CREATE USER <username> IDENTIFIED BY <password>;

-- Grant Privileges to the Database User
GRANT CREATE SESSION, ALTER SESSION, CONNECT TO <username>;
GRANT FLASHBACK ANY TABLE TO <username>;
GRANT SELECT ANY TABLE TO <username>;
GRANT SELECT ANY TRANSACTION TO <username>;

-- Grant Roles to the Database User
GRANT SELECT_CATALOG_ROLE TO <username>;
GRANT EXECUTE_CATALOG_ROLE TO <username>;

-- Grant Permission to run LogMiner
GRANT LOGMINING TO <username>;
Note: Replace the placeholder values in the commands above with your own. For example, <username> with hevo.
Refer to the table below for more information about these commands:
| Command | Grants access to |
|---|---|
| GRANT CREATE SESSION, ALTER SESSION, CONNECT TO <username>; | Connect to the database, and create or alter sessions. |
| GRANT FLASHBACK ANY TABLE TO <username>; | Restore past versions of any table in the database. |
| GRANT SELECT ANY TABLE TO <username>; | Retrieve data from any table in the database. |
| GRANT SELECT ANY TRANSACTION TO <username>; | Query data from any transaction in the database. |
| GRANT SELECT_CATALOG_ROLE TO <username>; | Query various data dictionary and performance views, containing metadata about database objects. |
| GRANT EXECUTE_CATALOG_ROLE TO <username>; | Run procedures and functions within the data dictionary. |
| GRANT LOGMINING TO <username>; | Use LogMiner to analyze and extract information from the redo log files. |
Set up Redo Logs for Replication
A redo log is a collection of log files that record information about modifications made to data objects on an Oracle server instance. Oracle LogMiner uses redo logs to track these modifications and determine the rows requiring updates in the Destination system.
Connect to your Oracle server as a user with SYSDBA privileges using SQL Developer or any other SQL client tool and perform the following steps:
1. Enable Archive log
Archive logs are essential for the backup and recovery processes of a database management system, especially in systems that use the transactional or logging approach to maintain data integrity. Before enabling this, verify if the current archiving mode of the database is ARCHIVELOG:
SELECT LOG_MODE FROM V$DATABASE;
This query returns either of the following values:
-
ARCHIVELOG: Indicates that archive log mode is enabled. -
NOARCHIVELOG: Indicates that archive log mode is disabled.
If the result of the above query is NOARCHIVELOG, enable archive log using the following commands:
BEGIN
rdsadmin.rdsadmin_util.set_configuration('archivelog retention hours', 72);
END;
Note: The minimum value for archive log retention hours must be 3 days (72 hours). This avoids any data loss that may occur due to downtimes in the Source database.
2. Configure the Fast Recovery Area
The fast recovery area in Oracle serves as a centralized storage space for all database recovery-related files. Consolidating these files into a single location simplifies backup and recovery management.
To enable fast recovery area, follow these steps:
-
Access the Amazon RDS console.
-
In the left navigation pane, click Databases (or Instances if you are using an older version).
-
In the Databases section on the right, click the DB instance that you want to connect to Hevo.

-
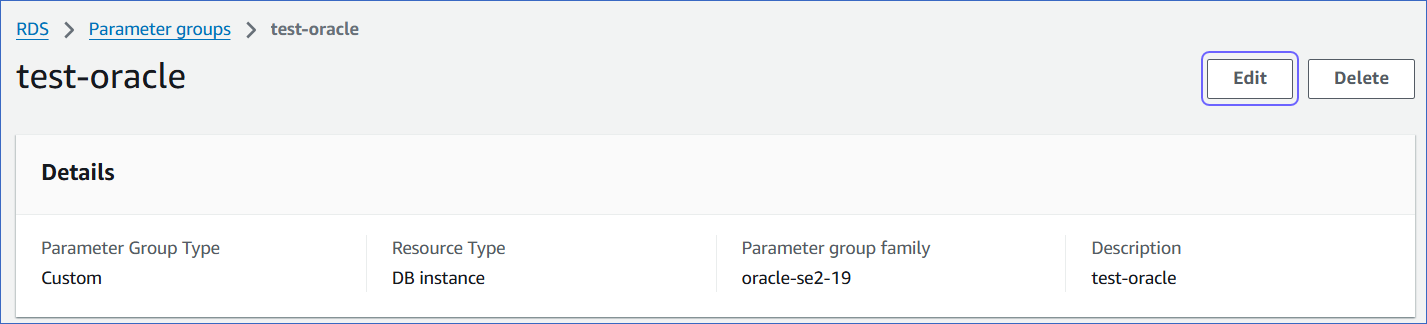
Click the Configuration tab, and then click the link text under DB instance parameter group.

-
Click Edit.
-
Set appropriate values for the following parameters:
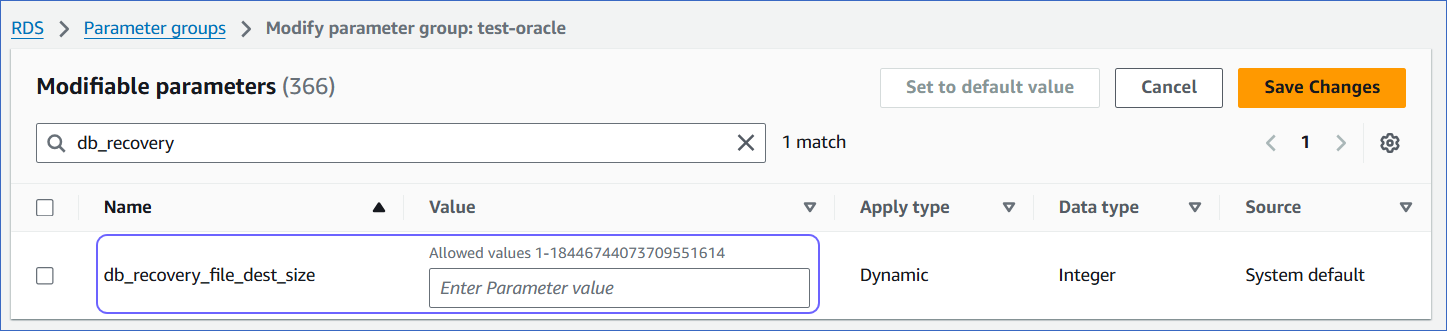
-
db_recovery_file_dest_size: Sets the size of the fast recovery area.
-
archive_lag_target: Sets a non-zero target value in seconds for the maximum acceptable delay between log switches.
-
-
Click Save Changes.
-
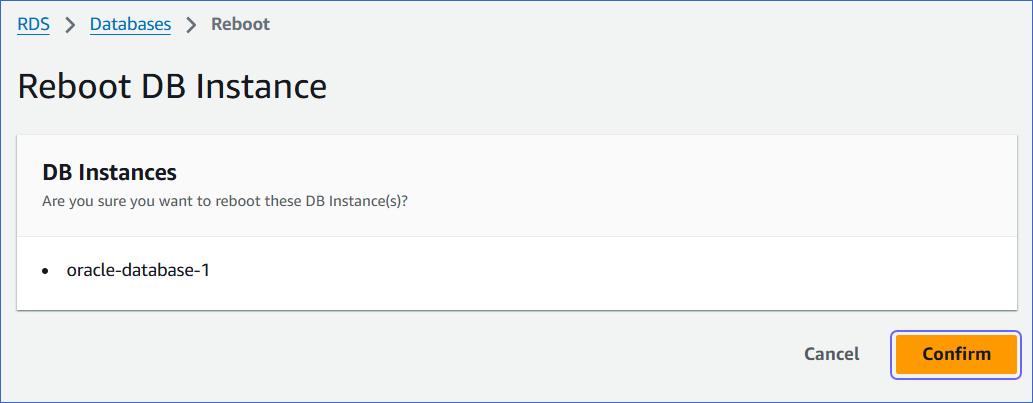
Reboot the database instance that you are using to connect to Hevo, to apply the above changes.
To do this:
-
In the left navigation pane, under Dashboard, click Databases.
-
In the Databases section on the right, select the DB instance that you want to connect to Hevo.
-
In the Actions drop-down, click Reboot.

-
On the Reboot DB Instance page, click Confirm to reboot your DB instance.
-
3. Enable supplemental logging
Supplemental logging ensures that any changes in columns are logged in redo log files, which is essential for LogMiner to access the activity history of a database.
-
Check if supplemental logging is enabled:
SELECT SUPPLEMENTAL_LOG_DATA_MIN FROM "V$DATABASE";This query returns one of the following values:
-
YES: Indicates that supplemental logging is enabled. -
IMPLICIT: Indicates that supplemental logging is automatically enabled by the database based on certain conditions or configurations. -
NO: Indicates that supplemental logging is disabled.
-
-
If the result of the above query is NO, enable supplemental logging with one of the following commands:
- Enable supplemental logging at the database level for all columns:
begin rdsadmin.rdsadmin_util.alter_supplemental_logging( p_action => 'ADD', p_type => 'ALL'); end;Note: Enabling supplemental logging at the database level will increase redo log data.
- Enable minimal supplemental logging at the database level:
begin rdsadmin.rdsadmin_util.alter_supplemental_logging( p_action => 'ADD'); end;-
Enter the following command to retrieve the status of table-level supplemental logging:
SELECT COUNT(*) FROM ALL_LOG_GROUPS WHERE LOG_GROUP_TYPE='ALL COLUMN LOGGING' AND OWNER= '<group_name>' AND TABLE_NAME='<table_name>';Note: Replace the placeholder values in the commands above with your own. For example, <group_name> with hevo.
This returns one of the following values:
-
<number>: The number of log groups for which supplemental logging is enabled. -
zero: This represents that the supplemental logging is disabled.
-
-
If the result of the above query is zero, enable supplemental logging for all columns of a table in your Source database which you want to replicate:
ALTER TABLE <SCHEMA_NAME>.<TABLE_NAME> ADD SUPPLEMENTAL LOG DATA (ALL) COLUMNS;
4. Grant permissions to run LogMiner
The database user you created above must have SELECT privileges on LogMiner views and EXECUTE privileges on LogMiner packages. This ensures that the user can effectively analyze, mine redo log files, gaining valuable insights into database changes.
To grant these privileges, enter the following commands:
BEGIN
    rdsadmin.rdsadmin_util.grant_sys_object('V_$DATABASE', '<USERNAME>','SELECT');
    rdsadmin.rdsadmin_util.grant_sys_object('DBMS_LOGMNR','<USERNAME>','EXECUTE');
    rdsadmin.rdsadmin_util.grant_sys_object('DBMS_LOGMNR_D','<USERNAME>','EXECUTE');
    rdsadmin.rdsadmin_util.grant_sys_object('V_$LOG', '<USERNAME>','SELECT');
    rdsadmin.rdsadmin_util.grant_sys_object('V_$LOG_HISTORY', '<USERNAME>','SELECT');
    rdsadmin.rdsadmin_util.grant_sys_object('V_$LOGMNR_LOGS', '<USERNAME>','SELECT');
    rdsadmin.rdsadmin_util.grant_sys_object('V_$LOGMNR_CONTENTS', '<USERNAME>','SELECT');
    rdsadmin.rdsadmin_util.grant_sys_object('V_$LOGMNR_PARAMETERS', '<USERNAME>','SELECT');
    rdsadmin.rdsadmin_util.grant_sys_object('V_$LOGFILE', '<USERNAME>','SELECT');
    rdsadmin.rdsadmin_util.grant_sys_object('V_$ARCHIVED_LOG', '<USERNAME>','SELECT');
    rdsadmin.rdsadmin_util.grant_sys_object('V_$ARCHIVE_DEST_STATUS', '<USERNAME>','SELECT');
    rdsadmin.rdsadmin_util.grant_sys_object('V_$TRANSACTION', '<USERNAME>','SELECT');
    rdsadmin.rdsadmin_util.grant_sys_object('V_$MYSTAT', '<USERNAME>','SELECT');
    rdsadmin.rdsadmin_util.grant_sys_object('V_$STATNAME', '<USERNAME>','SELECT');
END;
Note: Replace the placeholder values in the commands above with your own. For example, <USERNAME> with HEVO.
Refer to the table below for more information about these commands:
| Command | Allows Hevo to |
|---|---|
rdsadmin.rdsadmin_util.grant_sys_object('V_$DATABASE', '<USERNAME>','SELECT'); |
Query information about the database, such as the current System Change Number (SCN) and log mode, from the V_$DATABASE view. |
rdsadmin.rdsadmin_util.grant_sys_object('DBMS_LOGMNR','<USERNAME>','EXECUTE'); |
Run procedures and functions available in the DBMS_LOGMNR package. Note: This package is required for starting and stopping LogMiner, adding redo log files for analysis, querying change data, and managing LogMiner sessions effectively. |
rdsadmin.rdsadmin_util.grant_sys_object('DBMS_LOGMNR_D','<USERNAME>','EXECUTE'); |
Run procedures and functions available in the DBMS_LOGMNR_D package. Note: This package is required for managing LogMiner dictionary data, which LogMiner uses to translate redo logs during log switches. |
rdsadmin.rdsadmin_util.grant_sys_object('V_$LOG', '<USERNAME>','SELECT'); |
Query information about redo logs, such as their status and group details, from the V_$LOG view. |
rdsadmin.rdsadmin_util.grant_sys_object('V_$LOG_HISTORY', '<USERNAME>','SELECT'); |
Query information about archived redo logs and their sequences from the V_$LOG_HISTORY view. |
rdsadmin.rdsadmin_util.grant_sys_object('V_$LOGMNR_LOGS', '<USERNAME>','SELECT'); |
Query information about the redo logs added to a LogMiner session from the V_$LOGMNR_LOGS view. |
rdsadmin.rdsadmin_util.grant_sys_object('V_$LOGMNR_CONTENTS', '<USERNAME>','SELECT'); |
Query transaction details retrieved during a LogMiner session from the V_$LOGMNR_CONTENTS view. |
rdsadmin.rdsadmin_util.grant_sys_object('V_$LOGMNR_PARAMETERS', '<USERNAME>','SELECT'); |
Query configuration details for the LogMiner session from the V_$LOGMNR_PARAMETERS view. |
rdsadmin.rdsadmin_util.grant_sys_object('V_$LOGFILE', '<USERNAME>','SELECT'); |
Query information about redo logs, such as their type and status, from the V_$LOGFILE view. |
rdsadmin.rdsadmin_util.grant_sys_object('V_$ARCHIVED_LOG', '<USERNAME>','SELECT'); |
Query metadata about archived redo logs, such as file names and timestamps, from the V_$ARCHIVED_LOG view. |
rdsadmin.rdsadmin_util.grant_sys_object('V_$ARCHIVE_DEST_STATUS', '<USERNAME>','SELECT'); |
Query configuration details for archived redo log destinations from the V_$ARCHIVE_DEST_STATUS view. |
rdsadmin.rdsadmin_util.grant_sys_object('V_$TRANSACTION', '<USERNAME>','SELECT'); |
Query information about active transactions in the database from the V_$TRANSACTION view. |
rdsadmin.rdsadmin_util.grant_sys_object('V_$MYSTAT', '<USERNAME>','SELECT'); |
Query performance statistics specific to the current session from the V_$MYSTAT view. |
rdsadmin.rdsadmin_util.grant_sys_object('V_$STATNAME', '<USERNAME>','SELECT'); |
Query details about performance monitoring statistics from the V_$STATNAME view. |
Oracle Buffers
In Oracle, buffers refer to memory storage for caching data to enhance database performance. When LogMiner reads data from redo log files, it utilizes the native in-memory Oracle buffer to cache ongoing transactions (ones that have not been committed or rolled back).
Data Manipulation Language (DML) operations within a transaction are buffered until a commit or rollback is detected. A long-running transaction can have a negative impact on the database performance. It can lead to increased lag in processing change events and memory usage on the database server.
This accumulation of data in the Oracle LogMiner buffers can lead to increased Program Global Area (PGA) memory consumption in your database. Therefore, it is essential to appropriately set the PGA memory size based on your database workload. Read Check PGA/SGA Memory Settings to review the memory settings and configure the PGA_AGGREGATE_LIMIT to prevent server OutOfMemory (OOM) errors.
Only your DBA can determine if your database has long-running transactions with a large number of changes. If so, set the PGA_AGGREGATE_LIMIT to an appropriate value to process these transactions.
5. Check PGA/SGA Memory Settings (Recommended)
In Oracle, the PGA memory settings allow you to manage and optimize memory usage for individual user processes involved in SQL execution.
-
Enter the command below to retrieve information about the initialization parameters ‘pga_aggregate_limit’ and ‘pga_aggregate_target’ from the
V$PARAMETERview:SELECT NAME, VALUE/1024/1024 as VALUE_MB FROM V$PARAMETER WHERE NAME IN ('pga_aggregate_limit', 'pga_aggregate_target');The following is an explanation of the command above:
-
SELECT NAME, VALUE/1024/1024 as VALUE_MB: This part retrieves data for the columns NAME and VALUE from the dynamic performance viewV$PARAMETER. It retrieves theNAMEcolumn as is and calculates theVALUEcolumn divided by 1024 twice to convert the value from bytes to megabytes. It aliases the result as VALUE_MB. -
WHERE NAME IN ('pga_aggregate_limit', 'pga_aggregate_target'): This part filters the results to include only the rows where theNAMEcolumn is eitherpga_aggregate_limitorpga_aggregate_target.
-
-
Enter the command below to monitor the current PGA memory usage in your Oracle database:
SELECT NAME, VALUE, UNIT
    FROM V$PGASTAT
    WHERE NAME IN ('total PGA inuse','total PGA allocated');
The following is an explanation of the command above:
-
SELECT NAME, VALUE, UNIT: This part retrieves data for the columns NAME, VALUE, and UNIT from the dynamic performance viewV$PGASTAT. It retrieves the PGA statistic name, its value, and the unit for the value. -
WHERE NAME IN ('total PGA inuse', 'total PGA allocated'): This part filters the results to include only the rows where theNAMEcolumn is eithertotal PGA inuseortotal PGA allocated.
-
6. Configure the PGA Aggregate Limit (Recommended)
It is important to set up the PGA aggregate limit for managing and controlling memory usage across individual user sessions and queries. Depending on your database workload, you can set the pga_aggregate_limit parameter to prevent out-of-memory errors.
To do this, follow these steps:
-
Complete steps 1 to 5 in Configure the Fast Recovery Area.
-
Set the appropriate value for the
pga_aggregate_limitparameter, and then click Save Changes.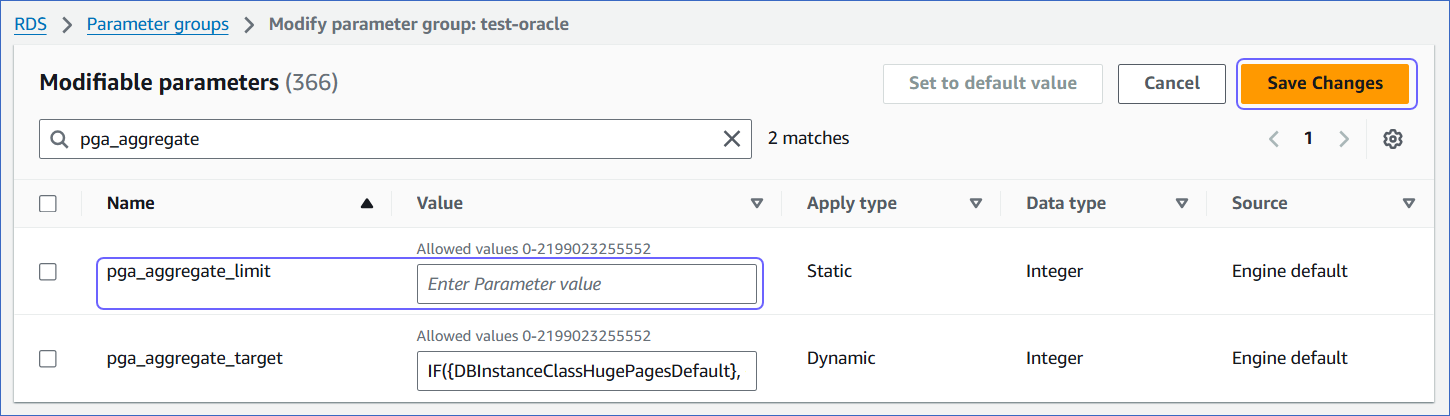
-
Reboot the database instance that you are using to connect to Hevo, to apply the above changes.
To do this:
-
In the left navigation pane, under Dashboard, click Databases.
-
In the Databases section on the right, select the DB instance that you want to connect to Hevo.
-
In the Actions drop-down, click Reboot.
-
On the Reboot DB Instance page, click Confirm to reboot your DB instance.
-
Allowlist Hevo IP addresses for your region
You need to allowlist the Hevo IP address for your region to enable Hevo to connect to your Amazon RDS Oracle database. You can do this by creating a VPC security group and adding inbound and outbound access rules for the Hevo IP addresses. A VPC group controls access to the database instances and virtual server instances inside a VPC.
To do this:
1. Create a VPC security group
-
Log in to the Amazon RDS console.
-
In the left navigation pane, click Databases.
-
In the Databases section on the right, click the DB identifier of your Amazon RDS Oracle database instance.

-
In the Connectivity & Security tab, click the link text under Security, VPC security groups.
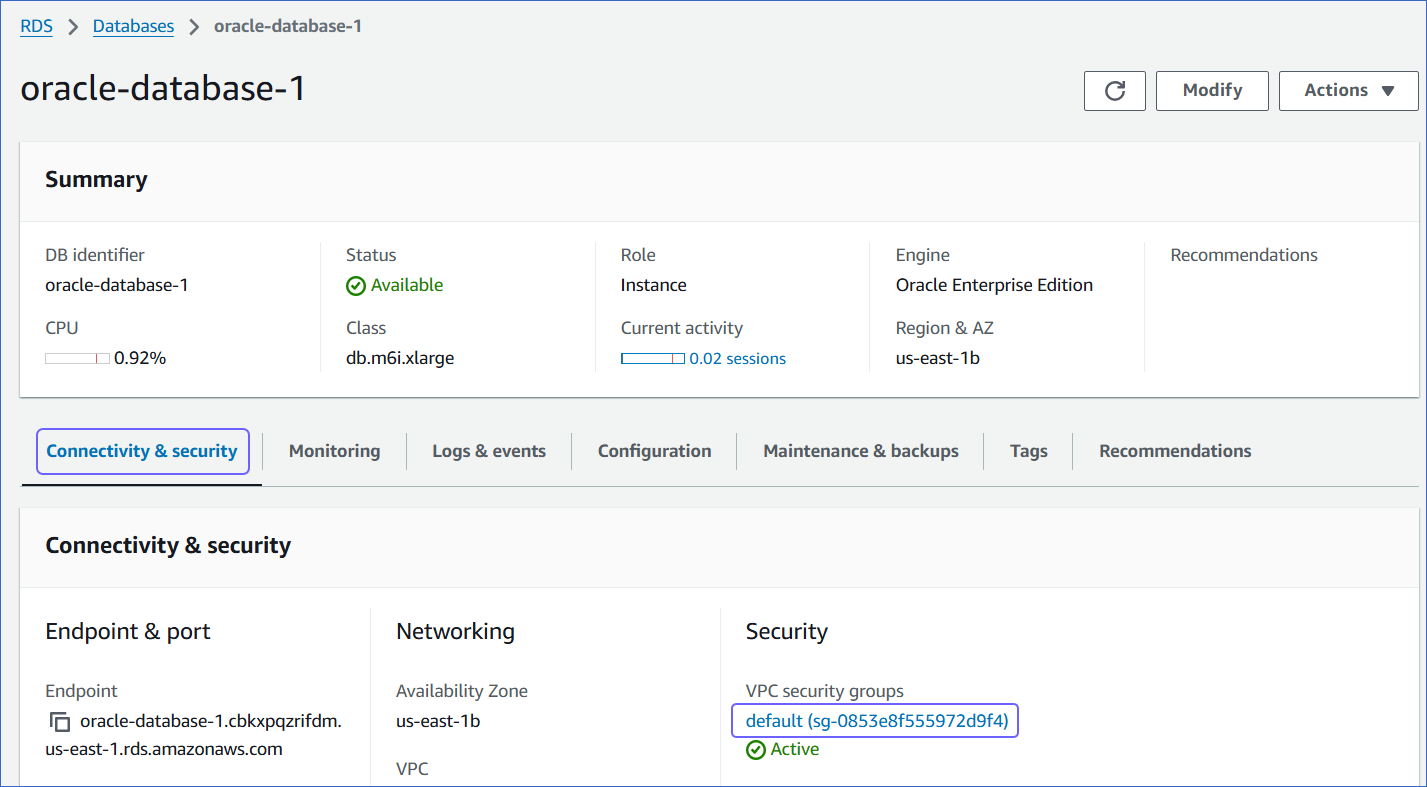
-
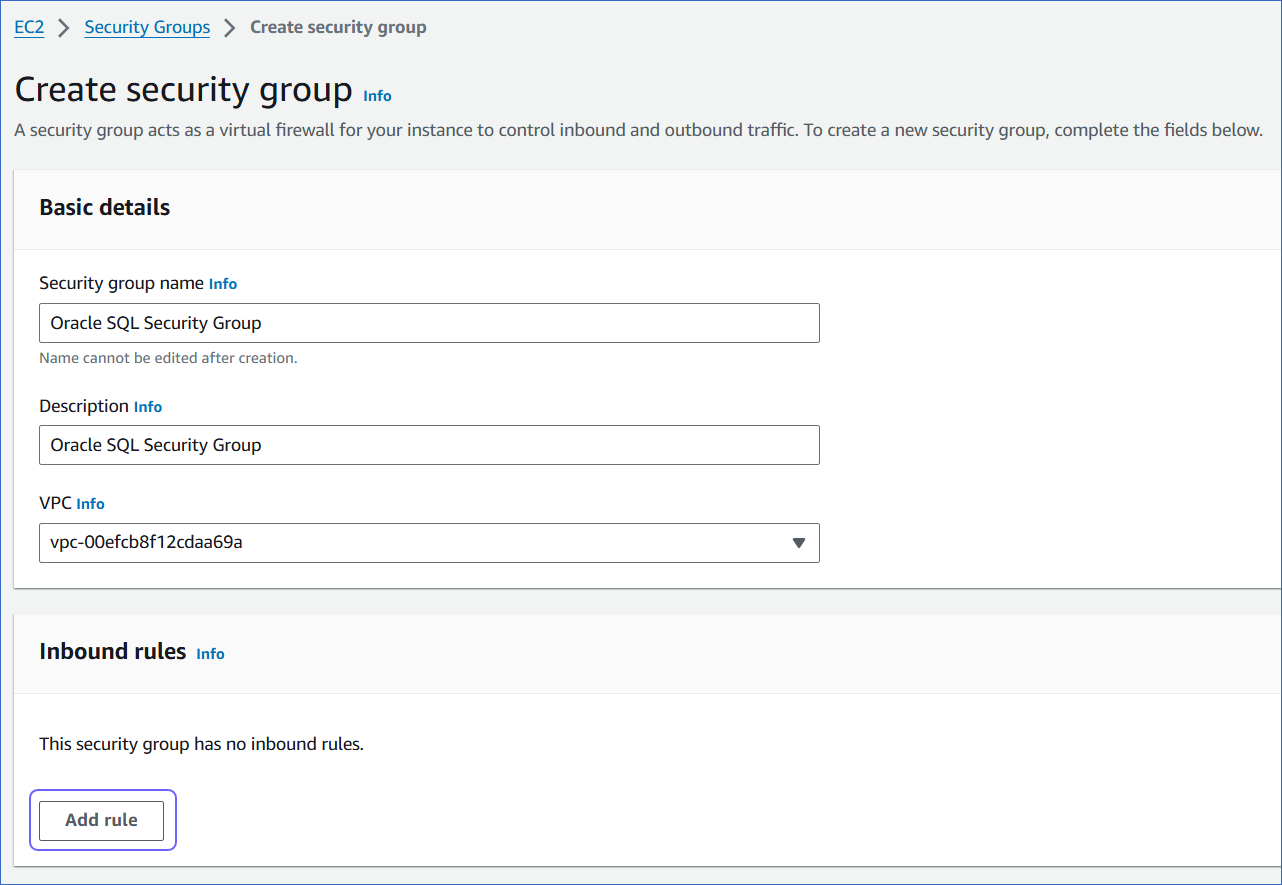
On the Security Groups page, click Create security group.
You can also select an existing group, which you have used for other database instances, and modify it.

-
On the Create security group page, specify the following:
-
Security group name: An appropriate name for the security group.
-
Description: A brief description of the security group.
-
VPC ID: A unique identifier for the VPC.
-
2. Add inbound rules
In the Inbound Rules section:
-
Click Add Rule and specify the following:
-
Port range: The port of your Amazon RDS Oracle instance. For example, 1521.
-
Source: Select Custom from the drop-down and specify Hevo’s IP addresses for your region.
-
-
Add more rules for all the Hevo IPs you want to allow.
-
Click Create security group.
Retrieve the Hostname, Service ID, and Port Number
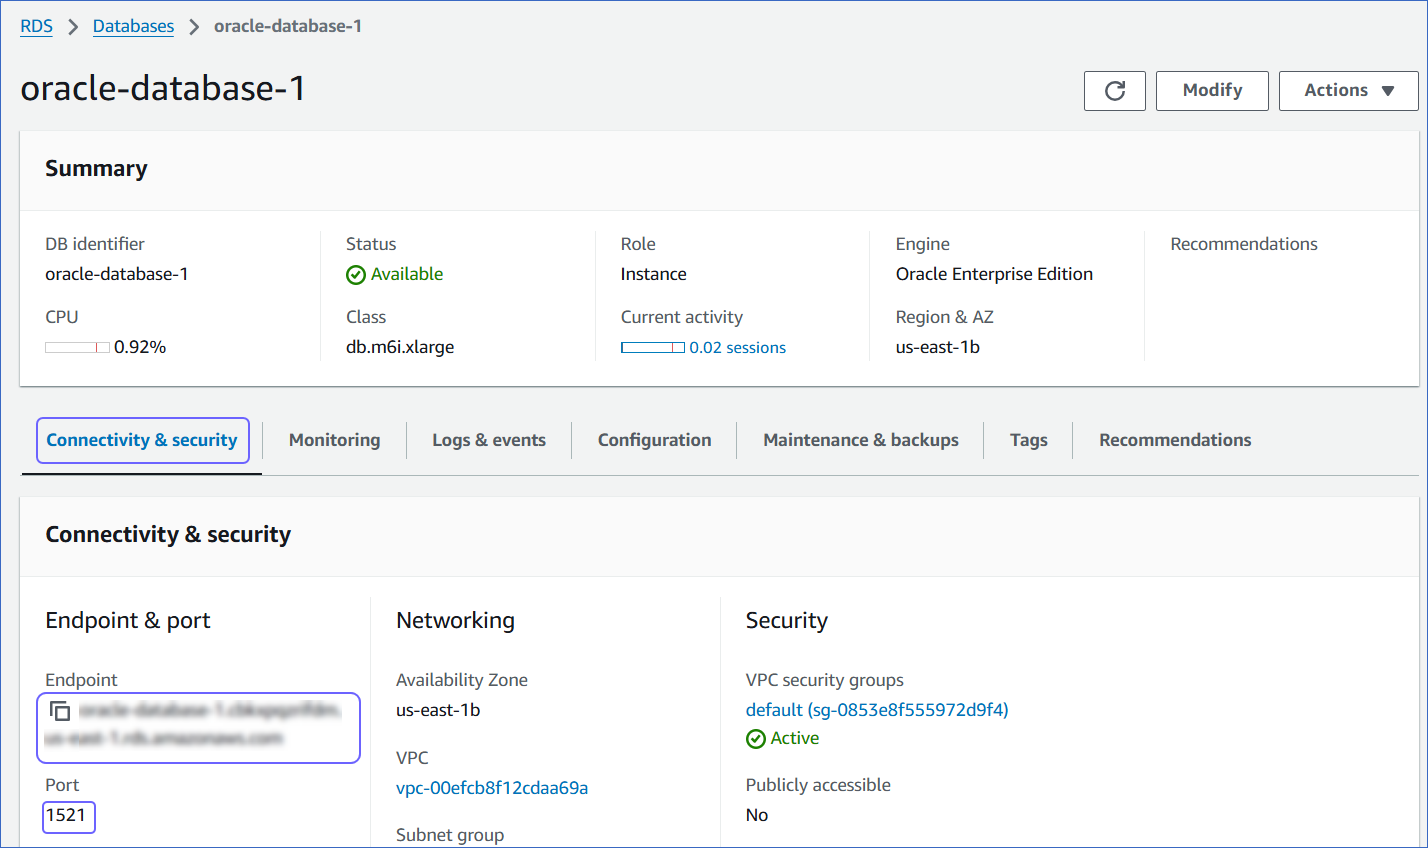
For configuring the Amazon RDS Oracle Source in Hevo, you must specify the database name, hostname, and port. The hostnames start with your database name and end with rds.amazonaws.com.
For example:
Host: oracle-database-1.xxxxxxxxx.rds.amazonaws.com
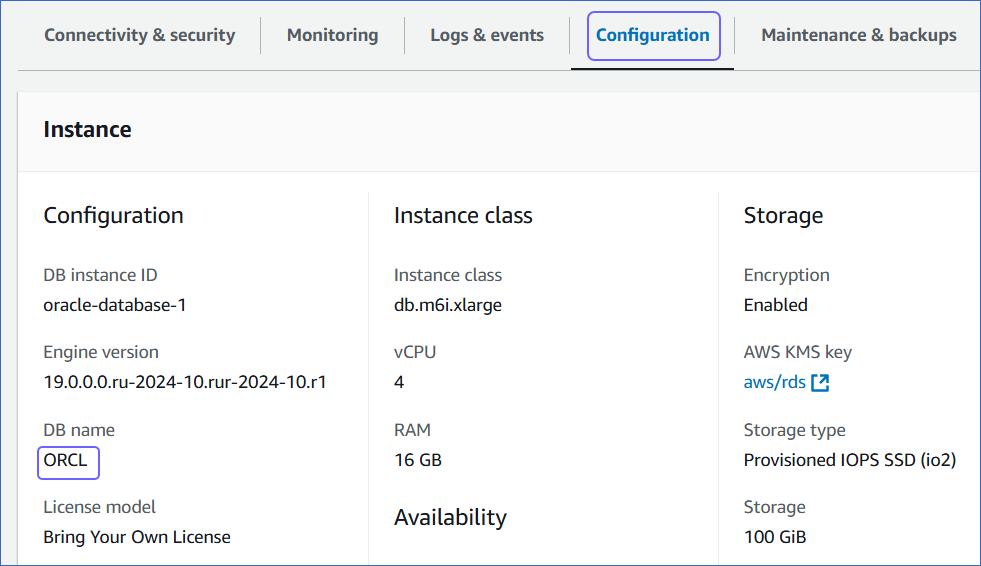
Database name: ORCL
Port: 1521
To retrieve these credentials:
-
In the left navigation pane of the Amazon RDS console, click Databases (or Instances if you are using an older version).
-
In the Databases section on the right, click the DB identifier of the Amazon RDS Oracle instance.
-
Click the Connectivity & Security tab, and copy the values under Endpoint and Port. Specify these values as the Database Host and Database Port, respectively, while creating your Hevo Pipeline.
-
Click the Configuration tab, and copy the value under DB name. Use this value as the Database Name while creating your Hevo Pipeline.
Configure Amazon RDS Oracle as a Source in your Pipeline
Perform the following steps to configure your Amazon RDS Oracle Source:
-
Click PIPELINES in the Navigation Bar.
-
Click + Create Pipeline in the Pipelines List View.
-
On the Select Source Type page, select Amazon RDS Oracle.
-
On the Select Destination Type page, select the type of Destination you want to use.
-
On the page that appears, do the following:
-
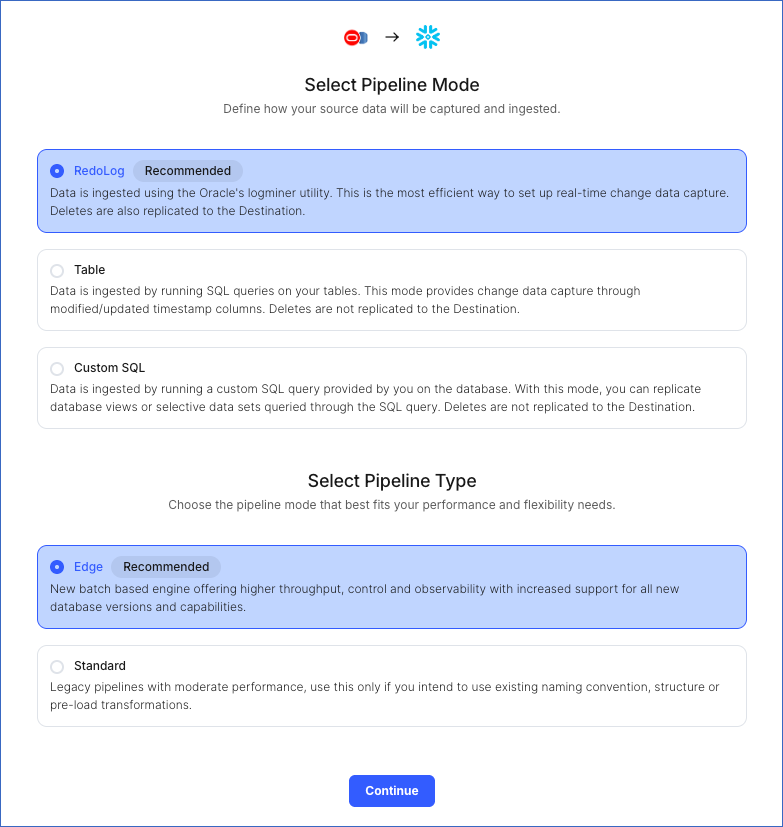
Select Pipeline Mode: Choose RedoLog. Hevo supports only this mode for Edge Pipelines created with Oracle Source. If you choose any other mode, you can proceed to create a Standard Pipeline.
-
Select Pipeline Type: Choose the type of Pipeline you want to create based on your requirements, and then click Continue.
-
If you select Edge, skip to step 6 below.
-
If you select Standard, read Amazon RDS Oracle to configure your Standard Pipeline.
This section is displayed only if all the following conditions are met:
-
The selected Destination type is supported in Edge.
-
The Pipeline mode is set to RedoLog.
-
Your Team was created before September 15, 2025, and has an existing Pipeline created with the same Destination type and Pipeline mode.
For Teams that do not meet the above criteria, if the selected Destination type is supported in Edge and the Pipeline mode is set to RedoLog, you can proceed to create an Edge Pipeline. Otherwise, you can proceed to create a Standard Pipeline. Read Amazon RDS Oracle to configure your Standard Pipeline.
-
-
-
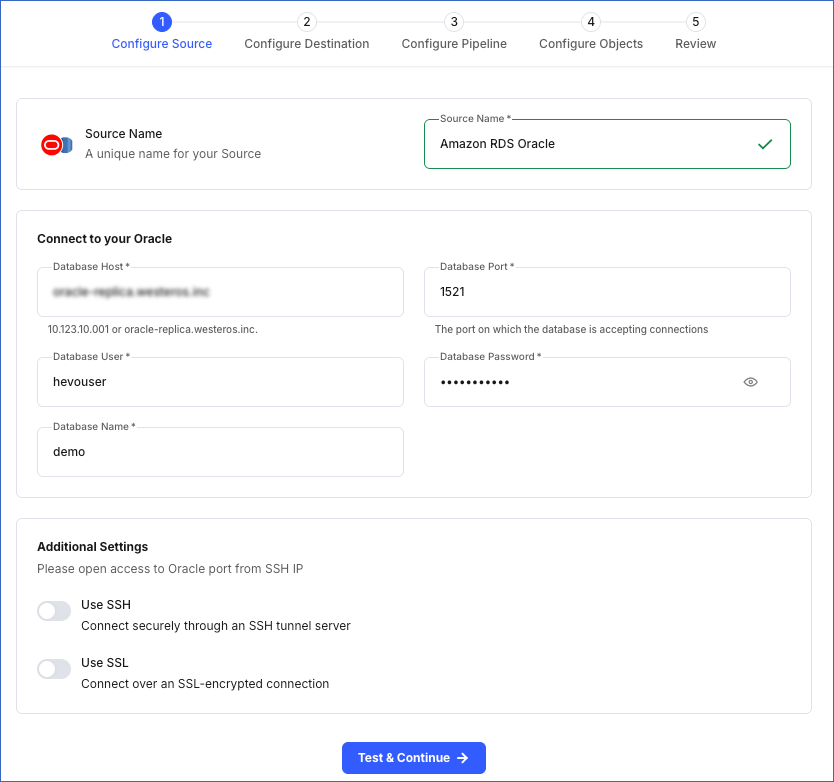
In the Configure Source screen, specify the following:
-
Source Name: A unique name for your Source, not exceeding 255 characters. For example, Amazon RDS Oracle Source.
-
In the Connect to your Oracle section:
-
Database Host: The Amazon RDS Oracle database host’s IP address or DNS. This is the endpoint that you obtained in Step 4 above.
-
Database Port: The port on which your Amazon RDS Oracle server listens for connections. This is the port number that you obtained in Step 4 above. Default value: 1521.
-
Database User: The user who has permission to read tables in your database. This user can be the one you created in Step 1 above. For example, hevouser.
-
Database Password: The password of your database user.
-
Database Name: The database from where you want to replicate data. For example, demo.
-
-
In the Additional Settings section:
-
Use SSH: Enable this option to connect to Hevo using an SSH tunnel instead of directly connecting your Oracle database host to Hevo. This provides an additional level of security to your database by not exposing your Oracle setup to the public.
If this option is turned off, you must configure your Source to accept connections from Hevo’s IP address.
-
Use SSL: Enable this option to use an SSL-encrypted connection. Specify the following:
-
CA File: The file containing the SSL server certificate authority (CA).
-
Client Certificate: The client’s public key certificate file.
-
Client Key: The client’s private key file.
-
-
-
-
Click Test & Continue to test the connection to your Amazon RDS Oracle Source. Once the test is successful, you can proceed to set up your Destination.
Additional Information
Read the detailed Hevo documentation for the following related topics:
Data Type Mapping
Hevo maps the Oracle Source data type internally to a unified data type, referred to as the Hevo Data Type, in the table below. This data type is used to represent the Source data from all supported data types in a lossless manner.
The following table lists the supported Oracle data types and the corresponding Hevo data type to which they are mapped:
| Oracle Data Type | Hevo Data Type |
|---|---|
| - BIT | BOOLEAN |
| - NUMBER - FLOAT |
- DECIMAL - DOUBLE |
| - CHAR - VARCHAR - VARCHAR2 - NCHAR - NVARCHAR - ROWID - INTERVAL_DAY_TO_SECOND - INTERVAL_YEAR_TO_MONTH |
VARCHAR |
| - TIMESTAMPTZ - TIMESTAMP_LOCALTZ |
TIMESTAMPTZ (Format: YYYY-MM-DDTHH:mm:ss.SSSSSSSSSZ) |
| - DATE - TIMESTAMP |
TIMESTAMP |
Read ANSI, DB2, and SQL/DS Data Types to know the data types that Oracle converts from ANSI to its supported ones.
Note: Hevo replicates values in TIMESTAMPTZ and TIMESTAMP_LOCALTZ fields in Coordinated Universal Time (UTC). Due to this, you may observe a time difference if the original values of these fields uses a different time zone. For example, if a value in a TIMESTAMPTZ column is in the US Eastern Time (UTC-4) and is recorded as 2024-05-01 10:00:00 -04:00, Hevo converts it to UTC and replicates it as 2024-05-01 14:00:00 00:00 in the Destination column.
Handling of NUMBER Data Type
In Oracle, NUMBER is a data type that stores fixed or floating-point numbers. To keep a check on the integrity of the input, the NUMBER data type is specified in the format NUMBER (p,s), where s is the scale and p is the precision. Precision (p) refers to the maximum number of significant digits a number can have. Significant digits are the digits in a number carrying meaningful information and exclude leading or trailing zeros. Scale (s) refers to the number of digits to the right of the decimal point. Read Numeric Data Types to know more about how Oracle handles the NUMBER data type.
Hevo calculates the width of a stored value, when its scale is less than or equal to zero, using the formula, Width = Precision - Scale. Width refers to the total number of digits required to store a number, considering both the integer (digits before decimal point) and fractional (digits after decimal point) parts.
The NUMBER data types are mapped to the following Hevo data types based on the calculated width:
| Width | Hevo Data Type |
|---|---|
| < 5 | SHORT |
| < 10 | INT |
| < 19 | LONG |
| > 19 | DECIMAL |
Note: If precision and scale are not defined for the NUMBER data type, Destination-specific default maximum values for precision and scale are used.
Handling of Unsupported Data Types
If any of the Source objects contain data types that are not supported by Hevo, the corresponding fields are marked as unsupported during object configuration in the Pipeline.
At this time, the following Oracle data types are not supported by Hevo:
- CLOB
- NCLOB
- BLOB
- UROWID
- LONG
- RAW
- LONG RAW
- XMLTYPE
- BFILE
- Any other data type not listed in the tables above.
Source Considerations
-
Redo Log does not support user-defined data types. Therefore, fields with such data types are not captured in the log and are lost.
-
Hevo uses Oracle LogMiner to read redo logs to capture changes made to a database. When LogMiner reads a log entry, it refers to the Oracle data dictionary to understand and translate the logs. However, as the data dictionary is not included in the redo logs by default, LogMiner uses the version of the dictionary available at the time of reading the logs. As a result, if the schema of any active object in the Pipeline changes after the redo log was generated, Hevo cannot track these schema changes, potentially leading to data loss. However, schema changes to skipped tables do not impact the Pipeline.
Note: If your Source database schema changes frequently and you want Hevo to write the Oracle data dictionary to the redo logs to track these changes, contact Hevo Support.
-
Oracle LogMiner does not support tables or columns with names longer than 30 characters.
As a result, Hevo cannot ingest data from objects whose names exceed this limit or that contain columns with names exceeding 30 characters. These objects are marked as Inaccessible during object configuration in the Pipeline.
To ingest data from these objects, rename the tables and columns to ensure the names are within the supported limit.
-
Oracle does not capture the negative sign for timestamps representing Before Common Era (BCE) dates in the redo logs. As a result, Hevo replicates negative timestamp values in DATE, TIMESTAMP, TIMESTAMPTZ, and TIMESTAMP_LOCALTZ fields as positive timestamp in the Destination columns. For example, a value
2024-01-24 12:34:56 BCin a TIMESTAMP column in the Source table is replicated as2024-01-24 12:34:56in the Destination column.
Limitations
-
Hevo does not support the flashback method to track incremental updates.
-
Hevo does not set the metadata column __hevo__marked_deleted to True for data deleted from the Source table using the TRUNCATE command. This action could result in a data mismatch between the Source and Destination tables.
-
If a table is created in the Source using the CREATE TABLE AS SELECT (CTAS) statement after the Pipeline is created, Hevo cannot automatically capture its schema. This happens because CTAS tables do not generate the metadata that Hevo uses to detect new objects. As a result, data ingestion for the corresponding object fails, and the object is marked as Skipped in the Pipeline. To ingest data for this object, you must resync it.