Database Objects and Actions
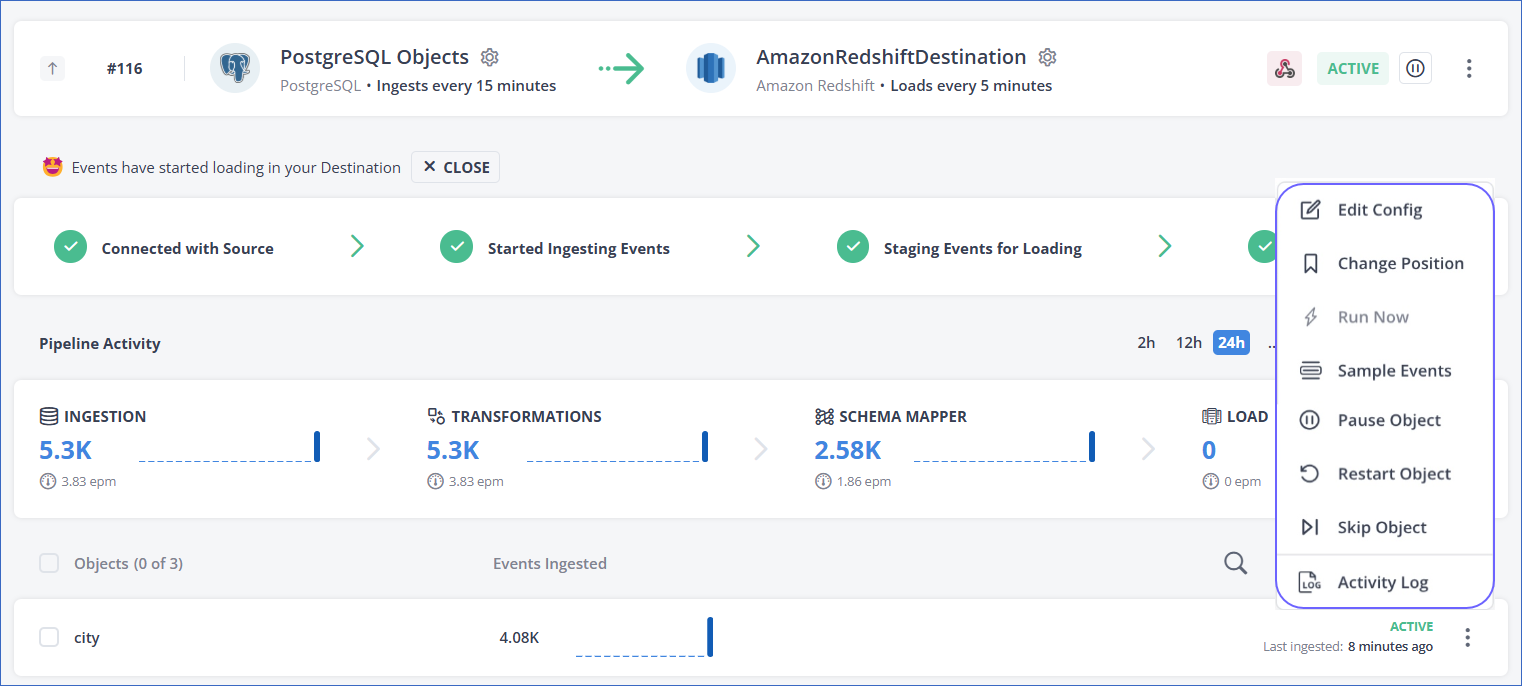
The image below shows the standard actions available for objects in Pipelines created with Amazon Redshift and database Sources.
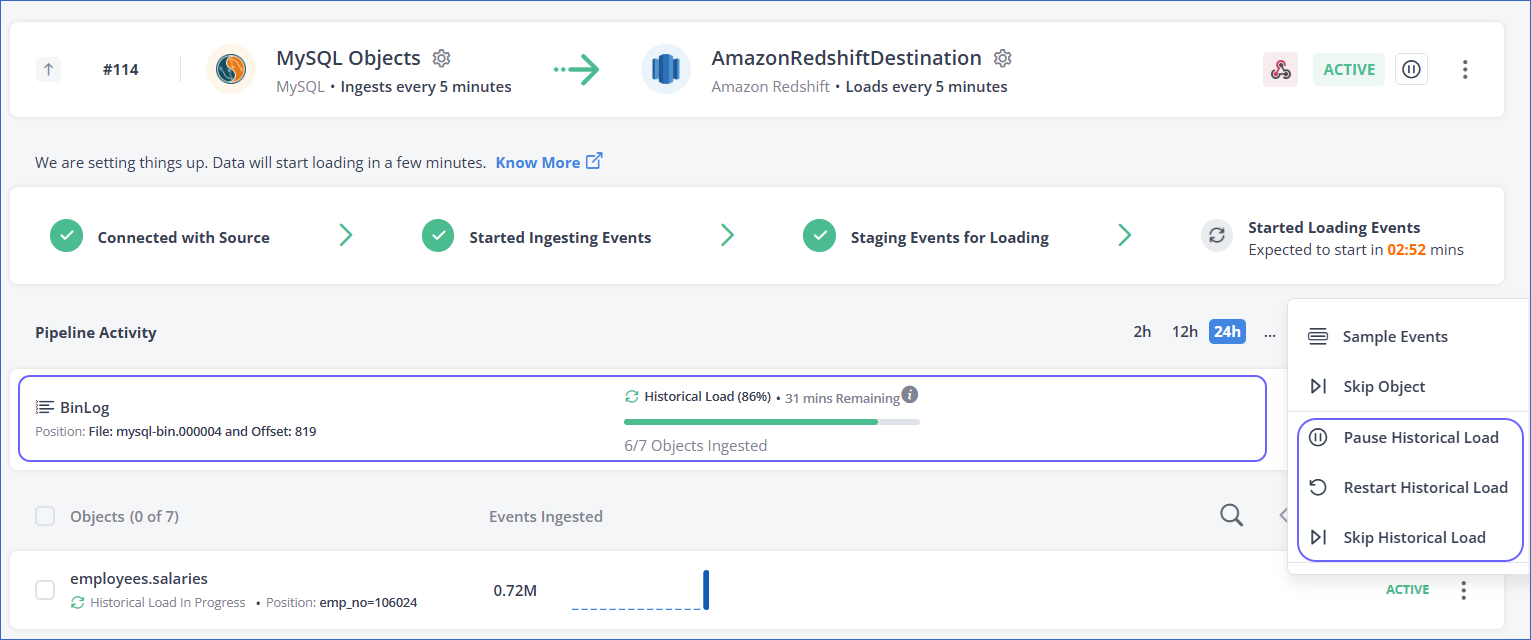
Additional actions related to historical load ingestion are available for objects in Elasticsearch and log-based Pipelines.
The following sections explain each available action in detail.
Edit Config
You can use the Edit Config action to change the query mode for objects in Pipelines created with Amazon Redshift, Elasticsearch, and RDBMS Sources. Read Factors Affecting Event Usage - Query Modes to understand how the query mode impacts the consumption of your Events quota.
Note: Whenever you perform the Edit Config action on an object, Hevo automatically performs a historical load, which is non-billable. However, if the object is in a SKIPPED state, ensure that you resume it before editing its configuration. If you edit an object while it is in the SKIPPED state and resume it afterward, Hevo considers it as an existing object being resumed for ingestion, and the Events are billable. By resuming the object first, you ensure that the historical load remains non-billable.
In log-based Pipelines, the query mode is applicable to historical data ingestion. In the case of table-based and Custom SQL-based Pipelines, both historical and incremental data ingestion tasks use the same query mode configuration. Read Query Modes for Ingesting Data for more information.
To change the query mode of an object:
-
In the Pipeline List View, select the Pipeline you want to modify to open it in the Detailed View.
-
In the Objects list, click the More (
 ) icon corresponding to the object for which you want to change the query mode, and then select Edit Config.
-
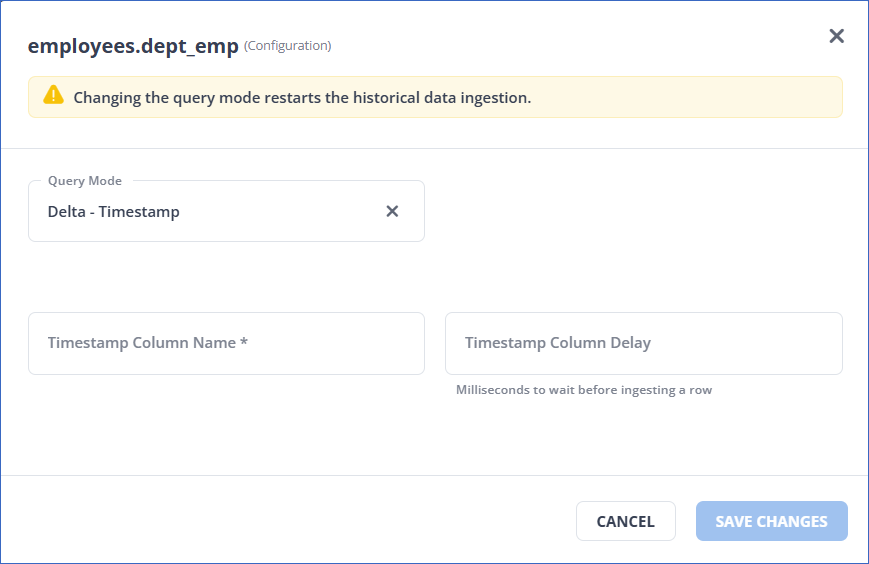
In the <Object Name> (Configuration) pop-up dialog, select a query mode from the available options, and provide the associated details. Any query mode change restarts the ingestion, as the offset determination mechanism changes. If any ingestion is currently in progress, it is halted and re-ingestion starts.
For example, for the Delta-Timestamp query mode, you must specify the parameters as shown below:
Refer to the following table for the information required for each query mode:
Query Mode Parameter Full Load None. Delta-Timestamp - Timestamp Column Name
- Milliseconds to wait before ingesting a row. (Optional)Change Data Capture - Incrementing Column Name
- Timestamp Column Name
- Milliseconds to wait before ingesting a row. (Optional)Unique Incrementing Append Only - The selected columns must be unique and cannot contain null values. Change Tracking - The selected columns must be unique and cannot contain null values. Points to note while selecting the query mode:
-
The Unique Incrementing Append Only (UIAO) mode requires a primary key or an indexed column. This mode is not recommended for incremental data.
-
In the case of Delta-Timestamp mode, the column chosen for querying the data must be one that is updated on each create and update Event in a table row.
-
The Change Data Capture mode is a combination of the UIAO and Delta-Timestamp modes and has the same conditions. This mode is highly efficient for ingesting historical data as it allows Hevo to ingest data in parallel based on the selected index column.
-
The Change Tracking mode is available for selection in the case of SQL Server Sources, but it works only if Change Tracking feature is enabled for both the table and database in the SQL Server.
-
-
Click SAVE CHANGES.
For steps to change the query mode for multiple objects at once, read Bulk Actions in Pipeline Objects.
In case you have selected Full Load as the query mode and the objects ingested in Full Load are higher than 10% of your billable Events, Hevo displays an alert on the UI and recommends you to optimize the query modes for the object.
Change Position
You can use the Change Position action to ingest data from a different offset than the value determined by Hevo. For example, suppose you want to apply a Transformation on only a part of the data. Then, you can use the Change Position action to re-ingest only the required data.
The position defines the last record read by Hevo from a database log file or table, and helps to identify the record from which the next ingestion must start. It comprises the position indicator, such as a timestamp, an offset, or a Log Sequence Number (LSN) of the last ingested record. This action is available for Pipelines created with Amazon Redshift and database Sources, except Amazon DynamoDB. For log-based MongoDB and Amazon DocumentDB Pipelines, the position is based on logs, which is common to all the objects. Therefore, the position is applicable at the Pipeline level rather than individual objects.
Once you change the position, ingestion restarts from the new position. Any data ingested using the Change Position action is billable.
Changing the position for a log-based Pipeline
In case of log-based Pipelines, the Change Position action is available only for the Amazon DocumentDB and MongoDB Sources.
To change the position:
Note: If you need help in changing the offset, contact Hevo Support.
-
In the Pipeline List View, select the Pipeline you want to modify to open it in the Detailed View.
-
In the Pipeline Activity section, click the More (
 ) icon, and then select Change Position.
-
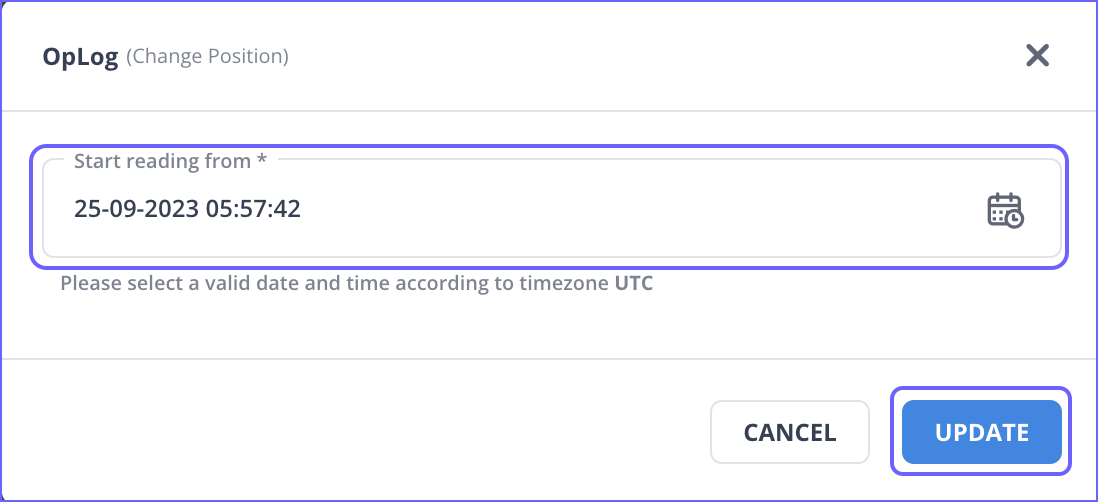
In the pop-up dialog, specify a date and time from where Hevo must start reading the data, and then click UPDATE.
Changing the position for an object in a non-log-based Pipeline
For Pipelines created in Table and Custom SQL modes, you can change the position for individual objects and re-ingest the data as per the new position.
-
In the Pipeline List View, select the Pipeline you want to modify to open it in the Detailed View.
-
In the Objects list, click the More (
 ) icon corresponding to the object for which you want to change the position, and then select Change Position.
-
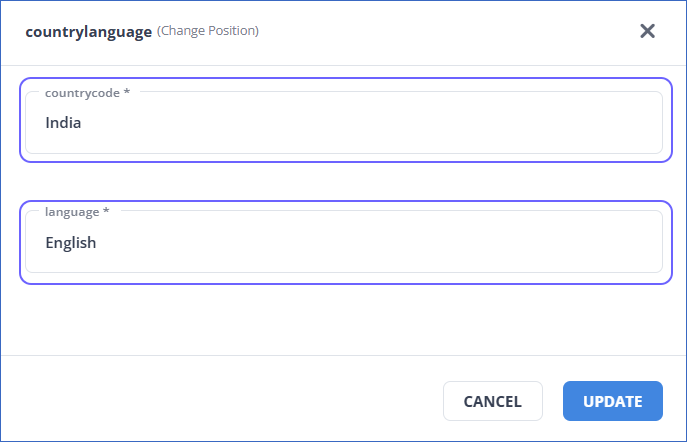
In the <Object Name> (Change Position) pop-up dialog, specify the new position to start ingesting data from. For example, in the image below, the position for the countrylanguage object is changed from countrycode, ZWE to India, and from language Shona to English.
The Source columns that determine the position are based on the query mode you selected for the object during Pipeline creation.
Tip: Click the Edit Config action to see these values. For example, the image below shows the query mode and columns selected for the countrylanguage object.

-
Click UPDATE. The object is queued for ingestion.
Run Now
The Run Now action enables you to manually trigger the ingestion for an active Pipeline or object. The Pipeline or object is immediately queued for ingestion.
Note: This action is not available for objects in log-based Pipelines.
-
To manually trigger the ingestion for a Pipeline, click the More (
 ) icon in the Pipeline Summary bar, and then select Run Now.
-
To manually trigger the ingestion for an object, click the More (
 ) icon corresponding to the object in the Objects list, and then select Run Now.
This action is useful when you urgently need data from the Source and do not want to wait for the next scheduled ingestion.
Manually triggering the ingestion using the Run Now action does not affect the scheduled ingestion for the object. The ingestion occurs as per the frequency set for the Pipeline.
Suppose you create a Pipeline at 3 PM (UTC) and set 1 Hour as the ingestion frequency. If you trigger ingestion using the Run Now action at 3:15 PM, the Events are ingested once and the next ingestion happens at 4 PM, as per the defined schedule. It is not moved to 4:15 PM. Thus, the Events are ingested at 3:15 PM, 4 PM, 5 PM, and so on.
Sample Events
You can use the Sample Events action to view a sample of the ingested Events as they will be loaded to the Destination.
For example, in the sample Event displayed in the image below, as the Merge Tables option was selected during Pipeline creation, the __hevo__database_name field is added to the Event at the time of ingestion.
To view sample Events:
-
In the Pipeline List View, select the Pipeline you want to modify to open it in the Detailed View.
-
In the Objects list, click the More (
 ) icon corresponding to the object for which you want to view sample Events, and then select Sample Events.
-
Click PREVIOUS and NEXT to move between the sample Events.

Pause and Resume Object
The Pause Object and Resume Object actions allow you to temporarily stop and later resume data ingestion for a specific object.
Note: This action is not available for objects in log-based Pipelines.
Perform the following steps to pause an object:
-
In the Pipeline List View, select the Pipeline you want to modify to open it in the Detailed View.
-
In the Objects list, click the More (
 ) icon corresponding to the object you want to pause, and then select Pause Object.
The ingestion status for the object changes to PAUSED.

Similarly, click the More (![]() ) icon corresponding to the object, and then select Resume Object to resume data ingestion for the object.
) icon corresponding to the object, and then select Resume Object to resume data ingestion for the object.
Restart Object
You can use the Restart Object action to ingest data for an object from the beginning. The starting point depends on the Source type and the ingestion mode, for example, it could be the earliest records available in the Source table or the logs retained by the Source. This action includes both historical and incremental data ingestion.
Perform the following steps to restart an object:
-
In the Pipeline List View, select the Pipeline you want to modify to open it in the Detailed View.
-
In the Objects list, click the More (
 ) icon corresponding to the object which you want to restart, and then select Restart Object.
-
In the pop-up dialog, select the check box to agree to the cost implications, and then click RESTART OBJECT.
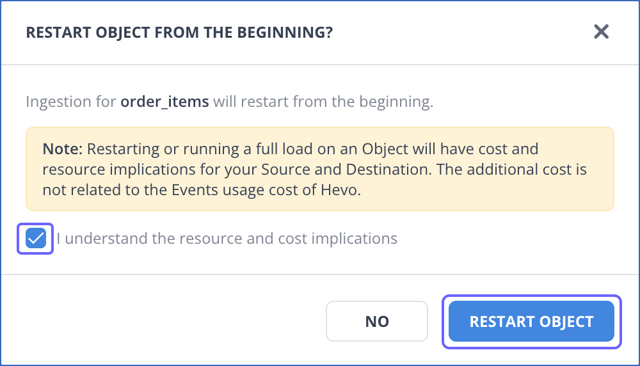
The object is queued for ingestion.
Include and Skip Objects
Skip and Include are complementary actions. You can skip and include both active and paused Source objects. For log-based Pipelines, skipping or including the Source object means dropping or including the related Events, respectively, from the log-based ingestion. However, Events already ingested from an active Source object are not dropped. They are loaded to the Destination before the object is skipped from log-based ingestion.
Note: These actions are available for Pipelines created with Amazon Redshift and database Sources, except Amazon DynamoDB.
-
To include an object that you skipped during or post-Pipeline creation:
-
In the Pipeline List View, select the Pipeline you want to modify to open it in the Detailed View.
-
In the Objects list, click the More (
 ) icon corresponding to the object you want to include, and then select Include Object.
-
In the <Object Name> (Configuration) pop-up dialog, select the appropriate query mode and the corresponding columns, and then click SAVE CHANGES.

-
-
To include multiple skipped objects:
-
In the Pipeline List View, select the Pipeline you want to modify to open it in the Detailed View.
-
In the Objects list, select the check boxes corresponding to the objects that you want to include.

-
In the bulk actions bar, click INCLUDE.

-
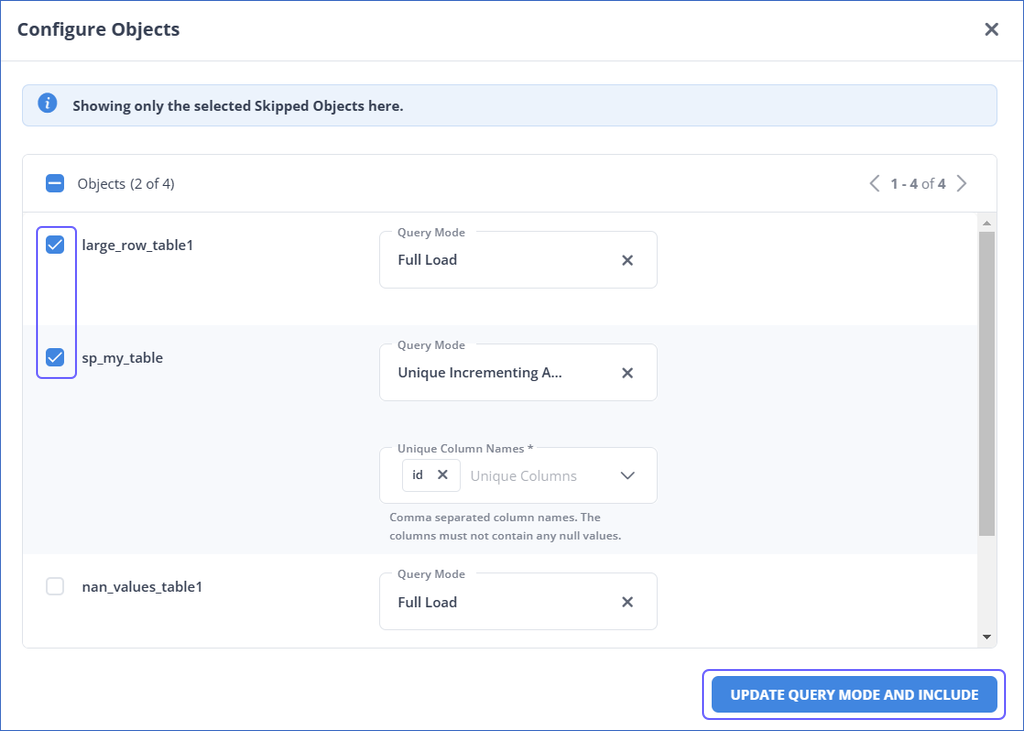
In the Configure Objects pop-up dialog, do the following:
-
Select the check boxes corresponding to the objects you want to include.
-
Select the appropriate query mode and the corresponding columns for the objects.
-
Click UPDATE QUERY MODE AND INCLUDE.
-
-
Pause and Resume Historical Load
The Pause Historical Load and Resume Historical Load actions allow you to pause and resume the ingestion of historical Events. You can resume the ingestion from the last position till which the historical data was successfully ingested. This action remains available only till the historical load ingestion is in progress.
These actions are available in Elasticsearch and log-based Pipelines created from Hevo version 1.67 onwards.
To pause the historical load:
-
In the Pipeline List View, select the Pipeline you want to modify to open it in the Detailed View.
-
In the Objects list, click the More (
 ) icon corresponding to the object while its status is Historical Load in Progress and select Pause Historical Load.
The ingestion status for the object changes to Historical Load Paused.

Similarly, click the More (![]() ) icon corresponding to the object, and then select Resume Historical Load to resume the historical data ingestion.
) icon corresponding to the object, and then select Resume Historical Load to resume the historical data ingestion.
Restart Historical Load
The Restart Historical Load action allows you to ingest data for an object from the beginning. The beginning for the object depends on the Source type and the ingestion mode, for example, it could be the earliest records available in the Source table or the logs retained by the Source. This action is supported for objects in ACTIVE and SKIPPED states. If historical data was previously ingested for a skipped object, you can restart the historical load for it. If an object was skipped during Pipeline creation, you can use the Include Historical Load action instead.
This action is not available for log-based Pipelines created with the Amazon DynamoDB Source before Release 1.92. In such Pipelines, you can use the Restart Incremental Load action instead, which re-ingests both the historical data and the incremental data retained in the DynamoDB Streams. Events ingested through this action are non-billable.
For other log-based Pipelines, restarting incremental ingestion is not supported, as log expiry can cause data mismatches. Therefore, to re-ingest data in these Pipelines, you must use the Restart Historical Load action.
Perform the following steps to restart the historical load for an object:
-
In the Pipeline List View, select the Pipeline you want to modify to open it in the Detailed View.
-
In the Objects list, click the More (
 ) icon corresponding to the object for which you want to restart the historical load, and then select Restart Historical Load.
-
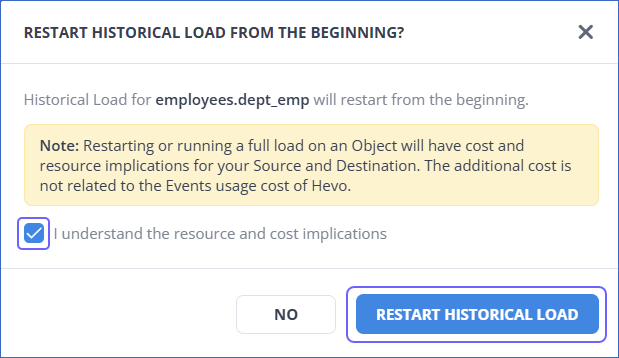
In the pop-up dialog, select the check box to agree to the cost implications, and then click RESTART HISTORICAL LOAD. The object is queued for ingestion.
Include and Skip Historical Load
You can use the Skip Historical Load action to skip the historical Events and include them later, if needed.
Similarly, if you had previously skipped historical data ingestion, you can use the Include Historical Load action to ingest that data. This option is also available for objects that were skipped during Pipeline creation. Once historical data is ingested, the object’s status changes to ACTIVE.
Note: The Include Historical Load action is only available for objects that were present in the Source when the Pipeline was created. This action will not appear for objects created in the Source later. If you want to include historical data for newly added objects, contact Hevo Support.
These actions are available in Elasticsearch and log-based Pipelines created from Hevo version 1.67 onwards.
To include the historical load:
-
In the Pipeline List View, select the Pipeline you want to modify to open it in the Detailed View.
-
In the Objects list, click the More (
 ) icon corresponding to the object for which you want to include the historical load, and then select Include Historical Load.
-
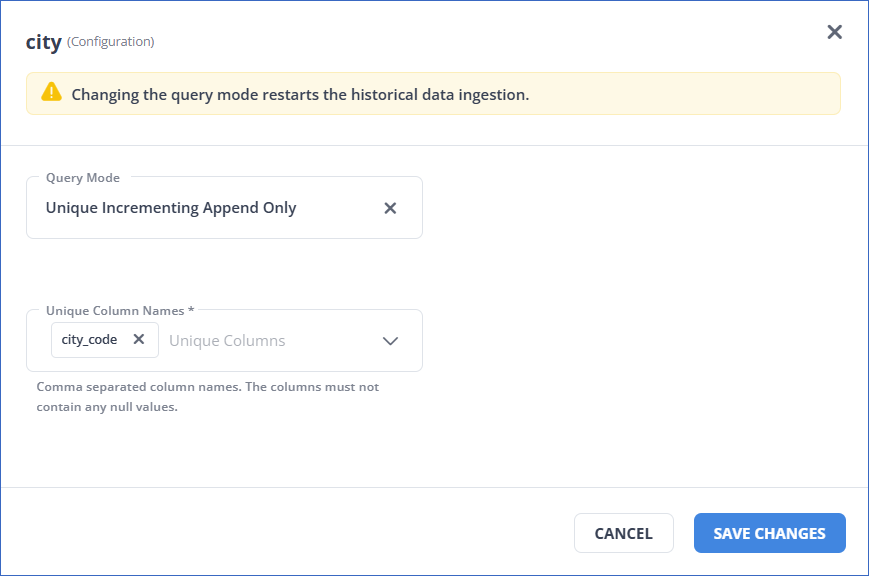
In the <Object Name> (Configuration) pop-up dialog, confirm or update the query mode settings for the object.
-
Click SAVE CHANGES. The ingestion status for the object changes to Historical Load In Progress.

To skip the historical load:
-
In the Pipeline List View, select the Pipeline you want to modify to open it in the Detailed View.
-
In the Objects list, click the More (
 ) icon corresponding to the object for which you want to skip the historical load, and then select Skip Historical Load.
The ingestion status for the object changes to Historical Load Skipped.

Pause and Resume Incremental Load
Note: These actions are available only in Pipelines created with Amazon DynamoDB as a Source.
The Pause Incremental Load and Resume Incremental Load actions allow you to pause and later continue the ingestion of incremental Events for a specific object. When resumed, ingestion continues from the last successfully saved offset, ensuring no data already ingested is duplicated.
Perform the following steps to pause the incremental load for an object:
Note: Pausing incremental ingestion for more than 24 hours may lead to data loss because DynamoDB streams retain data only for the last 24 hours, and Hevo reads data changes from these streams. Any changes older than this retention period are no longer available for incremental ingestion. However, you can ingest this data by using the Restart Historical Load action.
-
In the Pipeline List View, select the Pipeline you want to modify to open it in the Detailed View.
-
In the Objects list, click the More (
 ) icon corresponding to the object, and then select Pause Incremental Load.
Similarly, click the More (![]() ) icon corresponding to the object, and then select Resume Incremental Load to resume the incremental data ingestion.
) icon corresponding to the object, and then select Resume Incremental Load to resume the incremental data ingestion.
Restart Incremental Load
Note: This action is available only in Pipelines created with Amazon DynamoDB as a Source.
The Restart Incremental Load action allows you to ingest incremental data for an object for the last 24 hours, based on the data changes recorded in the DynamoDB streams. In Pipelines created with the Amazon DynamoDB Source before Release 1.92, this action re-ingests both historical and incremental data retained in the DynamoDB streams for the last 24 hours.
Perform the following steps to restart the incremental load for an object:
-
In the Pipeline List View, select the Pipeline you want to modify to open it in the Detailed View.
-
In the Objects list, click the More (
 ) icon corresponding to the object for which you want to restart the incremental load, and then select Restart Incremental Load.
-
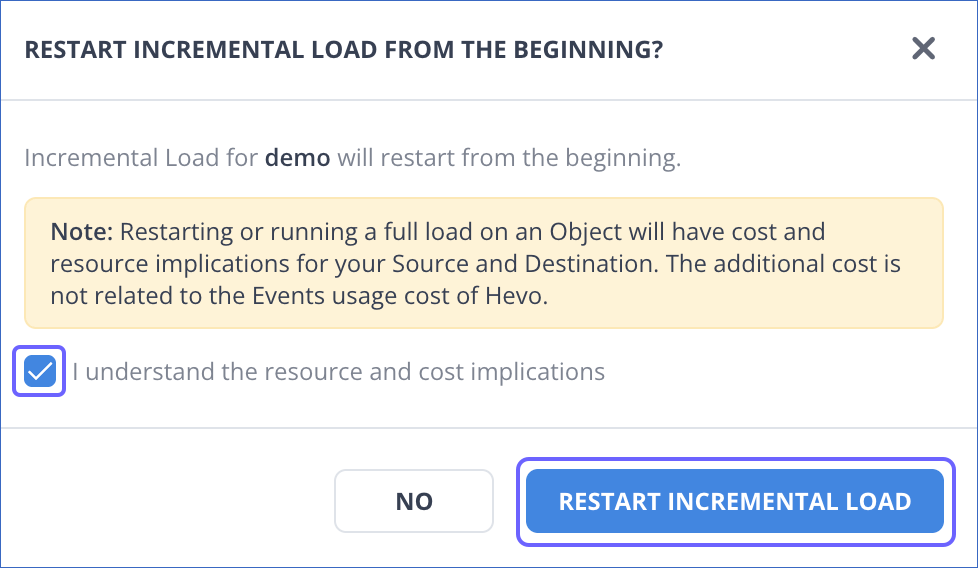
In the pop-up dialog, select the check box to agree to the cost implications, and then click RESTART INCREMENTAL LOAD.
Include and Skip Incremental Load
Note: These actions are available only in Pipelines created with Amazon DynamoDB as a Source.
The Skip Incremental Load action temporarily excludes incremental Events from ingestion. If needed, you can later ingest the skipped Events using the Include Incremental Load action. This action is also available for objects that were skipped when the Pipeline was created.
Perform the following steps to include the incremental load for an object:
Note: DynamoDB streams retain incremental data for up to 24 hours. Therefore, when you include incremental data for an object, Hevo ingests only the changes recorded within this retention period. Any changes older than 24 hours are no longer available for incremental ingestion. However, you can ingest this data by using the Restart Historical Load action.
-
In the Pipeline List View, select the Pipeline you want to modify to open it in the Detailed View.
-
In the Objects list, click the More (
 ) icon corresponding to the object for which you want to include the incremental load, and then select Include Incremental Load.
The ingestion status for the object changes to ACTIVE.

Similarly, click the More (![]() ) icon corresponding to the object, and then select Skip Incremental Load to skip the incremental data ingestion for the object.
) icon corresponding to the object, and then select Skip Incremental Load to skip the incremental data ingestion for the object.
View Activity Log
The Activity Log action displays the log of all the activities performed by any member of your team for an object. This is accessible to all the users irrespective of their role.
To view the activity log:
-
In the Pipeline List View, select the Pipeline you want to modify to open it in the Detailed View.
-
In the Objects list, click the More (
 ) icon corresponding to the object, and then select Activity Log.
-
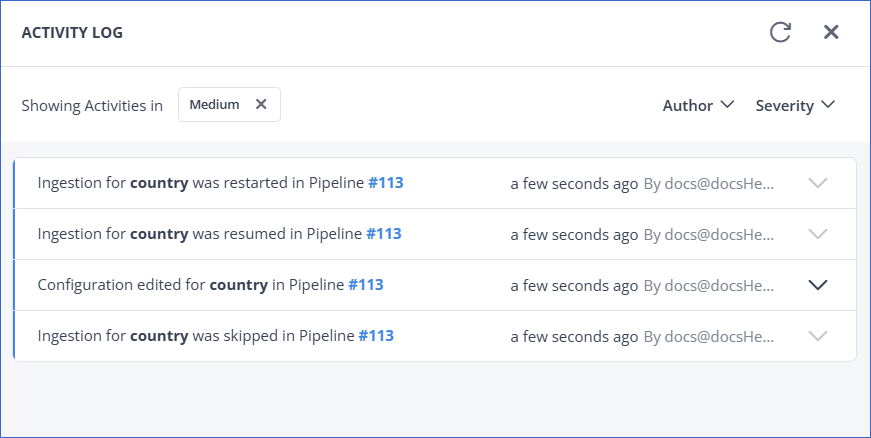
In the ACTIVITY LOG, view the list of actions performed on that object since Pipeline creation.
-
Optionally, click the Expand and Collapse icons next to an action to view and hide detailed information about it respectively.
-
Optionally, filter by Author to view the actions performed by a specific team member, or by Severity to view the actions of a specific severity level, such as, Critical, High, Medium, and Low. The severity levels are assigned by Hevo as follows:
Severity Level Description Low Assigned to updates relating to syncing of the records. It does not indicate any concern; it is just an audit trail for users to follow. Medium Assigned to successful creation and execution actions. For example, a change to a Source configuration, successful execution of Models, a create, update, or delete Event action in Schema Mapper, a pause, resume, or update Event for Pipelines or Models, and so on. High Assigned to temporary connection failures for Source or Destination, creation and deletion of a Pipeline or Model. Critical Assigned to permanent failure of a Source, Destination, or Model.