A deploy job builds and updates your dbt models in a selected environment, writing the results to your Destination. Unlike CI and Merge jobs, which are triggered by pull request events, a deploy job gives you direct control over when and how your models execute.
You can trigger a deploy job in three ways:
-
Scheduled: Runs automatically on a schedule you define, using a fixed interval, a daily time, or a cron expression.
-
On Demand: Runs manually from the UI or via an external orchestration tool through the Hevo API.
-
On Pipeline Sync: Runs automatically each time a selected Pipeline finishes syncing data into your Destination.
If a deploy job fails, your Destination data may be stale or incomplete. Check the job run history to identify the error, then re-run the job once it’s resolved.
Creating a Deploy Job
Note: Before creating a deploy job, ensure that all the prerequisites are completed.
Perform the following steps to create a deploy job:
-
In the Navigation Bar, click Transformations.
-
On the Transformations page, select the project for which you want to create a deploy job.
-
In the Transformations Detailed View, click the Jobs tab.

-
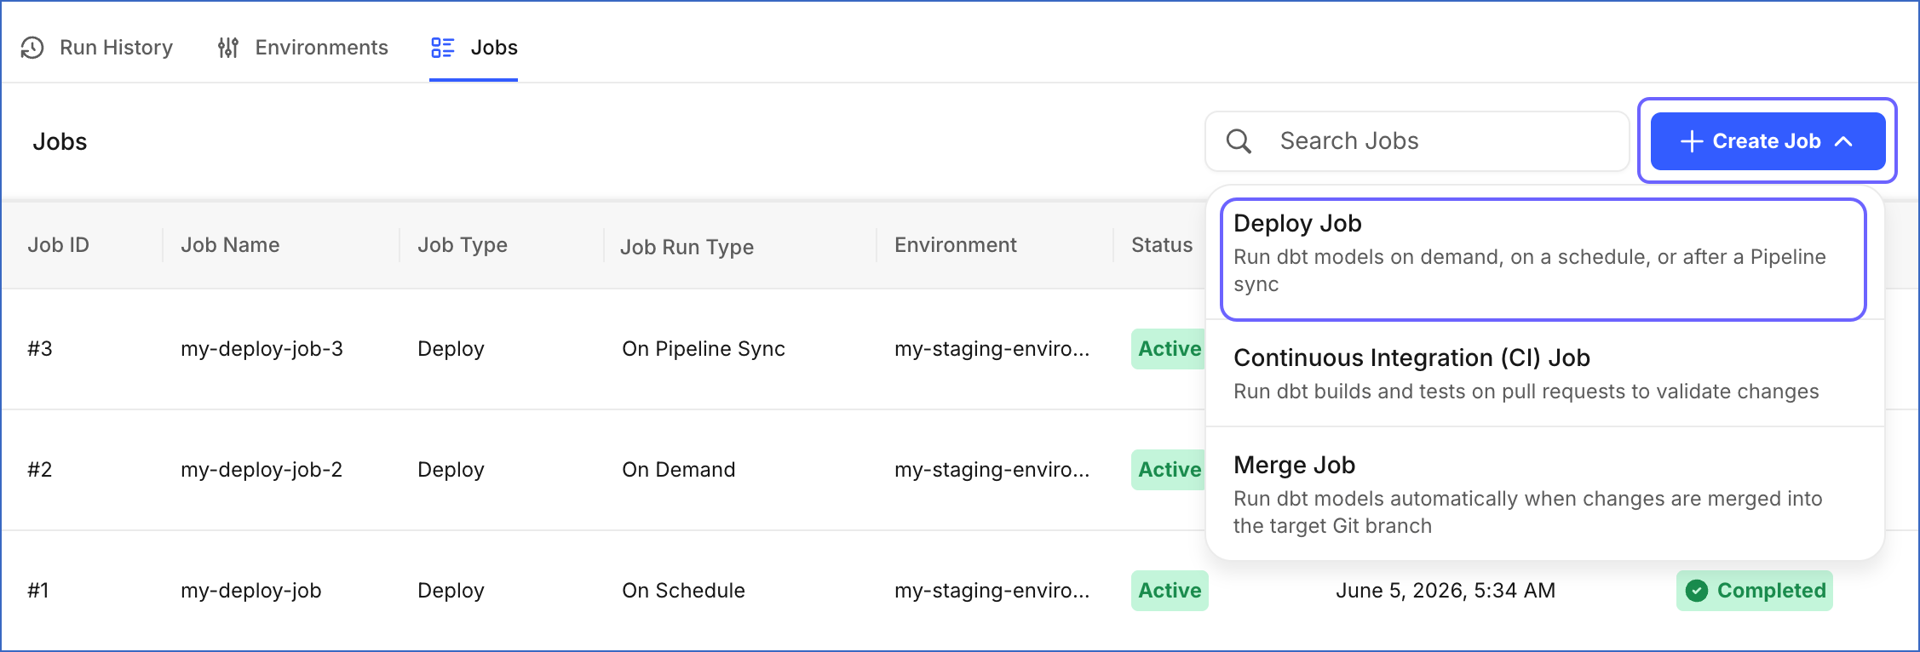
Click + Create Job and select Deploy Job from the drop-down.
-
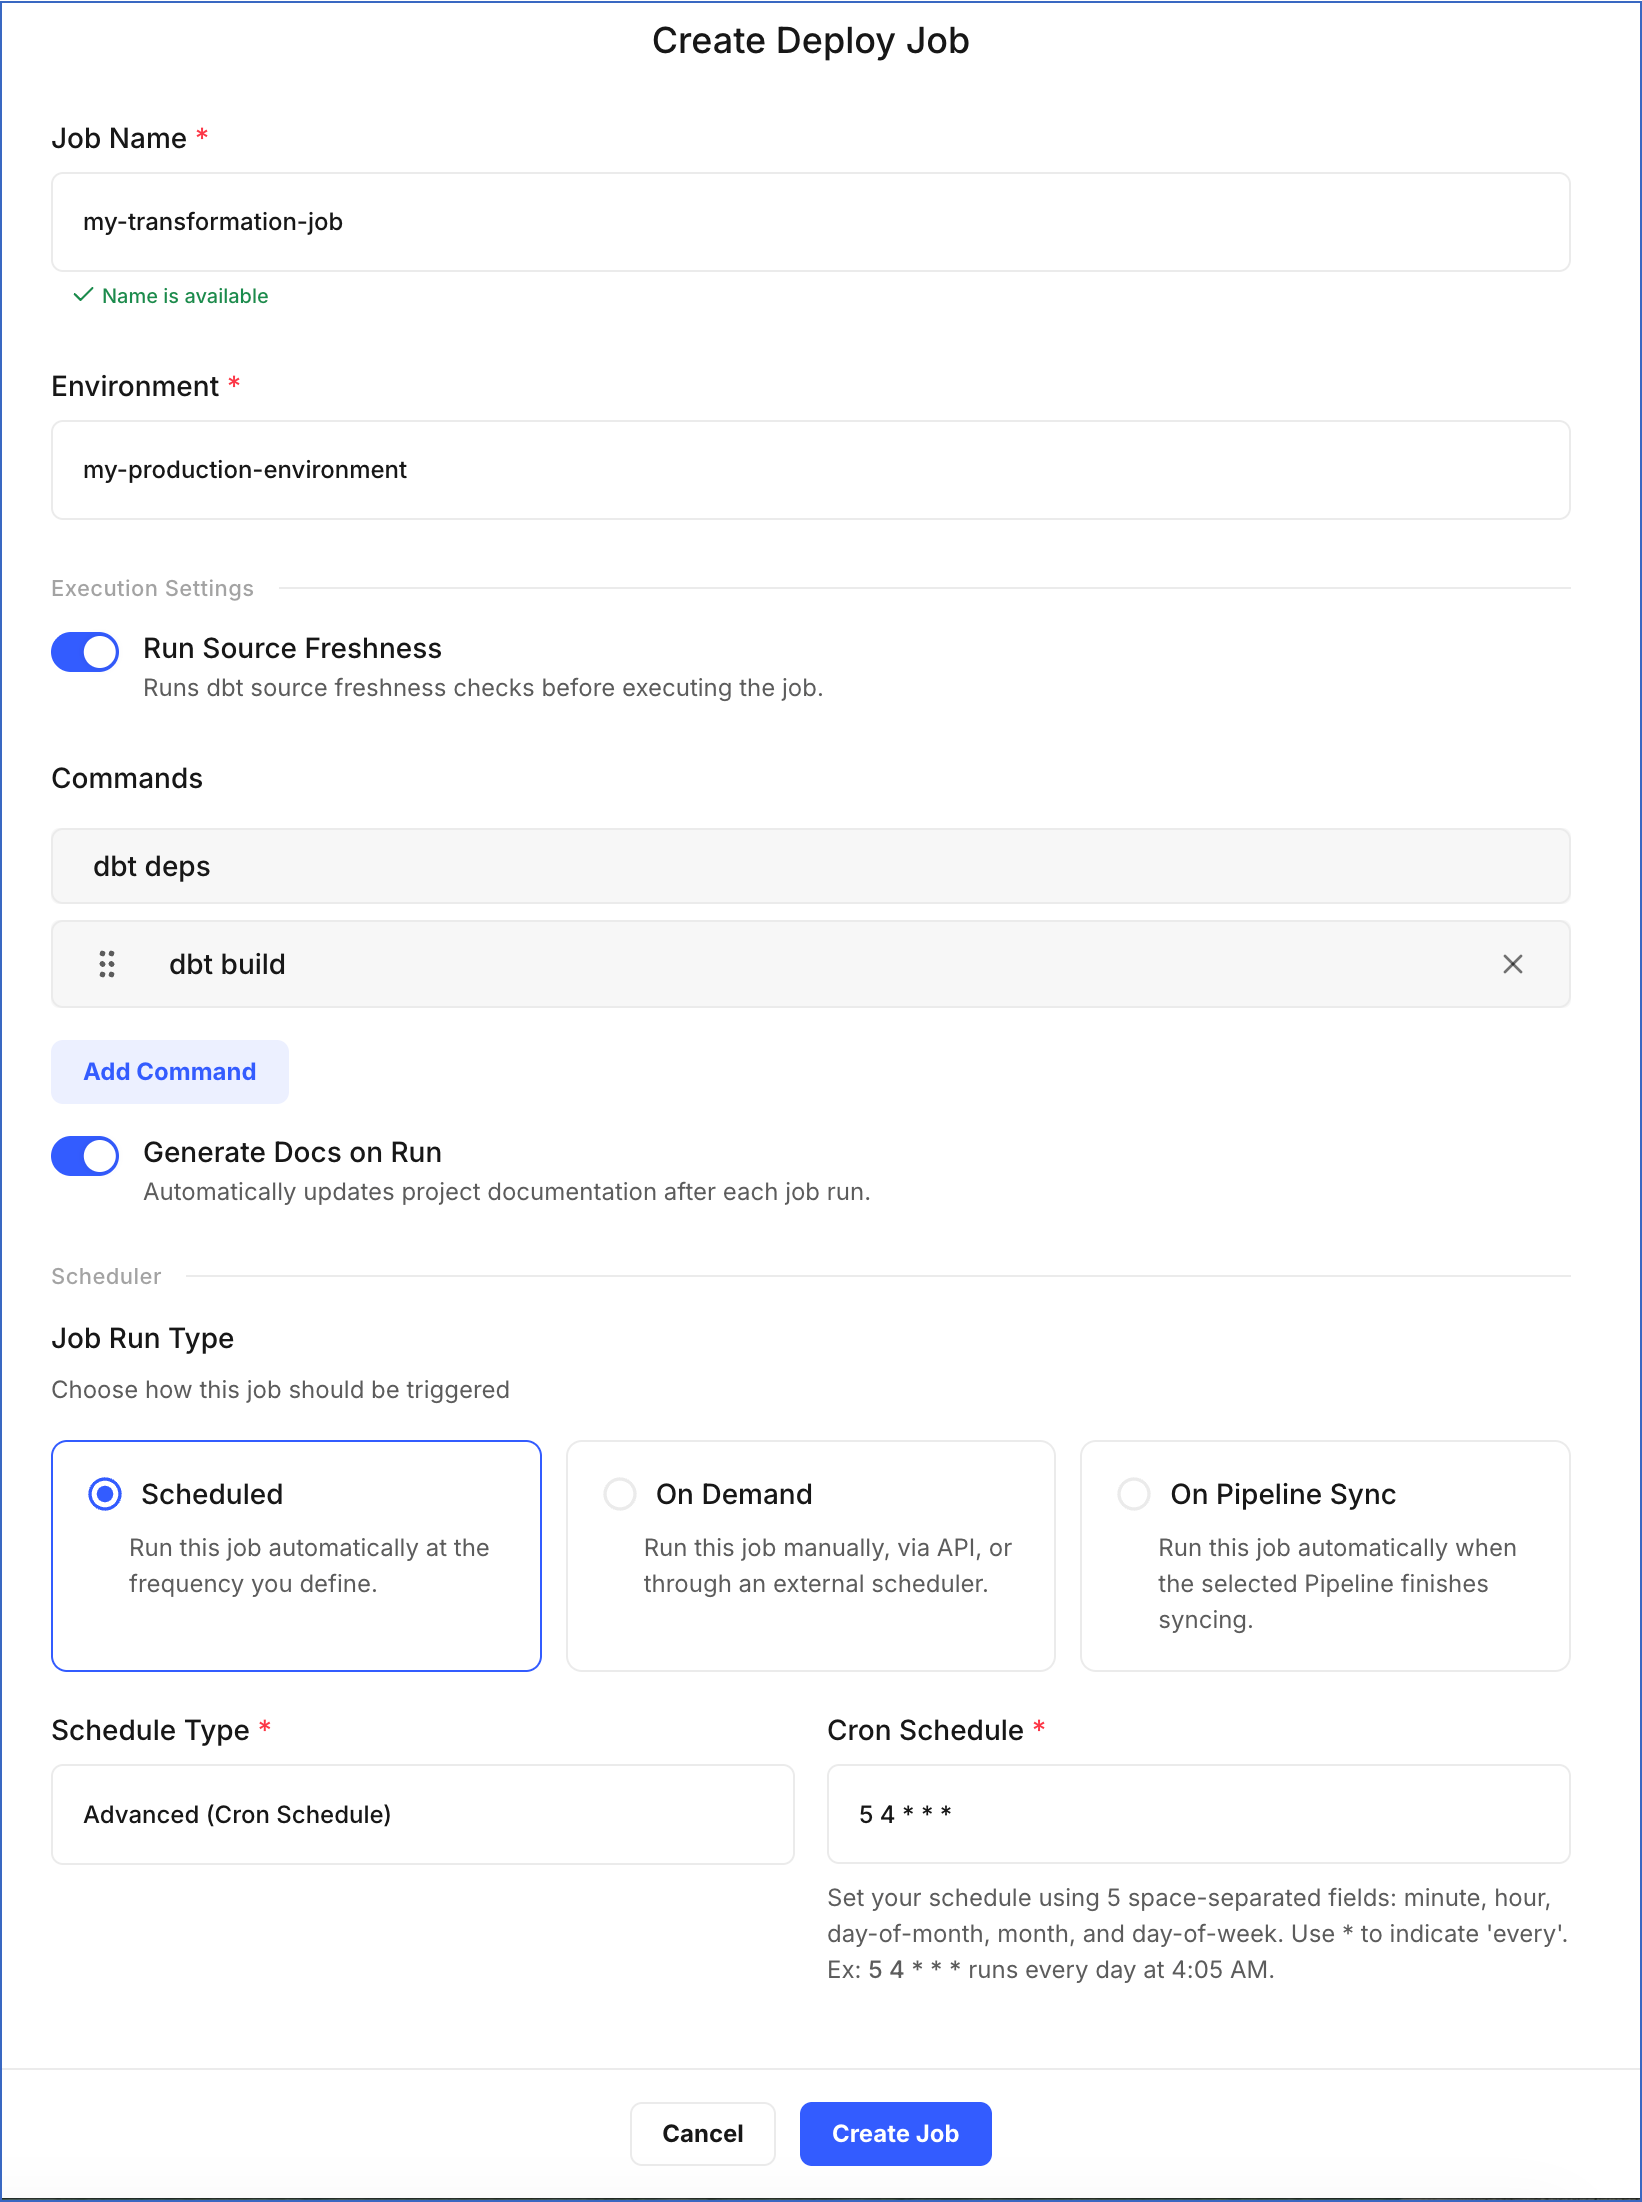
On the Create Deploy Job page, do the following:
-
Job Name: Specify a unique name for the job. Use a name that reflects the job’s purpose and schedule. For example, my-transformation-job.
-
Environment: Select the environment in which the dbt models will run.
-
In the Execution Settings section:
-
Run Source Freshness: This option allows the job to ensure that the data for your dbt models is up-to-date and reliable. If enabled, the dbt source freshness command is run before any other dbt commands. Default selection: Disabled.
-
Commands: Click Add Command to specify the dbt commands you want to execute during the job run. By default, dbt deps is included, which installs the packages listed in your
packages.ymlfile before the models execute. For example, in the image above, we have added the dbt build command, which compiles and tests your models. -
Generate Docs on Run: This option updates the documentation for your project in each run. If enabled, the dbt docs generate command is automatically invoked in each run. Default selection: Disabled.
-
-
In the Scheduler section, select how the job should be triggered:
-
Scheduled: Runs the job automatically based on the schedule you define. Select one of the following from the Schedule Type drop-down:
-
Advanced (Cron Schedule): Define a custom schedule using a cron expression.
- Cron Schedule: Specify the time and date at which the job must run. The cron expression must contain five fields, with each separated by a space to indicate the minute, hour, day of the month, month, and day of the week, respectively. Read Understanding Cron Schedules to learn how to write one.
-
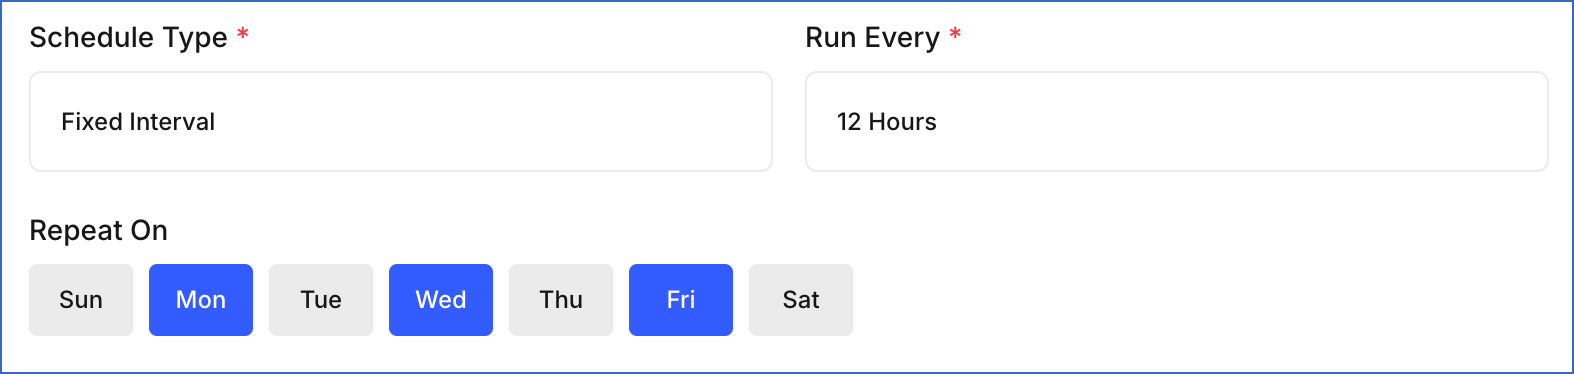
Fixed Interval: Runs the job repeatedly at a fixed time interval.
-
Run Every: Select the interval from the drop-down, such as 1 Hour, 2 Hours, or 12 Hours.
-
Repeat On: Select the days of the week on which the job should run.
-
-
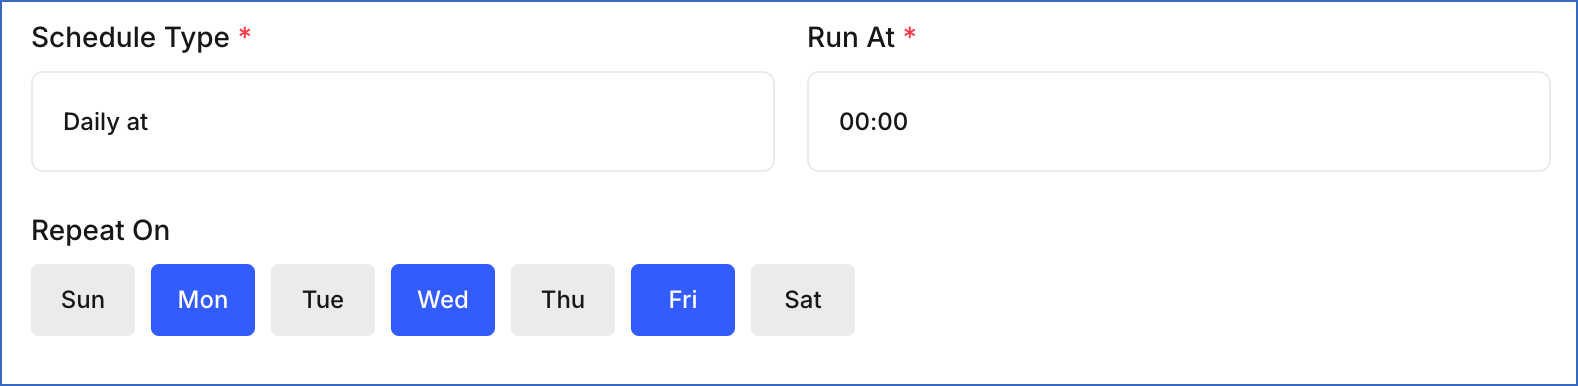
Daily at: Runs the job once per day at a specific time.
-
Run At: Select the time at which the job should run each day. Times are available in 30-minute intervals, from
00:00(12:00 AM) to23:30(11:30 PM). -
Repeat On: Select the days of the week on which the job should run.
-
-
-
On Demand: Runs the job manually from the UI or through an external orchestration tool such as Apache Airflow.
-
On Pipeline Sync: Runs the job automatically each time a selected Pipeline finishes syncing data into your Destination. This is useful when you want your dbt models to process the latest data immediately after it is loaded, without waiting for a scheduled run or triggering it manually.
- In the Select Pipeline section, choose the Pipeline whose sync completion should trigger this job. The table displays the Pipeline name, Source, and Destination to help you identify the correct one.
-
-
-
Click Create Job.
You are redirected to the Jobs tab, where the new deploy job appears in the list. The job runs based on the trigger mode you configured. Once the job runs, you can view the results in the Run History tab. A passing run confirms your dbt models built successfully and your Destination data is up to date.
Understanding Cron Schedules
A cron expression is a text that tells Hevo exactly when to run your job. It consists of five values separated by spaces, each representing a unit of time:
[minute] [hour] [day of month] [month] [day of week]
-
Minute: The minute of the hour, from 0 to 59.
-
Hour: The hour of the day in 24-hour format, from 0 to 23. For example, 0 = midnight, 14 = 2:00 PM.
-
Day of month: The day of the month, from 1 to 31.
-
Month: The month of the year, from 1 to 12.
-
Day of week: The day of the week, from 0 to 6. 0 = Sunday, 6 = Saturday.
Use * in any position to mean “every.” For example, * in the month field means the job runs every month.
The following table shows some common examples:
| Cron Expression | When It Runs |
|---|---|
0 6 * * * |
Every day at 6:00 AM (UTC) |
30 9 * * 1 |
Every Monday at 9:30 AM (UTC) |
0 0 1 * * |
On the 1st of every month at midnight (UTC) |
0 */4 * * * |
Every 4 hours |
15 14 * * 1-5 |
Monday to Friday at 2:15 PM (UTC) |
Read CRONTAB for more information on cron. You can also use the Cron expression generator to build and validate cron expressions.