Azure SQL Server Database is an intelligent, scalable, and relational database service built for the cloud. It can automate your database management and maintenance, including routine updates, backups, and security, enabling you to focus on working with your data.
You can ingest data from your Azure SQL Server database using Hevo Pipelines and replicate it to a Destination of your choice.
Prerequisites
-
The Azure SQL Server version is 2016, 2017, 2019, or 2022.
-
Change Tracking or Change Data Capture is enabled for the database and the required tables.
-
Hevo’s IP address(es) for your region is added to the Azure SQL Server database IP Allowlist.
-
The necessary privileges are granted to the database user.
Note: We recommend creating a database user Azure SQL Server Source in Hevo. If you already have a database user, grant the required privileges.
-
The database hostname and port number of the Source instance are available.
Perform the following steps to configure your Azure SQL Server Source:
Enable Data Replication Modes
Hevo supports data replication from SQL Server using its built-in Change Tracking and Change Data Capture features. These features track changes, including inserts, updates, and deletes, made to your database. Read Supported Ingestion Modes for more information on these data tracking methods.
Enable Change Tracking
You must enable change tracking on your SQL Server database to replicate incremental data.
Perform the following steps to do this:
-
Connect to your Azure SQL Server database as any user with the ALTER DATABASE privilege or as an admin user, using an SQL client tool such as sqlcmd.
-
Run the following commands to enable change tracking:
Note: Replace the placeholder values in the commands below with your own. For example, <database_name> with demo.
-
At the database level:
ALTER DATABASE <database_name> SET CHANGE_TRACKING = ON (CHANGE_RETENTION = 7 DAYS, AUTO_CLEANUP = ON)The
CHANGE_RETENTIONvalue specifies the duration for which change tracking information is retained. When theAUTO_CLEANUPvalue is set to ON, SQL Server runs a cleanup task to remove lapsed or invalid change tracking metadata. Read Enable Change Tracking for a Database for more information on the available options.Note: Hevo recommends setting
CHANGE_RETENTIONto 7 DAYS. This reduces the risk of log expiry and missed data changes for Pipelines with a low sync frequency, such as 24 hours. -
At the table level:
ALTER TABLE <schema_name>.<table_name> ENABLE CHANGE_TRACKINGRun the command given above for each table that you want to replicate. Read Enable Change Tracking for a Table for more information on the available options.
-
Enable Change Data Capture
You must enable change data capture on your SQL Server database to replicate incremental data.
Perform the following steps to do this:
-
Connect to your Azure SQL Server database as an admin user with an SQL client tool, such as sqlcmd.
-
Run the following commands to enable change data capture:
Note: Replace the placeholder values in the commands below with your own. For example, <database_name> with demo.
-
At the database level:
USE <database_name>; EXEC sys.sp_cdc_enable_db; -
At the table level:
USE <database_name>;

--Begin tracking a table
EXEC sys.sp_cdc_enable_table
    @source_schema          = N'<schema_name>',
    @source_name            = N'<table_name>',
    @role_name              = NULL;
Run the command given above for each table that you want to replicate. Read Tracking tables with change data capture for more information on the available options.
-
Run the following command to set the retention duration:
 USE <database_name>;

 -- Set the retention period to 10080 minutes (7 days)
 EXEC sys.sp_cdc_change_job
     @job_type = N'cleanup'
 ,   @retention = 10080;  -- value in minutes.
The
retentionvalue specifies for how long (in minutes) the captured data changes are retained in the CDC change tables.Note: Hevo recommends setting the
retentionperiod to 10080 minutes. This reduces the risk of missed data changes for Pipelines with a low sync frequency, such as 24 hours.
-
Detecting schema changes for CDC-enabled tables
Hevo displays a warning in the user interface (UI) when the schemas of a CDC-enabled Source table and the associated change table differ. This typically happens when columns are added or modified in a Source table that is already included in the Pipeline.
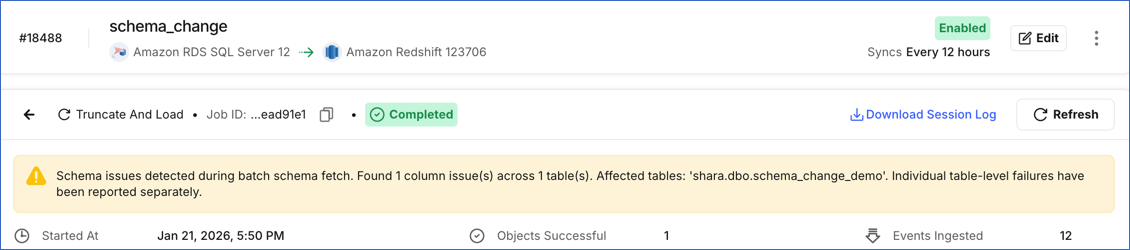
To allow Hevo to ingest data from these columns, re-enable CDC for the affected table. Re-enabling CDC recreates the change table with the updated schema. To do this, perform the following steps:
Note: Hevo provides a stored procedure to automatically re-enable CDC when schema changes are detected. Using this procedure removes the need for manual CDC reconfiguration. Refer to Hevo Stored Procedures for Change Tracking and Change Data Capture for the installation steps.
-
Connect to your SQL Server database as an admin user with an SQL client tool, such as sqlcmd.
-
Run the following commands to re-enable CDC for the table included in your Hevo Pipeline:
Note: Replace the placeholder values in the commands below with your own. For example, <affected_table_name> with customers.
USE <database_name>; -- Switch context to the database with the changed schema

-- Stop tracking CDC for the affected table
-- This removes the existing capture instance and its change history.
EXEC sys.sp_cdc_disable_table
    @source_schema      = N'<schema_name>',
    @source_name        = N'<affected_table_name>',
    @capture_instance   = N'all';

-- Start tracking CDC for the affected table
-- This creates a new capture instance that includes the updated columns
EXEC sys.sp_cdc_enable_table
    @source_schema      = N'<schema_name>',
    @source_name        = N'<affected_table_name>',
    @role_name          = NULL;
Once CDC is successfully re-enabled for the affected table, Hevo does the following:
-
Updates the Source schema in its metastore.
-
Resyncs the object in the next Pipeline run.
If you want Hevo to ingest data immediately, Resync the Objects. If re-enabling CDC is unsuccessful, the Pipeline continues ingesting data from the affected tables using the previously stored schema.
Note: If the Schema Evolution Policy for your Pipeline is set to Allow all changes and a new table is added to your schema after the Pipeline is created, you must enable at least one data capture mechanism for the new table and refresh the schema. The newly added table is automatically included in the Pipeline for data ingestion. If none of the tracking mechanisms are enabled for the table, Hevo marks it as inaccessible and does not ingest any data from it.
Allowlist Hevo IP addresses for your region
You need to allowlist the Hevo IP addresses for your region to enable Hevo to connect to your Azure SQL Server database. The steps for allowlisting these IP addresses depend on the type of SQL database you are using:
-
For an Azure SQL database hosted on a logical server, you need to create firewall rules in your database network settings.
-
For an Azure SQL managed database, you need to enable the public endpoint and create inbound security rules for your SQL managed instance.
Create Firewall Rules for Azure SQL Database
Perform the following steps to create the firewall rules in your SQL database network settings to allowlist the Hevo IP addresses for your region:
-
Log in to the Azure Portal.
-
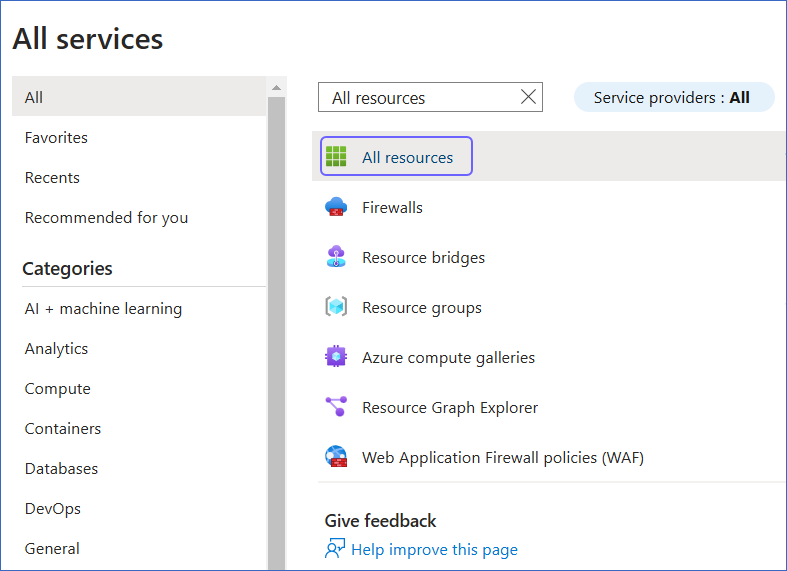
Under Azure services, select More services.

-
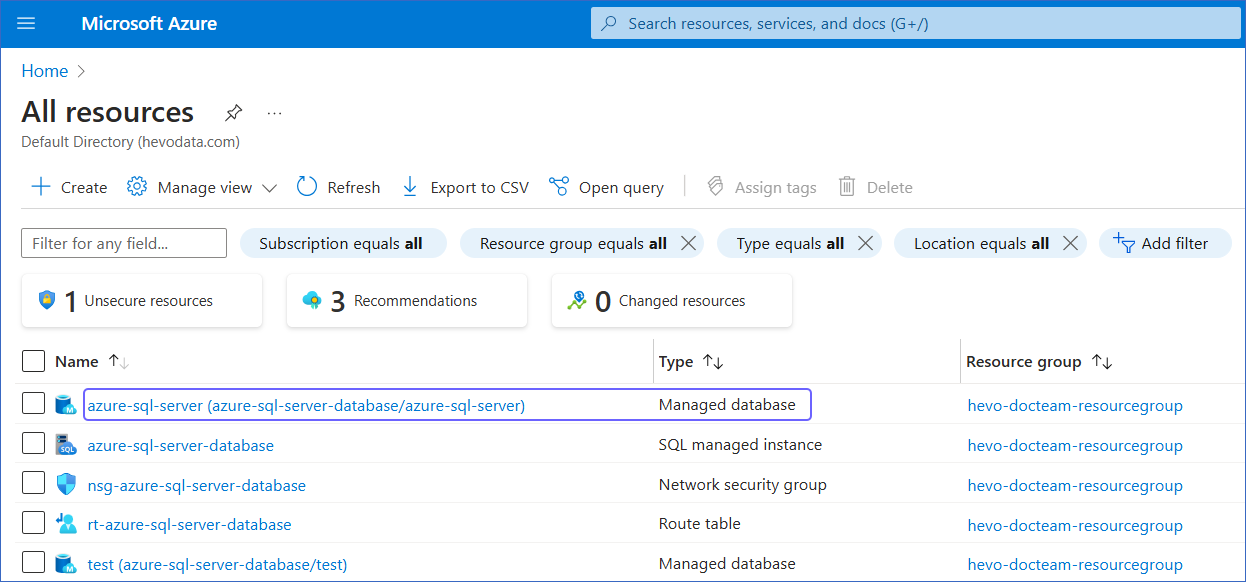
On the All services page, search for and select All resources.
-
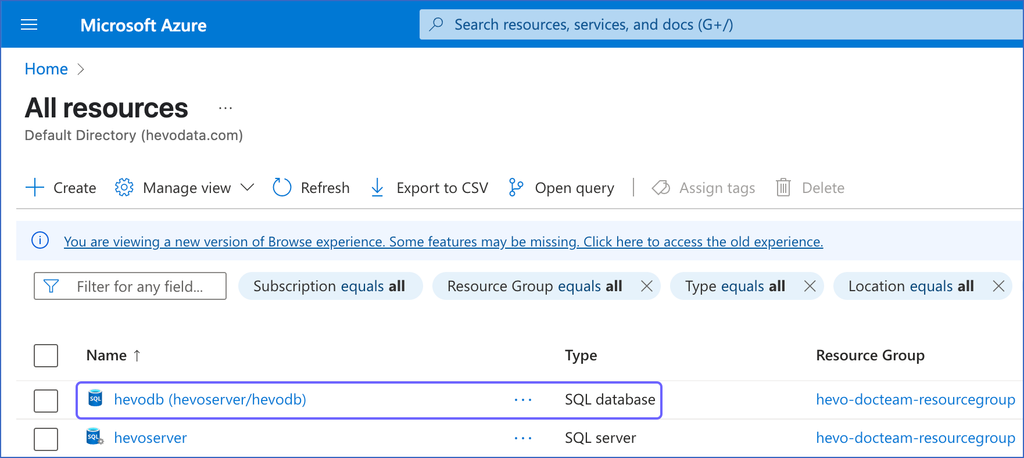
On the All resources page, click the SQL database you want to connect to Hevo.
-
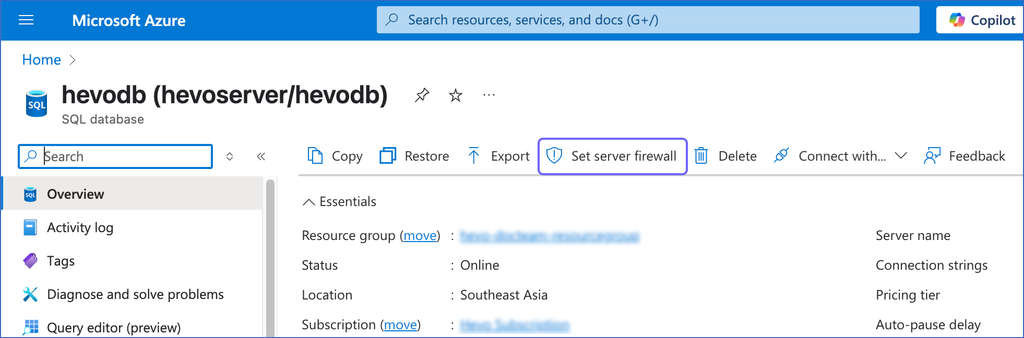
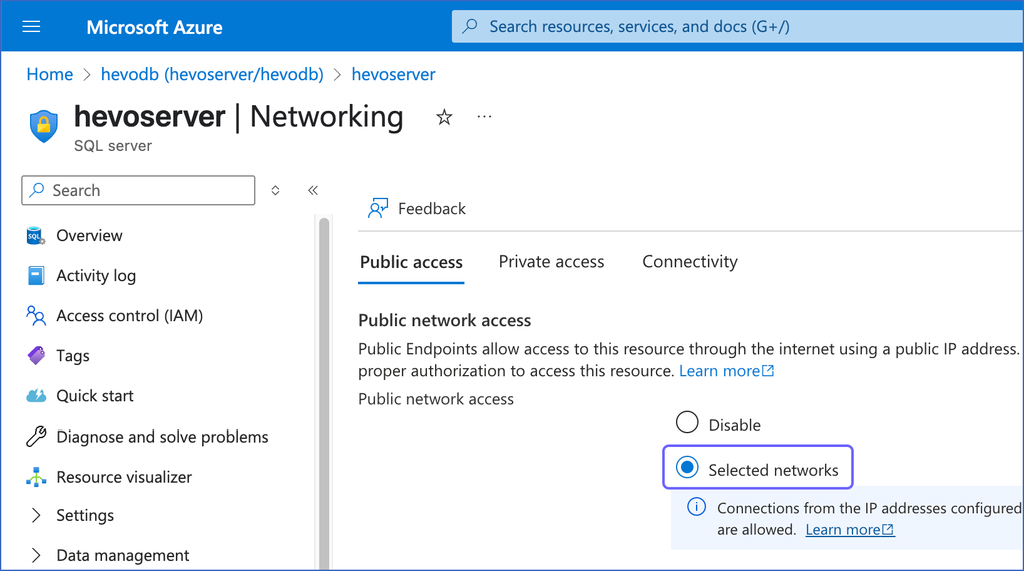
In the right pane of <Your Database Name> page, click Set server firewall.
-
On the Networking page, under the Public access tab, select the Selected networks option.
-
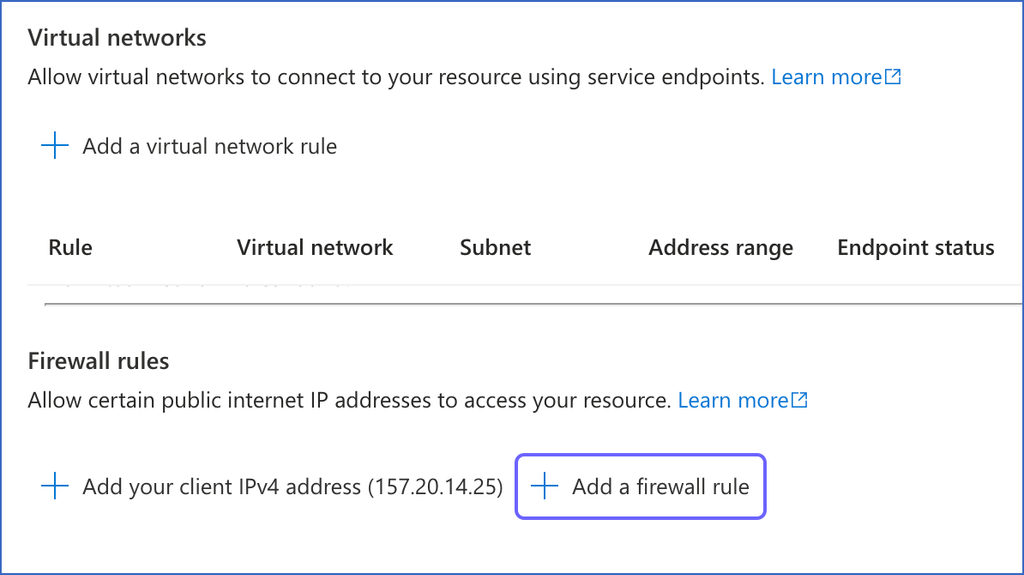
Under Firewall rules, click + Add a firewall rule.
-
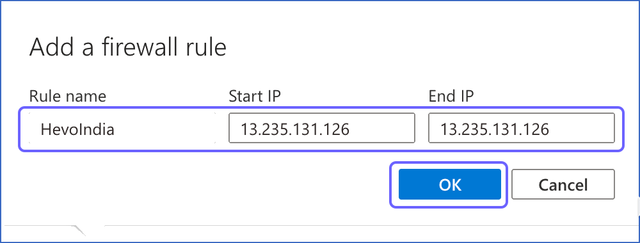
In the Add a firewall rule dialog box, do the following to add your firewall rule:
-
Specify the following:
-
Rule name: A name to identify the rule. For example, HevoIndia.
-
Start IP: The starting address of the IP range.
-
End IP: The ending address of the IP range.
Note: As Hevo has specific IP addresses and not a range, the value in the Start IP and End IP fields is the same. For example, 13.235.131.126 for the India region.
-
-
Click OK.
-
-
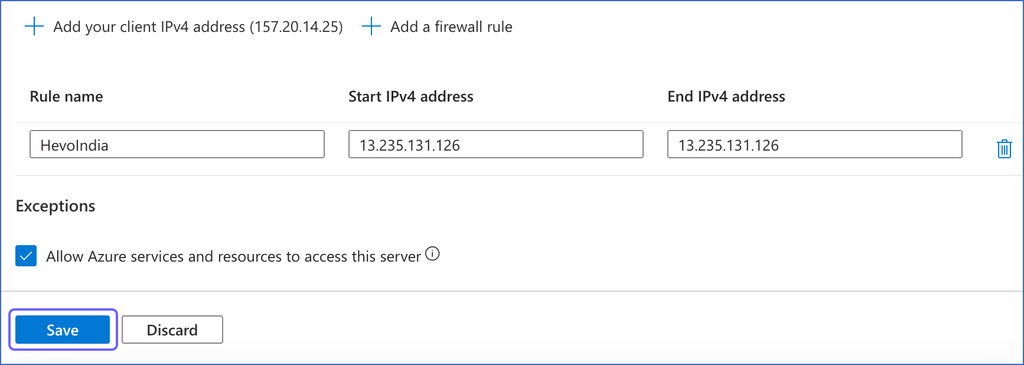
Repeat steps 7 and 8 to add all the IP addresses for your Hevo region.
-
Click Save to save the firewall rules.
Configure Public Endpoint and Inbound Security Rules for Azure SQL Managed Instance
You need to enable the public endpoint for your Azure SQL managed instance to allow connections to your SQL managed database over the internet. To keep your database secure, you can control access by allowlisting only trusted IP addresses, such as Hevo’s. This is done by creating inbound security rules in the network security group associated with your SQL managed instance. These rules ensure that only authorized connections can access your database.
1. Enable Public Endpoint for Azure SQL Managed Instance
Perform the following steps to enable the public endpoint for your SQL managed instance:
-
Log in to the Azure Portal.
-
Under Azure services, select More services.
-
On the All services page, search for and select All resources.
-
On the All resources page, click the SQL managed database you want to connect to Hevo.
-
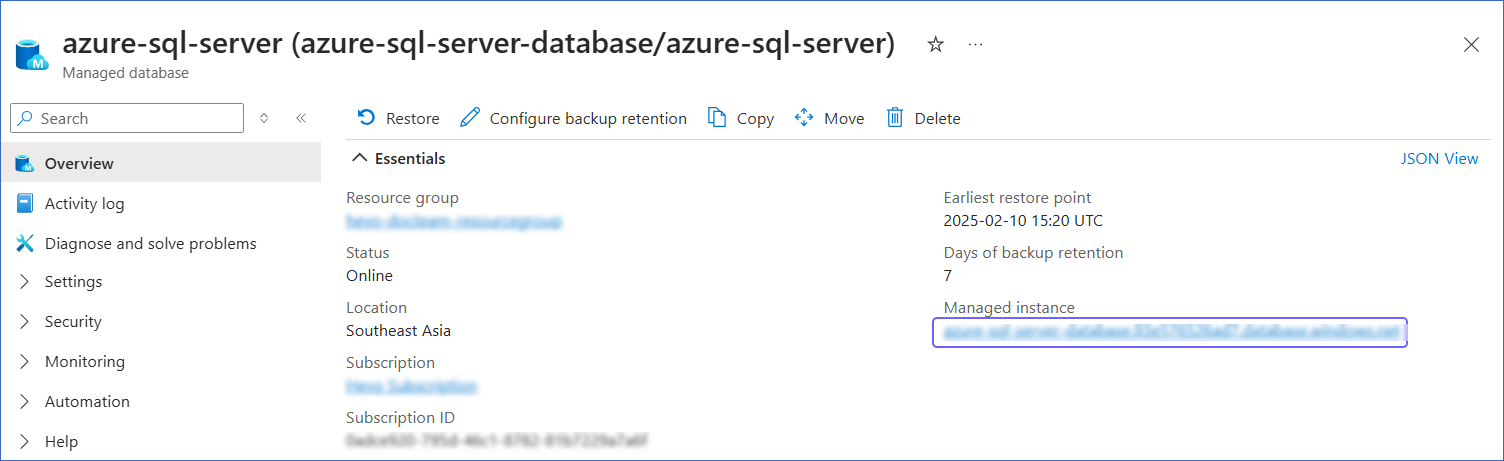
In the right pane of <Your Database Name> page, Essentials section, click the link text under Managed instance.
-
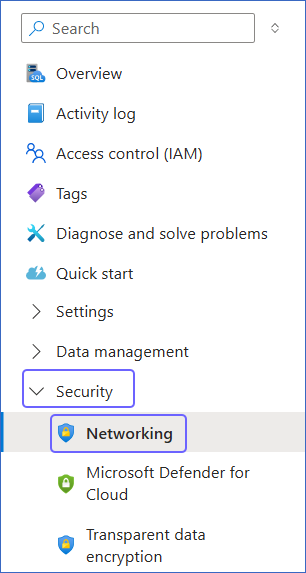
In the left navigation pane, click Security, and then click Networking.
-
On the Networking page, enable the Public endpoint (data), and then click Save.
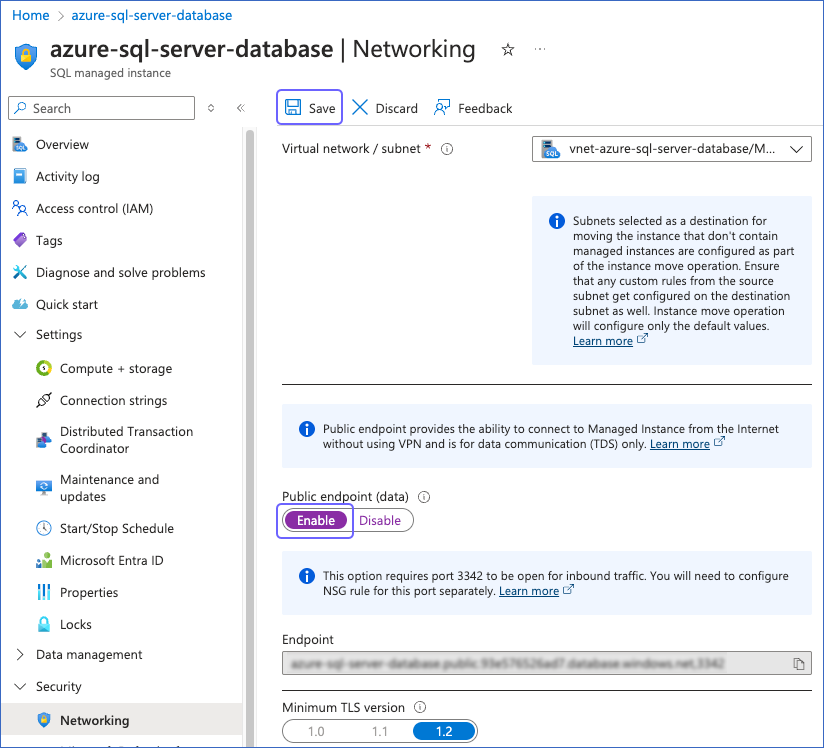
After saving the changes, the status of Public endpoint (data) displays as Enable.
2. Create Inbound Security Rules for Azure SQL Managed Instance
Perform the following steps to create inbound security rules in the network security group associated with your SQL managed instance:
-
Log in to the Azure Portal.
-
Under Azure services, select More services.
-
On the All services page, search for and select All resources.
-
On the All resources page, click the SQL managed database you want to connect to Hevo.
-
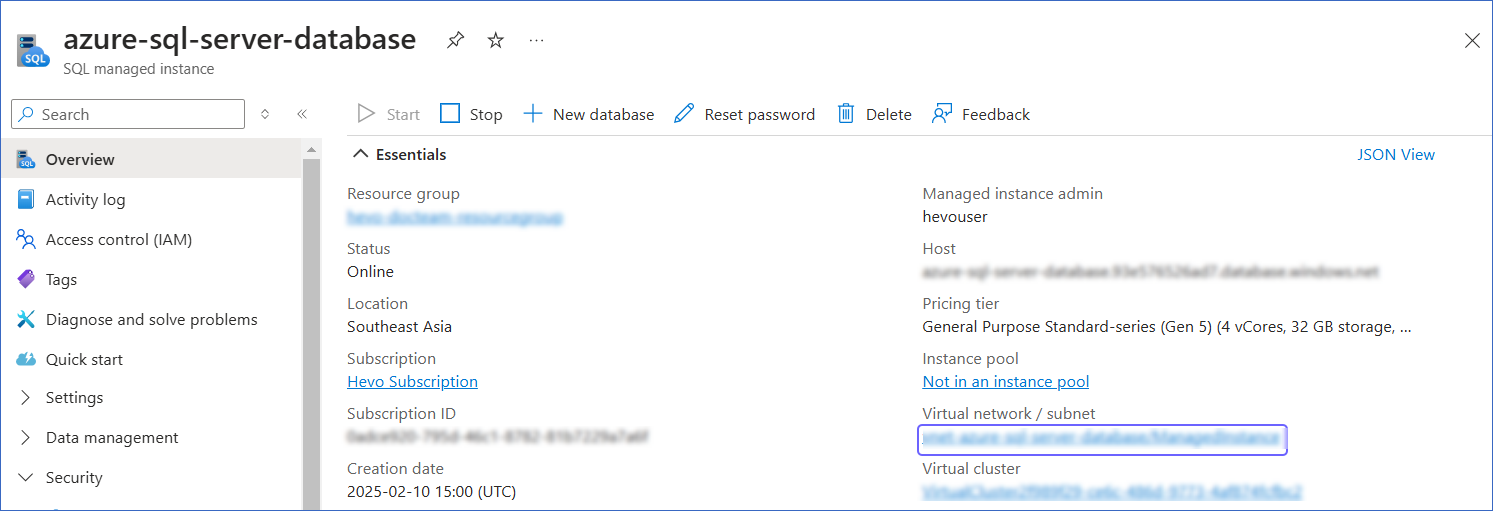
In the right pane of <Your Database Name> page, Essentials section, click the link text under Managed instance.
-
In the right pane of <Your SQL managed instance Name> page, Essentials section, click the link text under Virtual network / subnet.
-
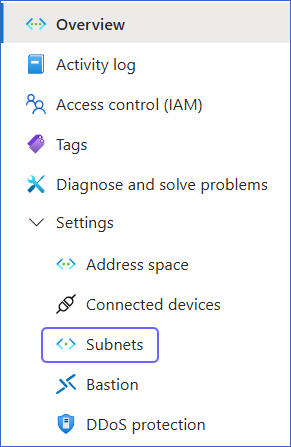
In the left navigation pane, click Subnets.
-
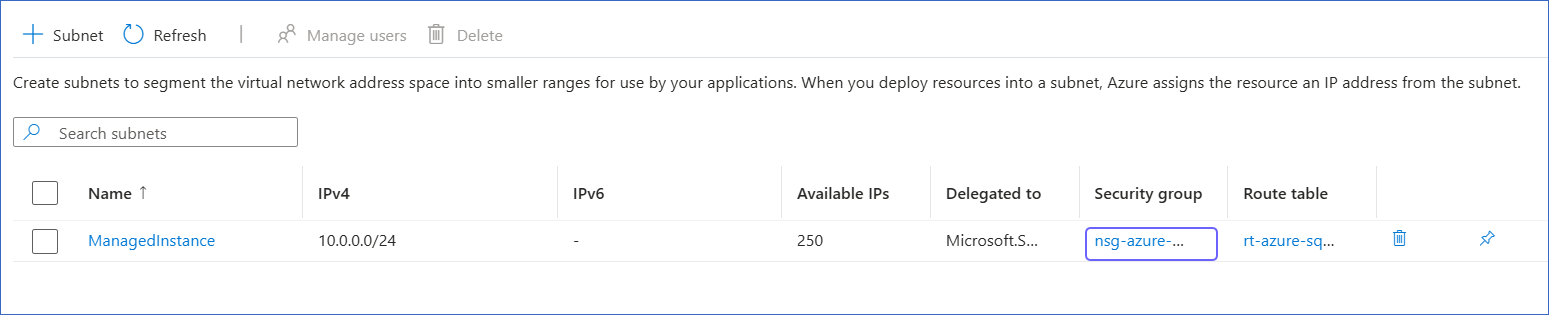
On the Subnets page, click the link text under Security group column corresponding to your SQL managed instance.
-
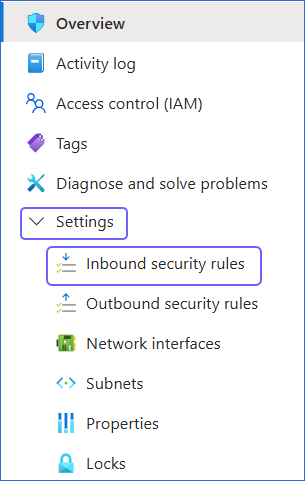
In the left navigation pane, click Settings, and then click Inbound security rules.
-
On the Inbound security rules page, click +Add.
-
In the Add inbound security rule slide-in page, do the following:
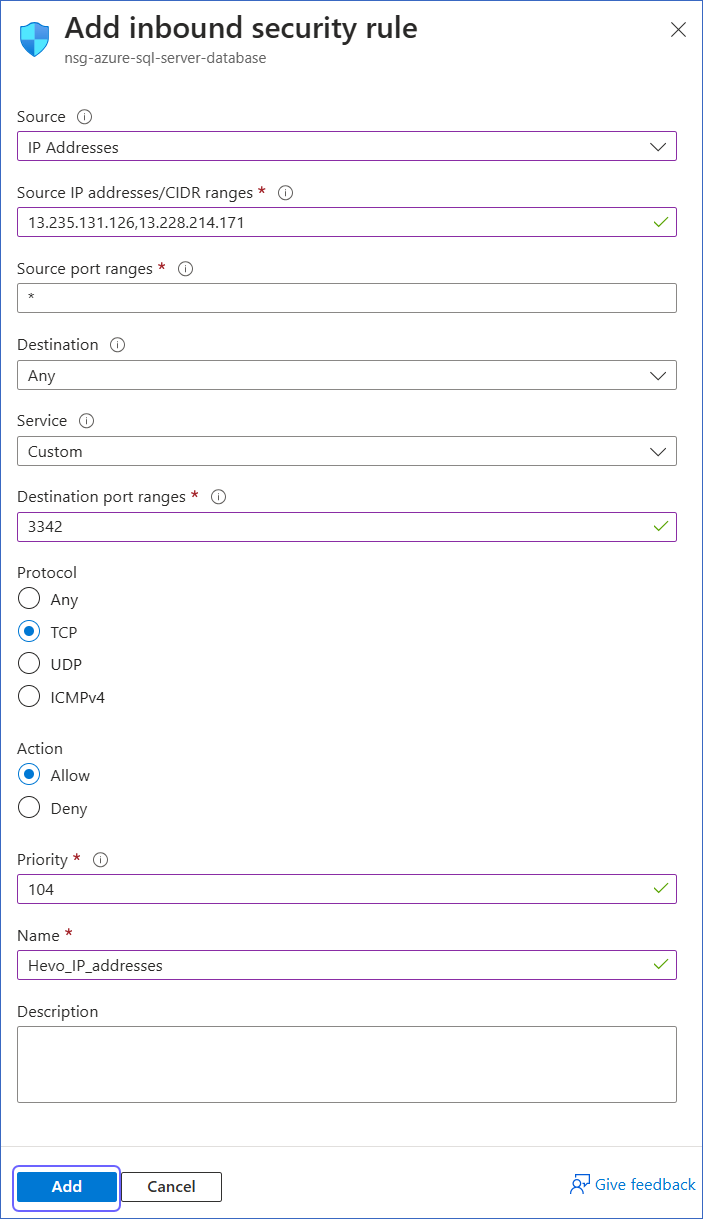
-
Source: Select IP Addresses from the drop-down.
-
Source IP addresses/CIDR ranges: Enter Hevo’s IP addresses for your region. You can enter multiple addresses, separating them with commas.
-
Destination port ranges: Enter 3342.
-
Protocol: Select TCP.
-
Priority: Enter a priority number between 100 and 4095 as per your requirement.
Azure processes security rules in order of priority, with lower numbers taking precedence over higher numbers.
Note: Ensure that the security rule for allowlisting Hevo’s IP addresses has a higher priority than any existing restrictive rules, such as the deny_all_inbound rule. This ensures that connection to Hevo is allowed before any restrictive rules are applied.
-
Name: Specify your rule name.
-
Click Add to save the rule.
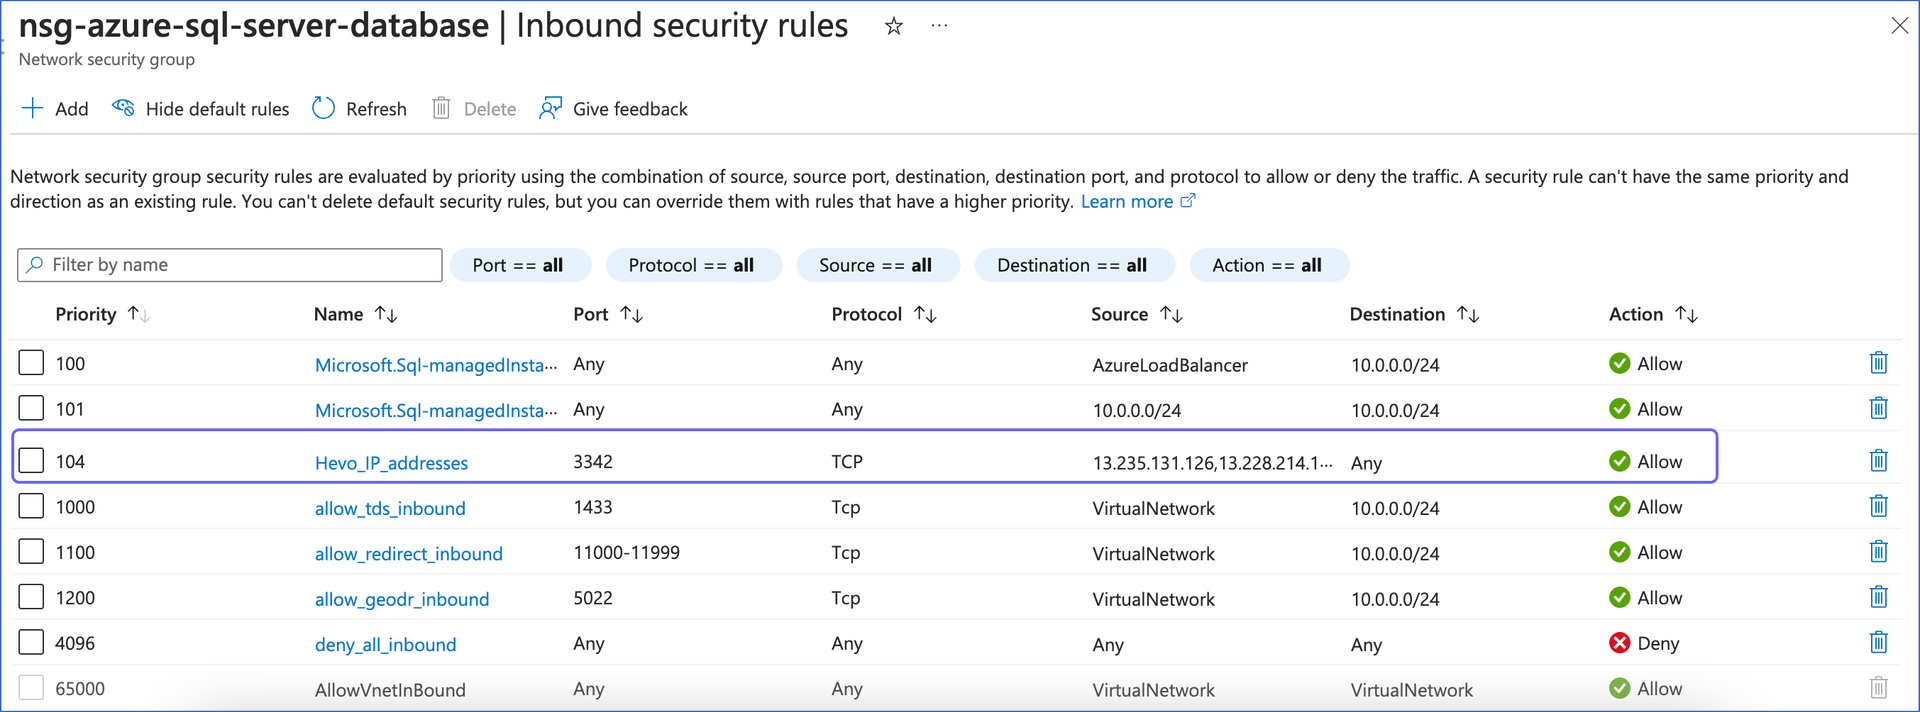
-
You can now view the new security rule on the Inbound security rules page of your network security group.
Create a Database User and Grant Privileges
1. Create a database user (Optional)
Note: Skip to the Grant privileges to the user section if you are using an existing database user.
Perform the following steps to create a database user in your Azure SQL Server database:
-
Connect to your Azure SQL Server database as an admin user with any SQL client tool, such as sqlcmd.
-
Run the following commands:
-- Select the master database to create a login USE master; CREATE LOGIN <login_user> WITH PASSWORD = '<password>'; -- Add a database user to your database for the login created above USE <database_name>; CREATE USER <database_user> FOR LOGIN <login_user>;Note: Replace the placeholder values in the commands above with your own. For example, <login_user> with hevouser.
2. Grant privileges to the user
The database user requires additional privileges to capture incremental data, depending on the replication mode selected in the Hevo Pipeline.
Grant privileges for Change Tracking
To enable the database user to replicate data from Change Tracking–enabled tables, the following privileges are required:
| Privilege | Grants access to |
|---|---|
| SELECT | Retrieve rows from the database tables. |
| VIEW CHANGE TRACKING | View changes made to tables and schemas for which with the Change Tracking feature is enabled. |
Connect to your Azure SQL Server database as an admin user with any SQL client tool, such as sqlcmd, and run the following commands:
-- Grant SELECT privilege at the database level
GRANT SELECT ON DATABASE::<database_name> TO <database_username>;

-- Grant SELECT privilege at the schema level
GRANT SELECT ON SCHEMA::<schema_name> TO <database_username>;

-- Grant VIEW CHANGE TRACKING privilege at the schema level
GRANT VIEW CHANGE TRACKING ON SCHEMA::<schema_name> TO <database_username>;

-- Grant VIEW CHANGE TRACKING privilege at the table level
GRANT VIEW CHANGE TRACKING ON OBJECT::<schema_name>.<table_name> TO <database_username>;
Note: Replace the placeholder values in the commands above with your own. For example, <database_username> with hevo.
Grant privileges for Change Data Capture
To enable the database user to replicate data from CDC-enabled tables, perform the following steps:
-
Connect to your Azure SQL Server database as an admin user with any SQL client tool, such as sqlcmd.
-
Run the following commands:
Note: Replace the placeholder values in the commands below with your own. For example, <database_user> with hevo.
USE <database_name>;

-- Grant SELECT privilege at the schema level
GRANT SELECT ON SCHEMA::<schema_name> TO <database_user>;

-- Optionally, grant read access to the CDC schema
GRANT SELECT ON SCHEMA::cdc TO <database_user>;
Note: Hevo recommends using a dedicated, minimum-privilege database user in production Pipelines.
Retrieve the Database Hostname and Port Number (Optional)
Note: The Azure SQL Server hostnames begin with your database name and end with database.windows.net. For example, azure-sql-server.xxxxxxxxx.database.windows.net.
You need configuration details such as the database hostname and port number to create your Hevo Pipeline. The steps to obtain these details depend on whether you are connecting to an Azure SQL database or an Azure SQL managed instance.
Retrieve Configuration Details for Azure SQL Database
Perform the following steps to obtain the configuration details for your Azure SQL database:
-
Log in to the Azure Portal.
-
Under Azure services, select More services.
-
On the All services page, search for and select All resources.
-
On the All resources page, click the SQL database you want to connect to Hevo.
-
In the right pane of <Your Database Name> page, hover on the Server name and click the copy icon to copy it. Use this as the Database Host while configuring your Azure SQL Server Source in Hevo.
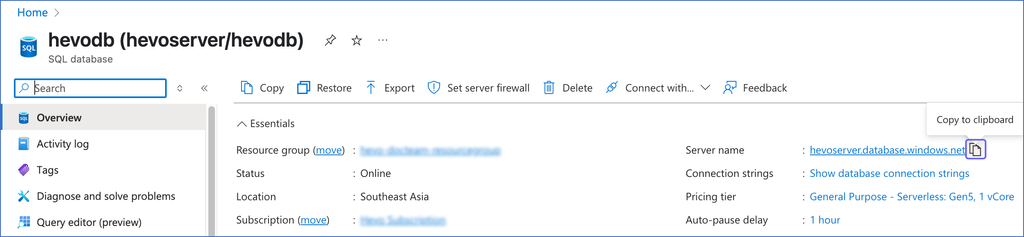
The default port number is 1433.
Retrieve Configuration Details for Azure SQL Managed Instance
Perform the following steps to obtain the configuration details for your Azure SQL managed instance:
-
Log in to the Azure Portal.
-
Under Azure services, select More services.
-
On the All services page, search for and select All resources.
-
On the All resources page, click the SQL managed database you want to connect to Hevo.
-
In the right pane of <Your Database Name> page, Essentials section, click the link text under Managed instance.
-
In the left navigation pane, click Security, and then click Networking.
-
On the Networking page, under Endpoint, click the copy icon.
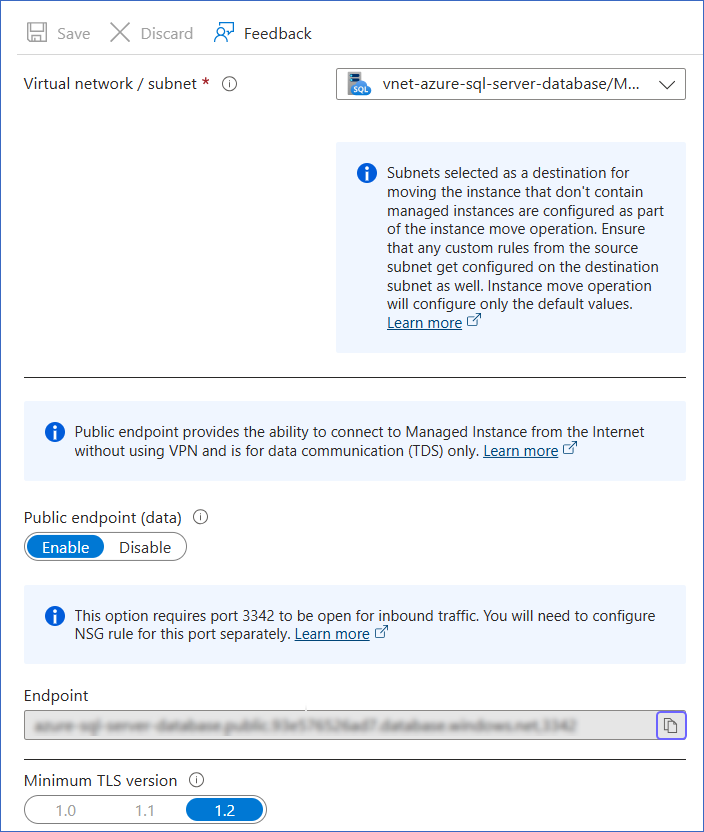
The endpoint consists of the database host, followed by a comma and the port number. Remove the comma, and then save the database host and port number separately.
For example, if exampledatabase.abc123xyz789.database.windows.net,3342 is the endpoint, use exampledatabase.abc123xyz789.database.windows.net as the database host and 3342 as the port number while configuring your Azure SQL Server Source in Hevo.
Configure Azure SQL Server as a Source in your Pipeline
Perform the following steps to configure your Azure SQL Server Source:
-
Click PIPELINES in the Navigation Bar.
-
Click + Create Pipeline in the Pipelines List View.
-
On the Select Source Type page, select Azure SQL Server.
-
On the Select Destination Type page, select the type of Destination you want to use.
-
On the page that appears, do the following:
-
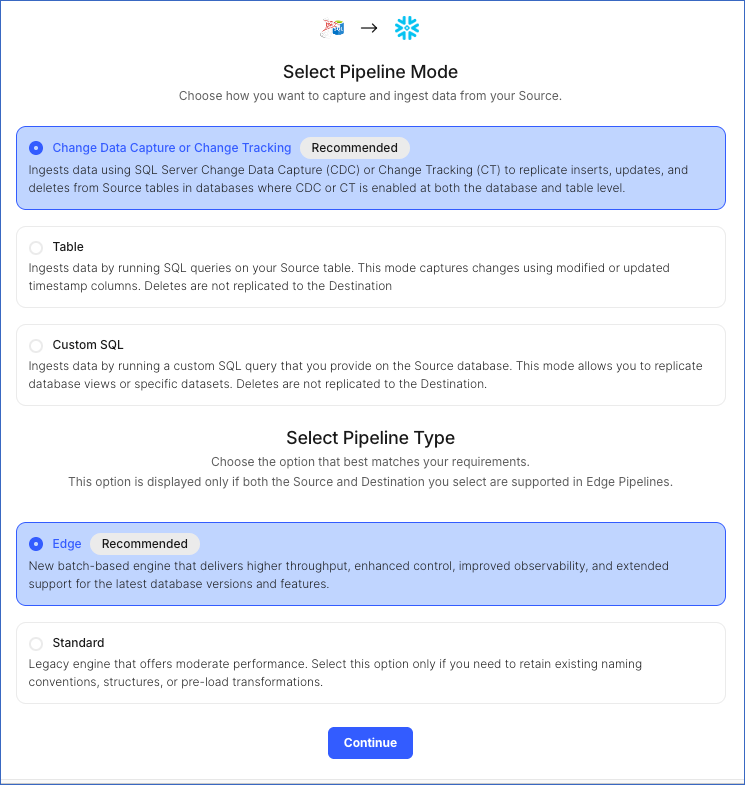
Select Pipeline Mode: Choose Change Data Capture or Change Tracking. Hevo supports only this mode for Edge Pipelines created with SQL Server Source. If you choose any other mode, you can proceed to create a Standard Pipeline.
Note: Hevo supports the Change Tracking mode for both Edge and Standard Pipelines, but Change Data Capture is supported only in Edge Pipelines.
-
Select Pipeline Type: Choose the type of Pipeline you want to create based on your requirements, and then click Continue.
-
If you select Edge, skip to step 6 below.
-
If you select Standard, read Azure SQL Server to configure your Standard Pipeline.
This section is displayed only if all the following conditions are met:
-
The selected Destination type is supported in Edge.
-
The Pipeline mode is set to Change Data Capture or Change Tracking.
-
Your Team was created before September 15, 2025, and has an existing Pipeline created with the same Destination type and Pipeline mode.
For Teams that do not meet the above criteria, if the selected Destination type is supported in Edge and the Pipeline mode is set to Change Data Capture or Change Tracking, you can proceed to create an Edge Pipeline. Otherwise, you can proceed to create a Standard Pipeline. Read Azure SQL Server to configure your Standard Pipeline.
-
-
-
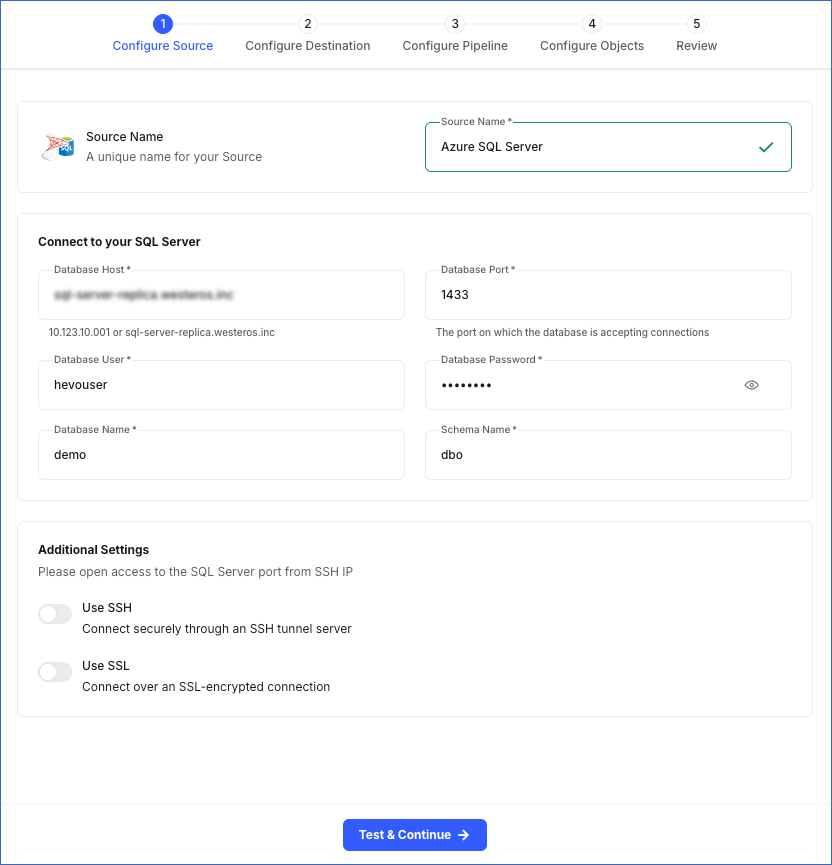
In the Configure Source screen, specify the following:
-
Source Name: A unique name for your Source, not exceeding 255 characters. For example, Azure SQL Server Change Tracking.
-
In the Connect to your SQL Server section:
-
Database Host: The Azure SQL Server host’s IP address or DNS. This is the database host that you obtained in the Retrieve the Database Hostname and Port Number (Optional) step of the Getting Started section.
-
Database Port: The port on which your Azure SQL Server listens for connections. This is the port number that you obtained in the Retrieve the Database Hostname and Port Number (Optional) step of the Getting Started section. Default value: 1433.
-
Database User: The authenticated user who has the permissions to read tables in your database. This user can be the login user you created in the Create a database user (Optional) step of the Getting Started section. For example, hevouser.
-
Database Password: The password for your database user.
-
Database Name: The database from where you want to replicate data. For example, demo.
-
Schema Name: The schema that holds the tables to be replicated. Default value: dbo.
-
-
In the Additional Settings section:
-
Use SSH: Enable this option to connect to Hevo using an SSH tunnel instead of directly connecting your Azure SQL Server database host to Hevo. This provides an additional level of security to your database by not exposing your Azure SQL Server setup to the public.
If this option is turned off, you must configure your Source to accept connections from Hevo’s IP address.
-
Use SSL: Enable this option to use an SSL-encrypted connection. Specify the following:
-
CA File: The file containing the SSL server certificate authority (CA).
-
Client Certificate: The client’s public key certificate file.
-
Client Key: The client’s private key file.
-
-
-
-
Click Test & Continue to test the connection to your Azure SQL Server Source. Once the test is successful, you can proceed to set up your Destination.
Additional Information
Read the detailed Hevo documentation for the following related topics:
Error Connection Fails Through SSH Tunnel
Error Summary
Hevo is unable to connect to the configured Azure SQL Server Source through the SSH tunnel.
Potential Causes
When connecting to Azure SQL Server through an SSH tunnel, Hevo first connects to the SSH tunnel host, which then forwards the connection request to the database. The Azure gateway that processes this request requires the server name to identify the correct database. As SSH connection requests use localhost IP address as the server name, the gateway cannot route the request to the correct server, causing the connection to fail.
Suggested Action(s)
While configuring the Azure SQL Server Source in the Hevo Pipeline, specify the Database User by combining the database username and server name with the @ symbol using the format <database_username>@<server_name>.
For example, if your database username is hevo and your server name is azuresqlserver.database.windows.net, specify the Database User as hevo@azuresqlserver.database.windows.net.
This ensures that the SSH connection request includes the correct server name so the gateway can route it successfully to your database.
After applying the suggested action, if the issue persists, connection policy on your Azure SQL Server might be set to Redirect. To connect to the database, you must allowlist Hevo’s IP addresses for your region. If you do not want your database to be publicly accessible, change the connection policy to Proxy or Default, which allows Hevo to connect through the SSH tunnel instead of connecting directly to your Azure SQL Server host.
Data Type Mapping
Hevo maps the SQL Server Source data type internally to a unified data type, referred to as the Hevo Data Type, in the table below. This data type is used to represent the Source data from all supported data types in a lossless manner.
The following table lists the supported SQL Server data types and the corresponding Hevo data type to which they are mapped:
| SQL Server Data Type | Hevo Data Type |
|---|---|
| - CHAR - VARCHAR - TEXT - NCHAR - NVARCHAR - NTEXT - XML - UNIQUEIDENTIFIER - GEOMETRY - GEOGRAPHY - HIERARCHYID - SQL_VARIANT |
VARCHAR |
| - DATETIMEOFFSET | TIMESTAMPTZ |
| - DATETIME - SMALLDATETIME - DATETIME2 |
TIMESTAMP |
| - TIME | TIME |
| - TINYINT - SMALLINT |
SHORT |
| - BIGINT | LONG |
| - INT | INTEGER |
| - REAL | FLOAT |
| - FLOAT | DOUBLE |
| - NUMERIC - DECIMAL - MONEY - SMALLMONEY |
DECIMAL |
| - DATE | DATE |
| - BINARY - VARBINARY - IMAGE - TIMESTAMP |
BYTEARRAY |
| - BIT | BOOLEAN |
At this time, the following SQL Server data types are not supported by Hevo:
-
CURSOR
-
VECTOR
-
ROWVERSION
-
TABLE
-
Any other data type not listed in the table above.
Note: If any of the Source objects contain data types that are not supported by Hevo, the corresponding fields are marked as unsupported during object configuration in the Pipeline.
Source Considerations
-
When a record is updated multiple times between two consecutive data ingestion runs, Change Tracking captures only the latest update made to the record. As a result, Hevo ingests only the latest record at the time of ingestion, which can lead to the loss of any updates that occurred between the previous ingestion and the current one.
-
By default, SQL Server uses a case-insensitive collation. This means that values such as tables, Tables, and TABLES are treated as identical by the server.
To differentiate between cases in your data, change the collation to case-sensitive.
-
In SQL Server, Change Tracking (CT) requires a primary key and cannot be enabled for tables without one. For such tables, Change Data Capture (CDC) can be enabled, but SQL Server may not be able to uniquely identify and capture data changes.
As a result, Hevo cannot accurately replicate data from CDC-enabled tables without a primary key. This may lead to mismatches between the Source and Destination data.
To ensure reliable data replication, define a primary key on your Source tables before enabling CT or CDC.
-
For a CDC-enabled database, SQL Server creates change tables in the
cdcschema using the database default collation. If columns in the Source table use different collations, CDC does not preserve the column-level collation in the change tables.As Hevo replicates data from the
cdcschema, this behavior may result in mismatches between the Source and Destination data, especially for string values. Therefore, it is recommended to set the same collation for the database and columns. -
SQL Server does not log values from computed columns in the CDC change tables. As a result, Hevo can ingest only historical data from such columns; any incremental updates are not captured.
-
SQL Server allows CDC to be enabled or re-enabled only on the primary instance. If a replica is configured in the Hevo Pipeline, newly added Source tables will be unavailable for ingestion until CDC is enabled for them on the primary instance. Read Known Issues, Limitations, and Errors with CDC for the entire list.
Limitations
-
Hevo does not support data replication from temporary tables and views.
-
Hevo does not set the metadata column __hevo__marked_deleted to True for data deleted from the Source table using the TRUNCATE command. This action could result in a data mismatch between the Source and Destination tables.
-
Hevo does not support ingesting data using Change Data Capture (CDC) from a single-user SQL Server database.
-
If you modify the tracking mechanism for a table from Change Tracking to CDC or vice versa, resync the table to ensure data consistency.
-
Hevo supports ingesting data only from tables with a single CDC capture instance. If Hevo detects a CDC-enabled table with two capture instances, it marks the table as inaccessible in the Pipeline.