After you create an Activation, you can run it on demand, resync its data, disable or enable scheduled runs, rename it, or delete it.
You can perform the following actions on an Activation:
-
Run an Activation On Demand: Trigger a sync without waiting for the schedule.
-
Resync an Activation: Discard the progress of previous syncs and send the full dataset again.
-
Disable an Activation: Stop the scheduled runs of an Activation temporarily.
-
Enable an Activation: Resume the scheduled runs of a disabled Activation.
-
Rename an Activation: Change the name that identifies the Activation.
-
Delete an Activation: Permanently remove an Activation.
Running an Activation On Demand
You can trigger a run at any time without waiting for the schedule. You may want to run an Activation on demand in the following scenarios:
-
You have just created the Activation and want to confirm it works.
-
Data in your Source has just been updated and you do not want to wait for the next scheduled run.
-
You have modified the dataset and want the change to reach your Target application immediately.
You must consider the following before you run an Activation on demand:
-
Run type: A run triggered on demand is incremental, so it sends only the rows that changed since the last successful run. To send everything again, resync the Activation instead.
-
Schedule: The configured schedule is unchanged. The next scheduled run occurs at its normal time.
-
Cancellation: You cannot cancel a run after it starts. Wait for it to finish, or disable the Activation to stop future scheduled runs.
-
Disabled Activations: A disabled Activation can be run on demand, which lets you test a change without resuming the schedule.
Perform the following steps to run an Activation on demand:
-
In the Navigation Bar, click Activate.
-
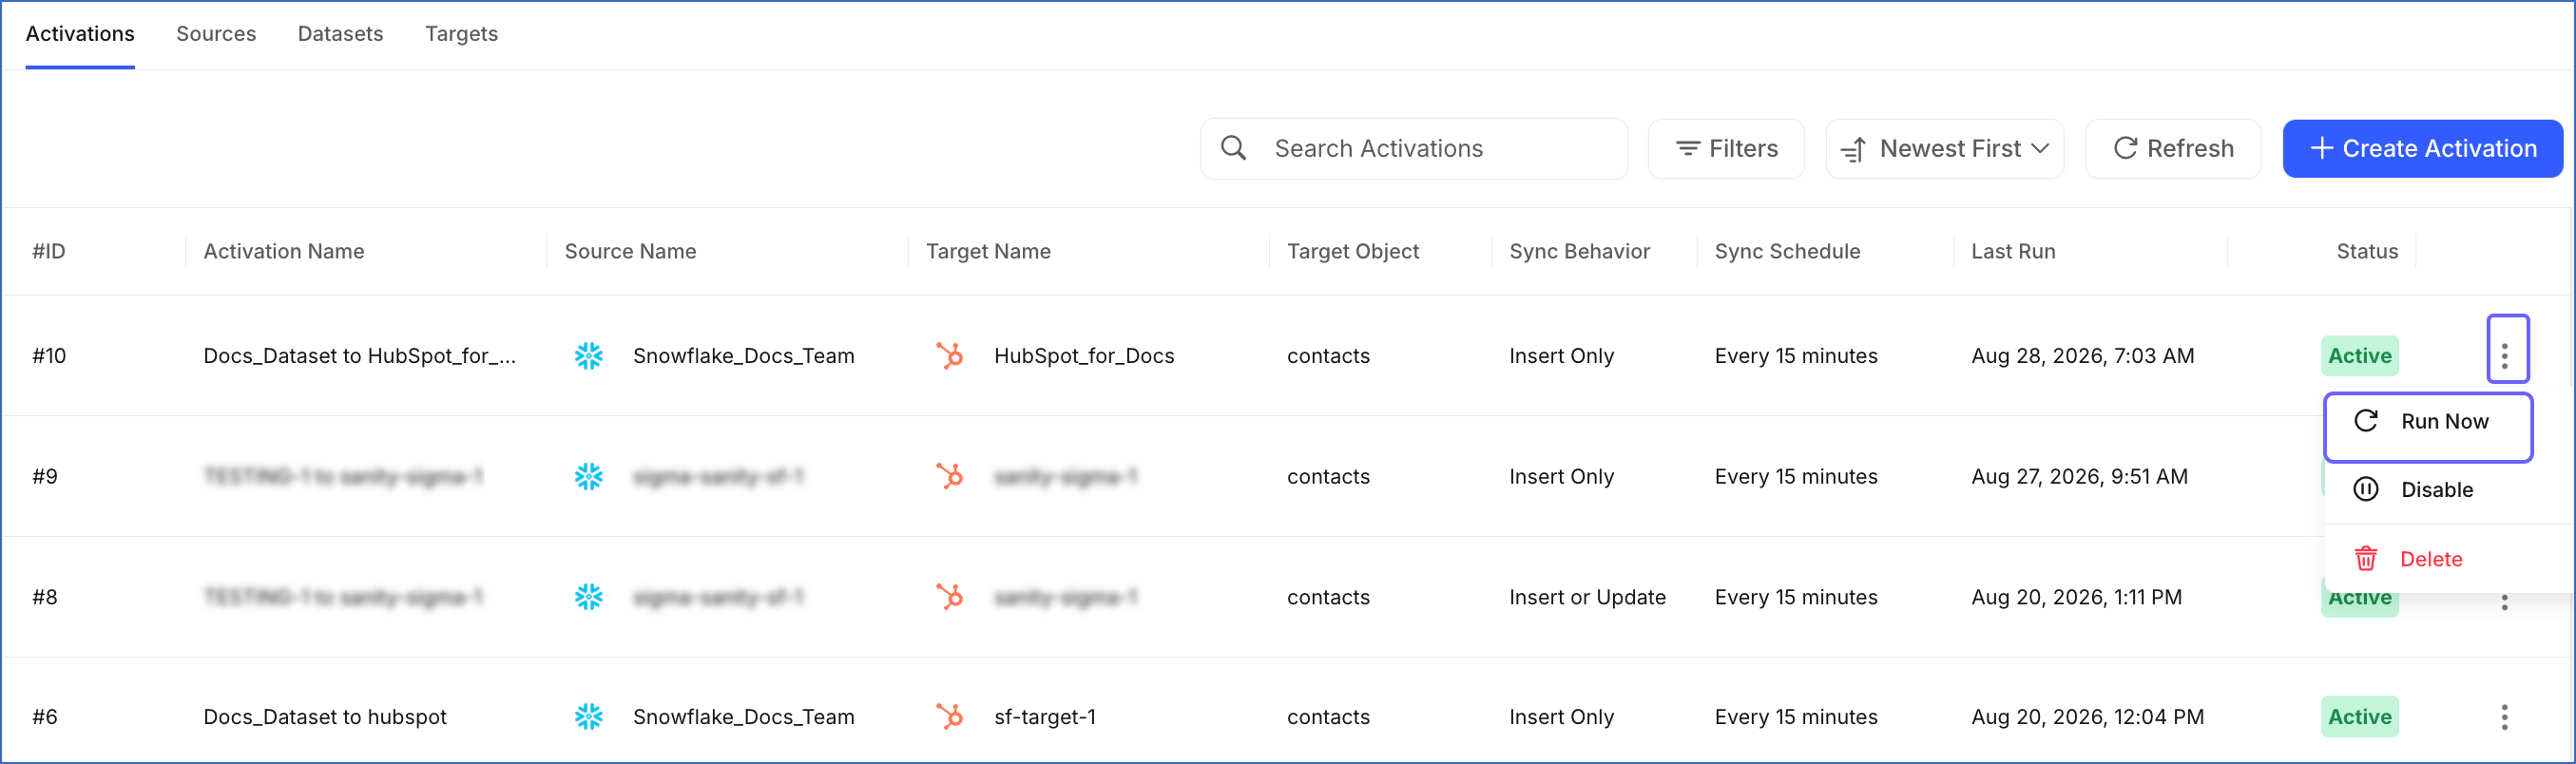
In the Activations tab, do one of the following:
-
Click the Actions icon corresponding to the Activation and select Run Now.
-
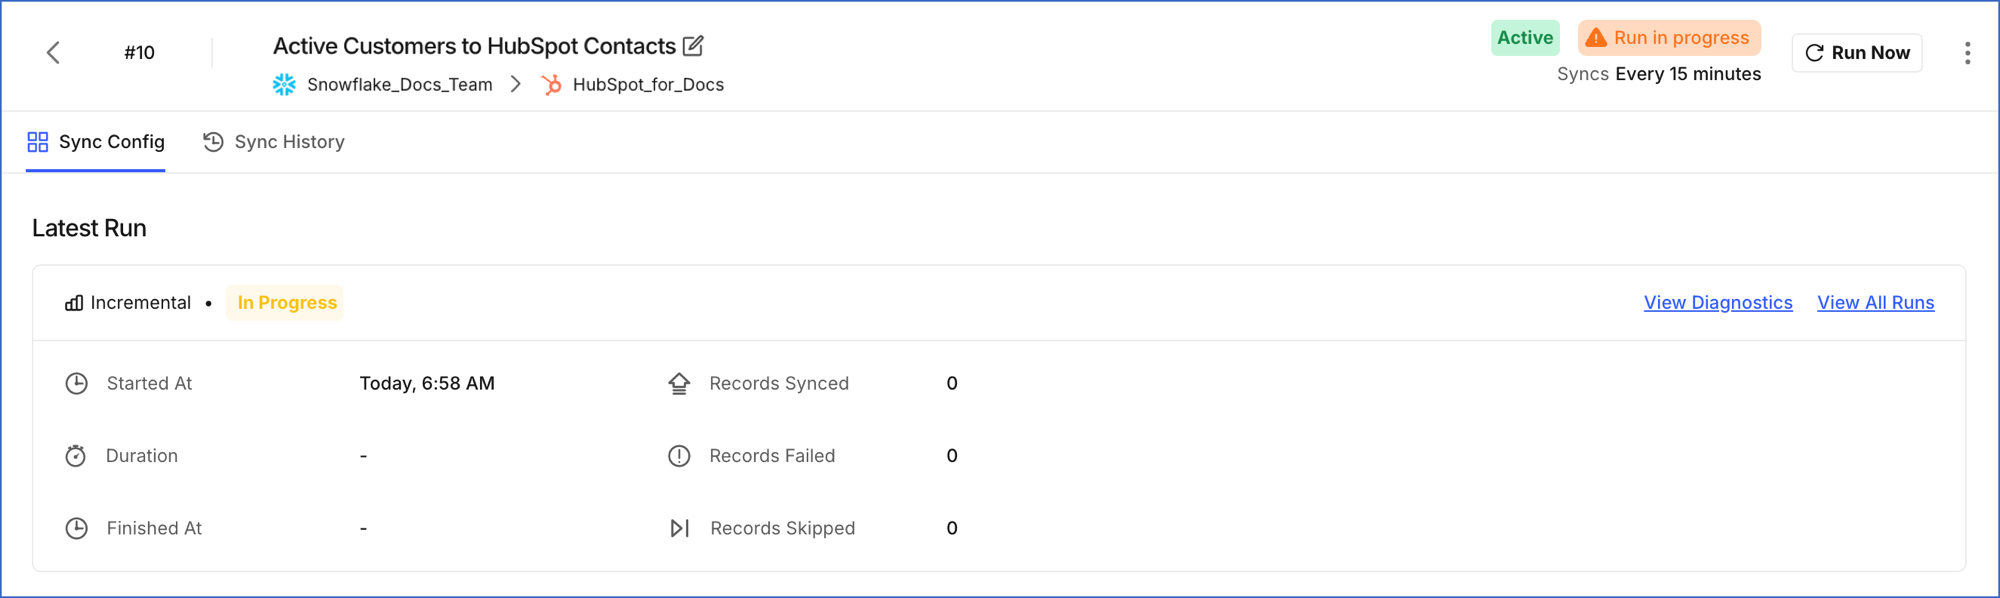
Click the Activation to open it in the Detailed View, and then click Run Now.

-
A notification is displayed to confirm that the Activation run has been triggered. The run does not start immediately. The Latest Run panel shows that the run has been requested, and updates on its own once the run starts.
Resyncing an Activation
A resync discards the progress recorded by previous syncs and sends every row your dataset returns instead of only the rows that changed.
You may want to resync an Activation in the following scenarios:
-
You have recreated the Activation with an additional mapped column and want existing records in the Target application to receive it.
-
Records were changed or deleted in the Target application and you want them to match your Source again.
-
A run failed after sending only some of the records and you want the whole dataset processed again from a clean state.
You must consider the following before you resync an Activation:
-
Duration and API usage: A resync sends every row, so it takes longer than an incremental run. It also sends more API requests to your Target application. Every application limits the number of API requests it accepts. On a large dataset, the run can last considerably longer.
-
Subsequent runs: A resync affects only the run you triggered. The runs after it are incremental.
-
Sync behavior: The sync behavior determines what happens to each row. A resync does not change the sync behavior. It only applies the behavior to more rows.
If your Activation uses a sync behavior that deletes records, such as Mirror or Delete Only, a resync can delete records when the dataset no longer returns them. Confirm that the dataset returns every record you want to keep before resyncing. Read Select the Target for what each behavior does.
Perform the following steps to resync an Activation:
-
In the Navigation Bar, click Activate.
-
In the Activations tab, click the Activation you want to resync to open it in the Detailed View.
-
Click the Actions icon at the top-right corner, and then click Resync.

-
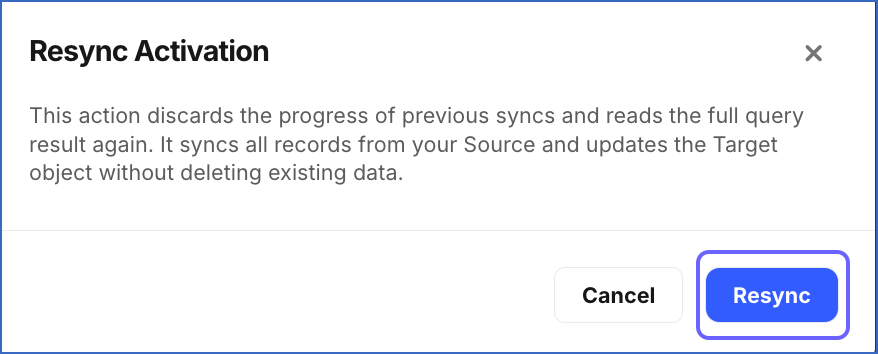
In the Resync Activation dialog, click Resync.
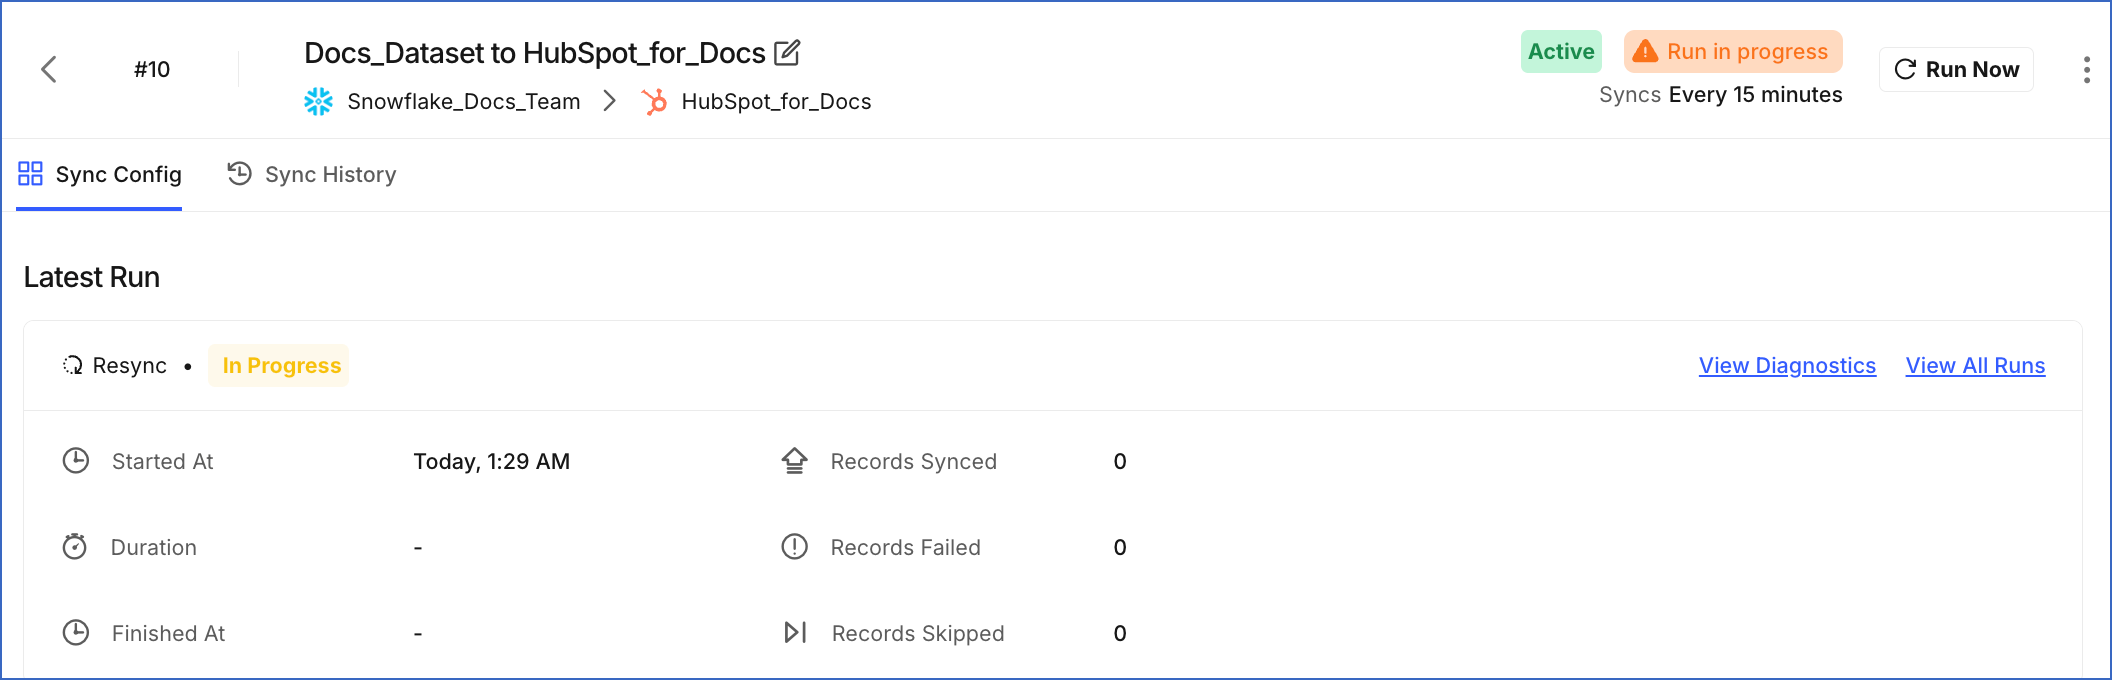
A notification is displayed to confirm that the resync has been triggered. The run appears in the Sync History tab with the Resync run type.
Disabling an Activation
Disabling an Activation stops its scheduled runs without deleting the Activation or changing its configuration, mappings, or run history. You can enable it again when you are ready to resume syncing.
You may want to disable an Activation in the following scenarios:
-
The dataset is being modified and you do not want partial data sent in the meantime.
-
The Target application is undergoing maintenance or a migration.
-
You are investigating unexpected records in the Target application and want to stop new ones arriving.
-
The Activation is not required for a period but may be needed later.
Perform the following steps to disable an Activation:
-
In the Navigation Bar, click Activate.
-
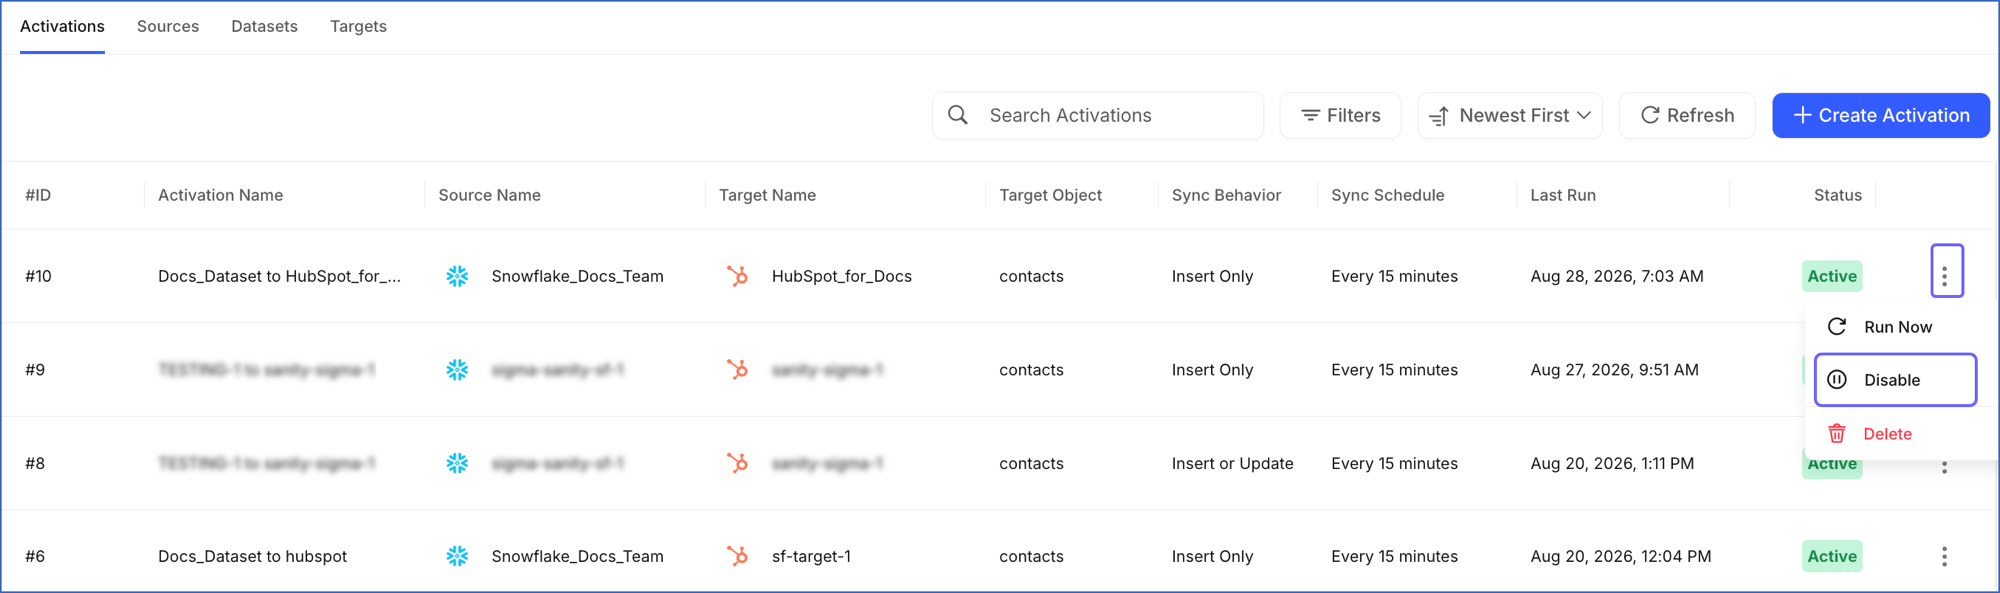
In the Activations tab, do one of the following:
-
Click the Actions icon corresponding to the Activation and select Disable.
-
Click the Activation to open it in the Detailed View, click the Actions icon at the top-right corner, and then click Disable.

-
-
In the Disable Activation dialog, click Disable.
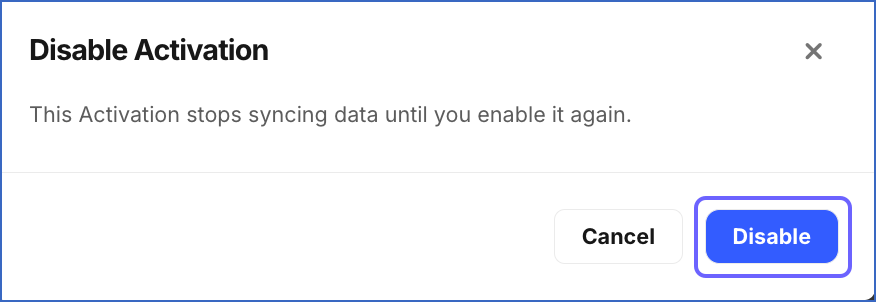
A notification is displayed to confirm that the Activation has been disabled. The Activation shows the Disabled status.

Disabling an Activation stops future scheduled runs. It does not stop a run that is already in progress, and it does not remove records that earlier runs already wrote to your Target application.
Enabling an Activation
Enabling an Activation resumes its scheduled runs without changing its configuration, mappings, or run history.
You may want to enable an Activation in the following scenarios:
-
The dataset has been modified and is ready to send data again.
-
The maintenance or migration in the Target application is complete.
-
You have finished investigating the records in the Target application and want the syncs to resume.
Perform the following steps to enable an Activation:
-
In the Navigation Bar, click Activate.
-
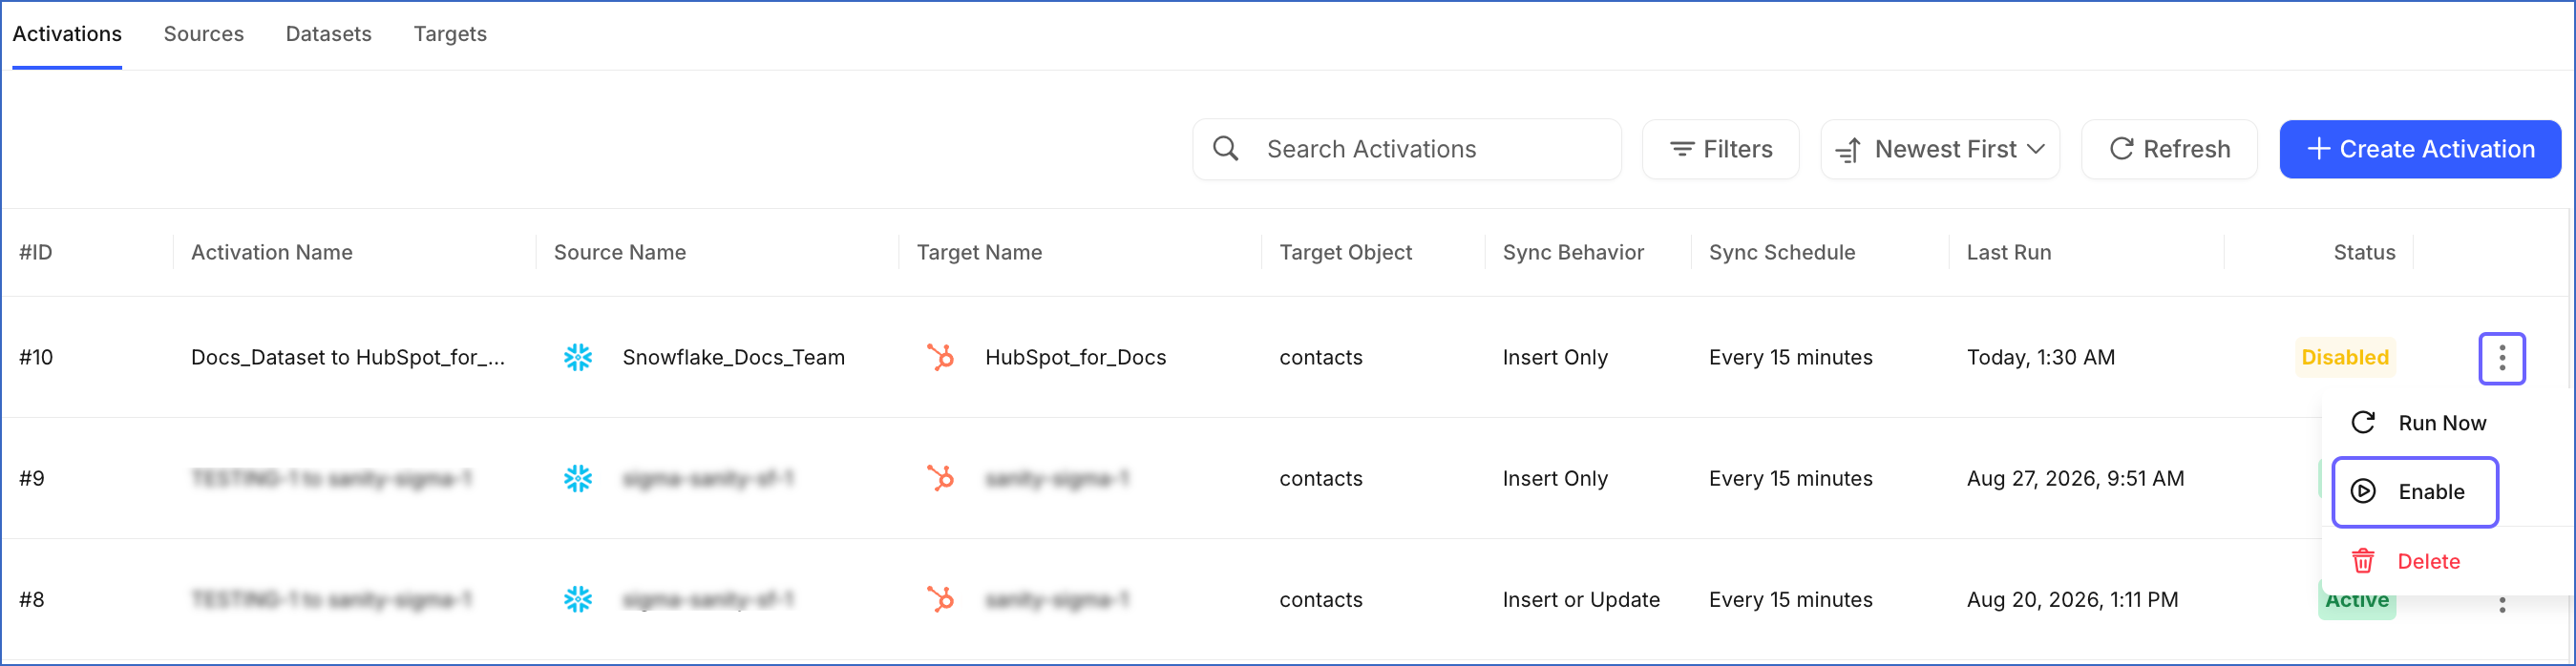
In the Activations tab, do one of the following:
-
Click the Actions icon corresponding to the Activation and select Enable.
-
Click the Activation to open it in the Detailed View, click the Actions icon at the top-right corner, and then click Enable.

-
-
In the Enable Activation dialog, click Enable.
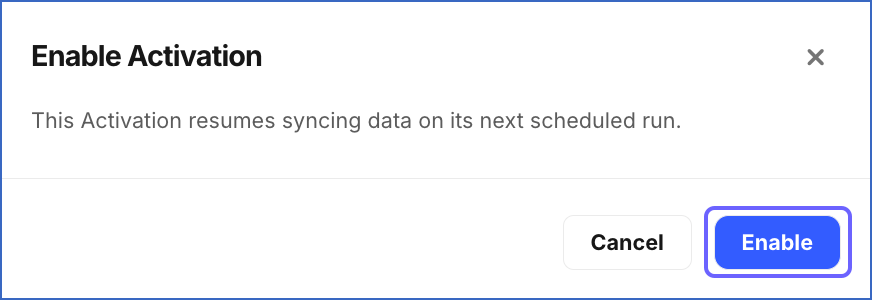
A notification is displayed to confirm that the Activation has been enabled. The Activation shows the Active status.

Scheduled runs resume from the time you enable it, based on the configured frequency. The runs that would have happened while it was disabled are not made up.
Renaming an Activation
You can rename an Activation to better describe its purpose or correct an incorrect name. The name identifies the Activation in the Activations List View and run history.
Perform the following steps to rename an Activation:
-
In the Navigation Bar, click Activate.
-
In the Activations tab, click the Activation you want to rename to open it in the Detailed View.
-
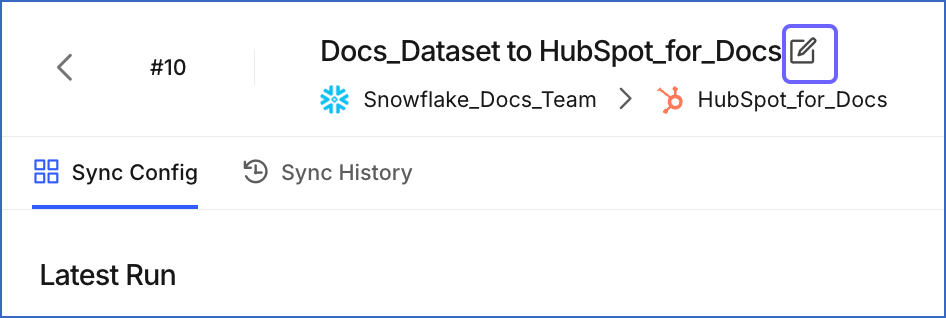
In the Activation Header, click the Edit icon next to the Activation name.
-
Specify a new name for your Activation, and then click Save.
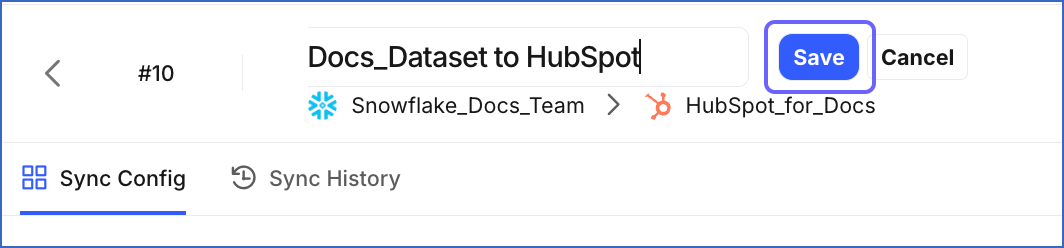
A notification is displayed to confirm that the Activation has been renamed successfully.
Deleting an Activation
You can delete an Activation when the sync it performs is no longer needed.
Deleting an Activation is permanent and cannot be undone. Its configuration, field mappings, and run history are also deleted. If you need a record of your syncs, download the required information before deleting the Activation.
You may want to delete an Activation in the following scenarios:
-
The Activation was created for testing and is no longer required.
-
The Target application no longer needs the data that the Activation sends.
-
The Activation was created in error.
You must consider the following before you delete an Activation:
-
Records previously written to the Target application remain unchanged. Deleting an Activation only stops future syncs. To remove those records, delete them in the Target application itself.
-
The dataset and Target are independent of the Activation and remain available for other Activations. Read Deleting a Dataset and Deleting a Target for the steps to remove them.
-
If you may need the sync again, disable the Activation instead of deleting it. Disabling keeps the configuration and the run history intact. Read Disabling an Activation for the steps.
Perform the following steps to delete an Activation:
-
In the Navigation Bar, click Activate.
-
In the Activations tab, do one of the following:
-
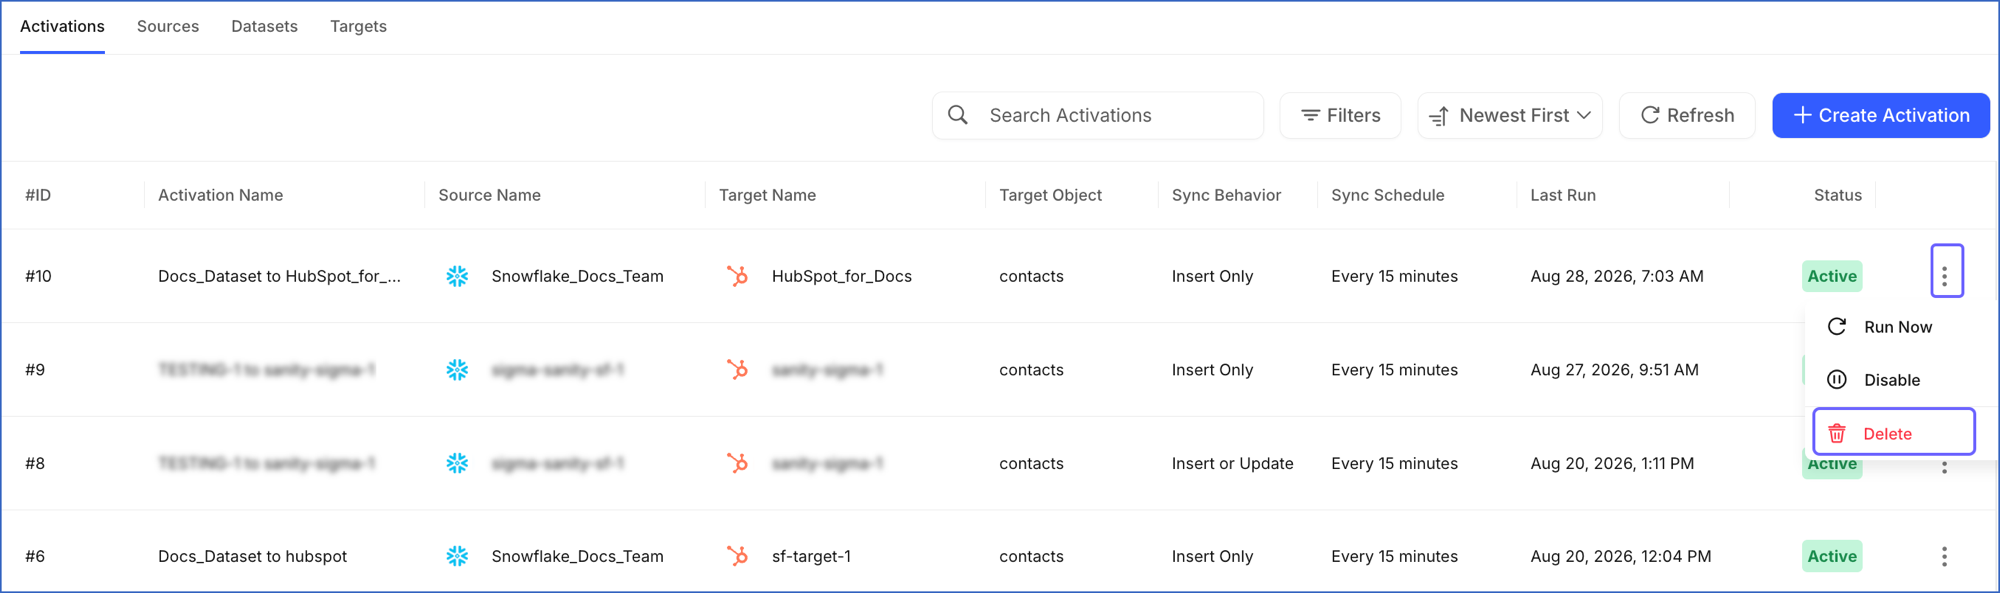
Click the Actions icon corresponding to the Activation and select Delete.
-
Click the Activation to open it in the Detailed View, click the Actions icon at the top-right corner, and then click Delete.

-
-
In the Delete Activation dialog, click Delete.
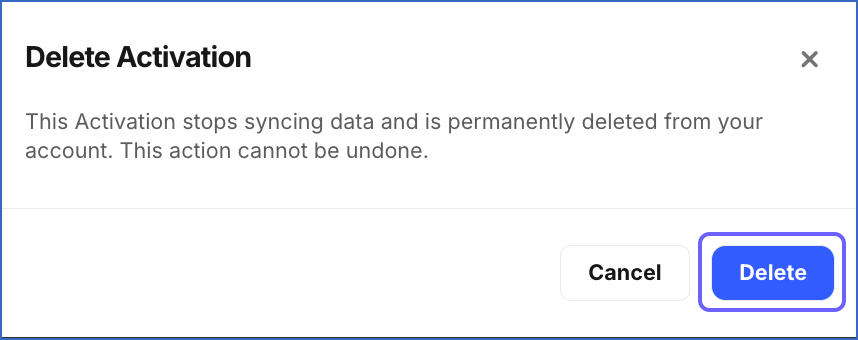
A notification is displayed to confirm that the Activation has been deleted successfully.